
Before you start
- A WhatsApp Business Account connected to ChatSyncs, with an active phone number.
- A subscriber list already in ChatSyncs — import one first if you haven’t, via How Do I Import Subscribers Using a CSV File?, How Do I Import Subscribers from Google Sheets?, or How Do I Add a Subscriber Manually?.
- An approved Message Template if you plan to send Anytime (most broadcasts do) — you can also create one partway through, but approval can take a few minutes to 24 hours, so it’s faster to have one ready.
- Read WhatsApp Rules: How to Never Get Banned first — a broadcast is exactly the kind of send that can hurt your quality rating if the audience didn’t opt in or isn’t engaged. See What WhatsApp API Pricing Really Means too, since every broadcast recipient outside their Customer Service Window is a paid template send.
Create a broadcast campaign
Broadcasting is its own item in the left navigation — a sibling to Chatbot Manager and Subscriber Manager, not something tucked inside either of them.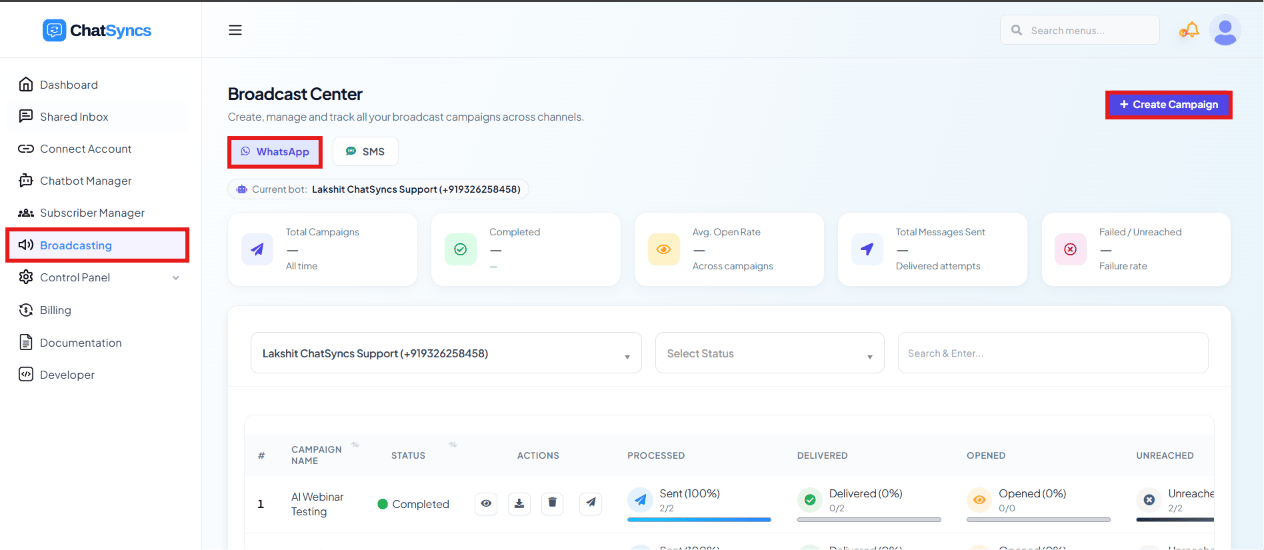
The Broadcast Center — Broadcasting selected in the left navigation, with the WhatsApp channel tab and the Create Campaign button highlighted.
Open Broadcasting
Choose the channel
Click Create Campaign
Configure the campaign
Clicking Create opens an Action Button configuration panel set to Broadcasting — fill in the campaign here: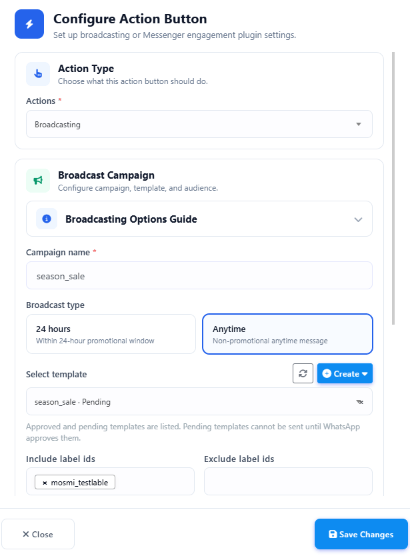
The Configure Action Button panel for a Broadcasting action, filled in with a real example — Campaign Name 'season_sale', Broadcast Type 'Anytime', and a pending template selected.
Campaign Name
Summer Promotion Campaign or season_sale.Broadcast Type
Select Template (Anytime only)
Include or exclude labels
Customers, Leads,
VIP Customers). Exclude Label IDs skips subscribers with that label (e.g.
Unsubscribed, Do Not Disturb). Don’t have a label yet?
Create a label in Subscriber Manager.Country of the Subscriber (optional)
India.Use Recently Added Subscribers (optional)
Assign Label After Broadcast (optional)
Summer Sale broadcast with Assigned Label set to Summer_Sale tags
every recipient — Rahul, Priya, Amit, and everyone else — with Summer_Sale the moment they
receive it, so you can target exactly that audience again later (e.g. a follow-up discount
reminder only to people who already saw the sale).Sending time (optional)
The Sending time toggle, right above the live Targeted subscribers count and Daily WABA conversation limit.
Filter by Custom Field
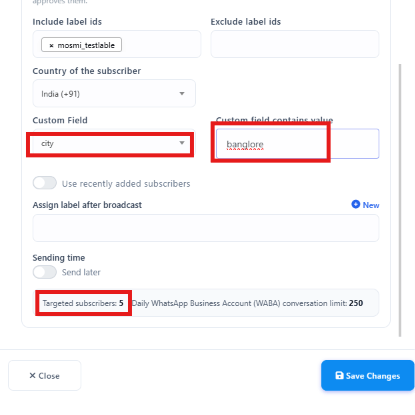
Custom Field and Custom Field Contains Value let you send a broadcast only to subscribers who have a specific answer saved in a specific field. Think of it in two parts:- Custom Field is the category — like asking “which box am I checking?” e.g.
Name,City,Plan Type. - Custom Field Contains Value is the answer you’re looking for inside that box — e.g. if
the field is
Name, the value could beRahul. If the field isCity, the value could beBangalore.
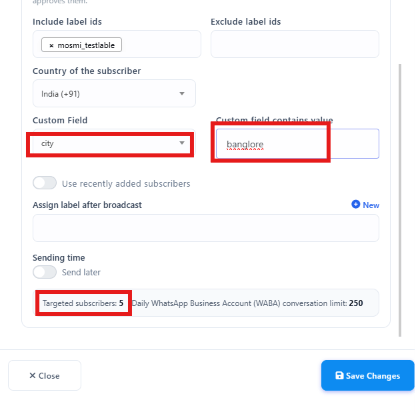
A real example — Custom Field set to 'city', Custom field contains value set to 'banglore', with the live Targeted subscribers count (5) shown below.
Check your daily sending limit
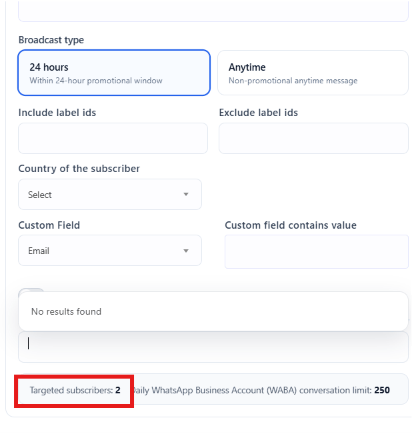
Audience filters with the live Targeted subscribers count and the Daily WABA conversation limit shown at the bottom.
Build the broadcast message
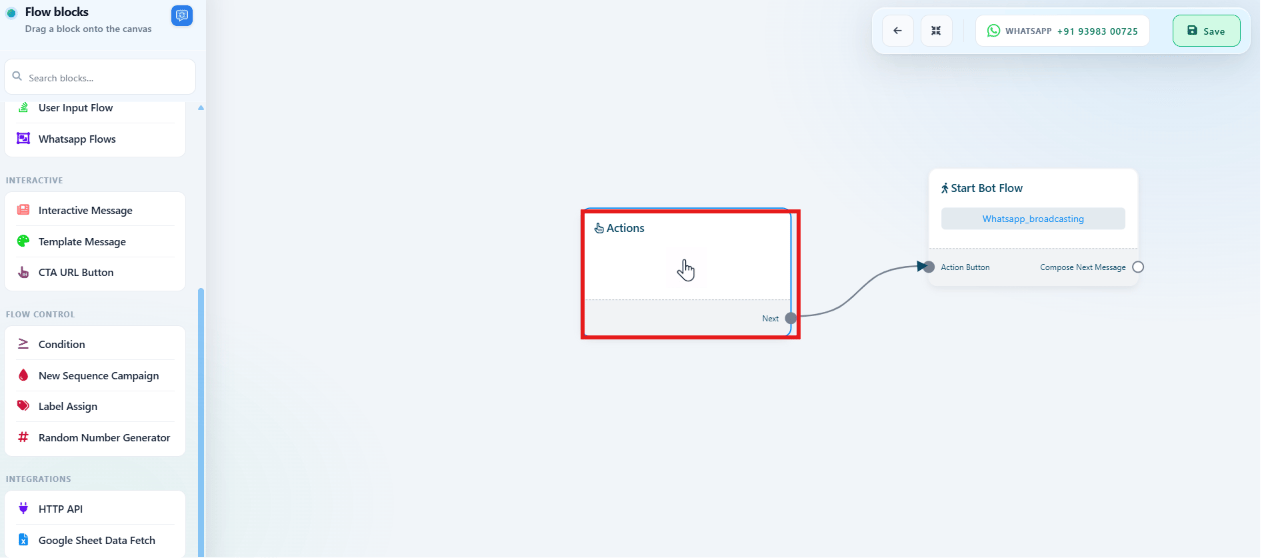
The broadcast canvas: an Actions (Broadcasting) block connected to Start Bot Flow, ready for message blocks to be added.
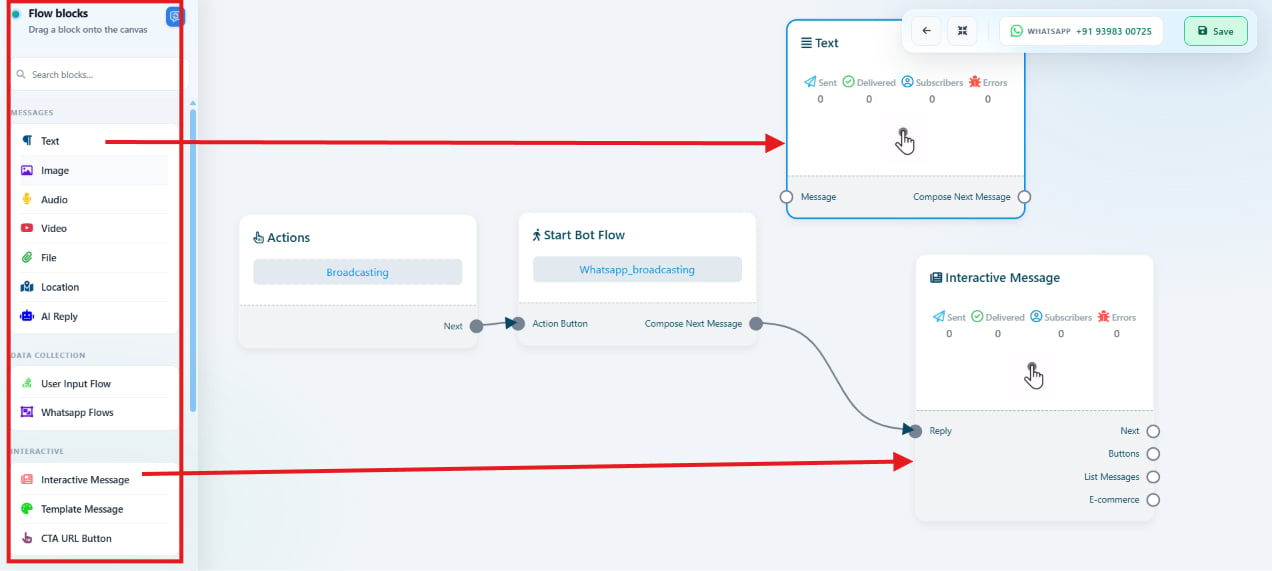
The Flow blocks panel (Messages, Data Collection, Interactive components) connected into a broadcast flow with Text and Interactive Message blocks.
Monitor campaign statistics
Once a campaign is sent, the WhatsApp Broadcasting list shows its Campaign Name, Status (Completed, Pending, Processing, etc.), Scheduled At time, and four metrics: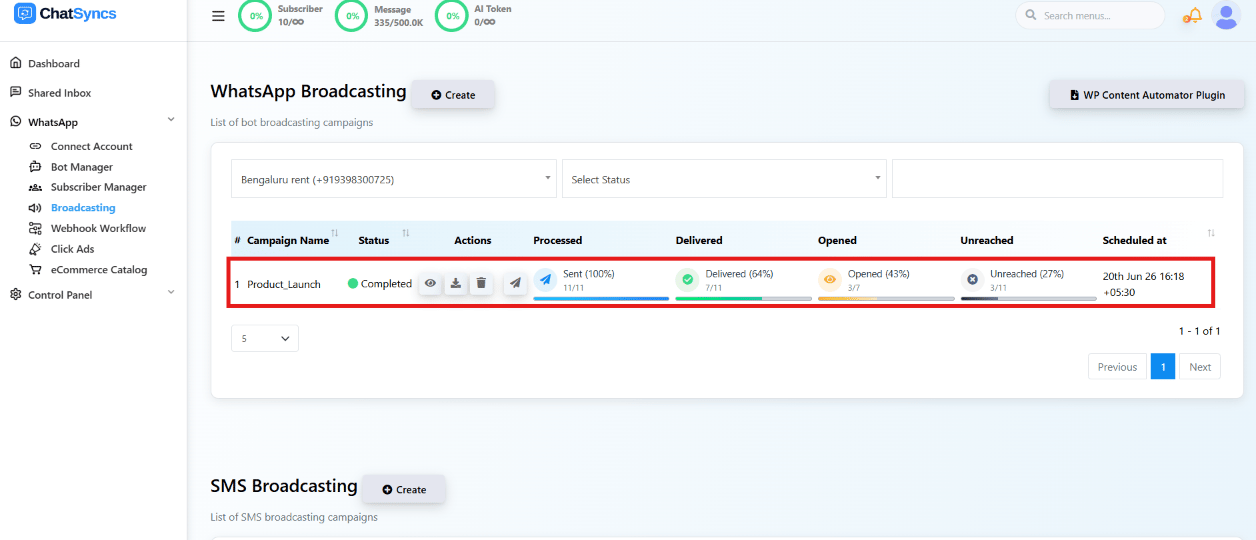
A completed campaign's row in the WhatsApp Broadcasting list, showing Processed, Delivered, Opened, and Unreached statistics.
Campaign actions
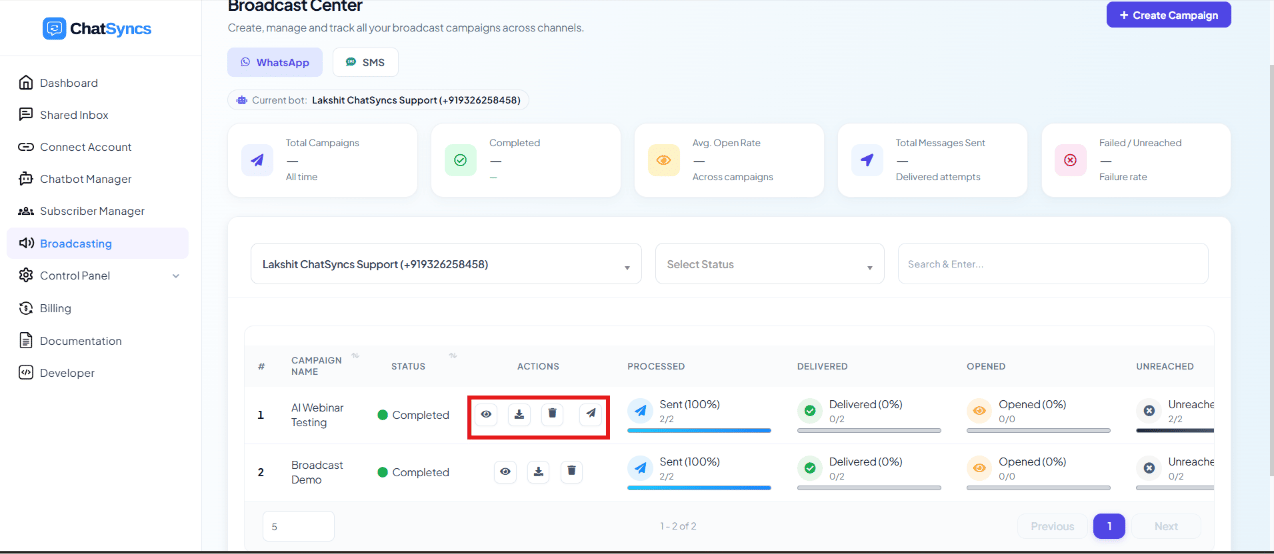
A campaign row's action icons — view report, download report, delete, and resend failed messages.
- View Report — detailed broadcast statistics and recipient information.
- Download Report — exports the report as a CSV for analysis and record keeping.
- Resend Failed Messages — retries delivery for messages that failed, e.g. after correcting invalid phone numbers.
- Delete Campaign — removes the campaign from the list.
Product_Launch completed with Processed 11/11, Delivered 7/11, Opened 3/7,
Unreached 3/11. After fixing the numbers behind the 3 unreached sends, Resend Failed
Messages retries delivery to just those subscribers.
Clicking View Report opens the campaign’s full detail — the audience filters it was sent
with (Template, Included/Excluded Labels, Country, Custom Field, Assign Label After Broadcast,
Added Before/After), plus its Status, Targeted count, Message Count, and the same
Processed/Delivered/Opened/Unreached breakdown shown on the list.
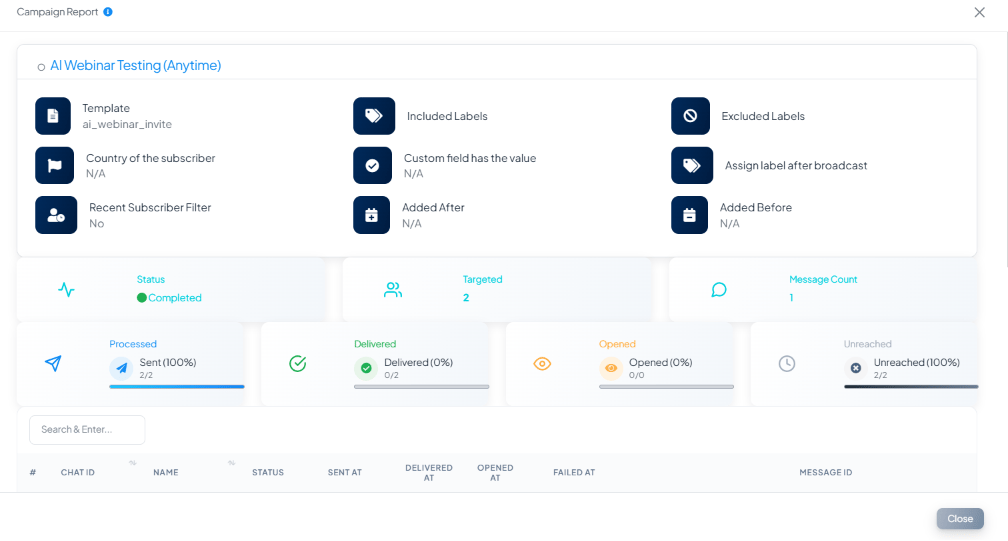
The Campaign Report modal — audience filters used, and Status/Targeted/Message Count/Processed/Delivered/Opened/Unreached stats.
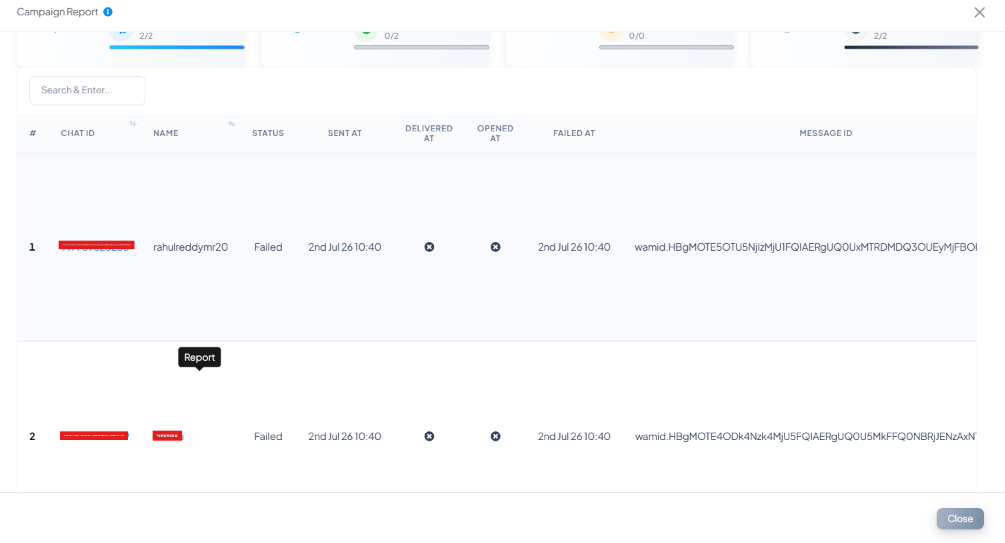
The Campaign Report's recipient table, listing each subscriber's delivery status and message ID.
Tips for successful broadcasts
- Start small on your first send. Target 100–200 subscribers first rather than your whole list, then check your quality rating a few hours later before scaling up to the rest.
- Don’t broadcast to cold lists. Contacts who never opted in or haven’t interacted with your business are far more likely to block or report you — that damages your quality rating and can shrink your daily messaging limit.
- Time it to your audience, not yours. Send during business hours in the recipient’s timezone — messages that land at odd hours get more blocks.
- Monitor results after every send. Check Processed / Delivered / Opened / Unreached on the campaign row. If blocks or Unreached are unusually high, pause and review your targeting before sending the next one.
- Know your daily limit before you send. Your WhatsApp Business Account’s daily conversation limit caps how many subscribers can actually be reached — see Understanding WhatsApp Quality Rating for how quality rating affects that limit over time.
Newsletter_Optin
(people who explicitly opted in) rather than all 5,000 imported contacts. Delivered comes back
at 96% with zero blocks — a strong signal it’s safe to broadcast to the full list next time.
Frequently asked
How do I send a WhatsApp message to many subscribers at once?
How do I send a WhatsApp message to many subscribers at once?
Can I schedule a broadcast for later instead of sending it immediately?
Can I schedule a broadcast for later instead of sending it immediately?
What's the difference between a 24 Hours broadcast and an Anytime broadcast?
What's the difference between a 24 Hours broadcast and an Anytime broadcast?
Why didn't all my subscribers receive the broadcast?
Why didn't all my subscribers receive the broadcast?
Can I target only specific subscribers, like VIP customers or one country?
Can I target only specific subscribers, like VIP customers or one country?
What's the difference between Custom Field and Custom Field Contains Value?
What's the difference between Custom Field and Custom Field Contains Value?
City. Custom Field Contains
Value is the specific answer you want inside that category, e.g. Bangalore. Together,
Custom Field = City and Value = Bangalore sends the broadcast only to subscribers whose
City is saved as Bangalore.Where do I go to see full details on how a specific campaign performed?
Where do I go to see full details on how a specific campaign performed?
Should I broadcast to my entire subscriber list right away?
Should I broadcast to my entire subscriber list right away?
What time should I send a broadcast?
What time should I send a broadcast?