

Step 1: Create the workflow
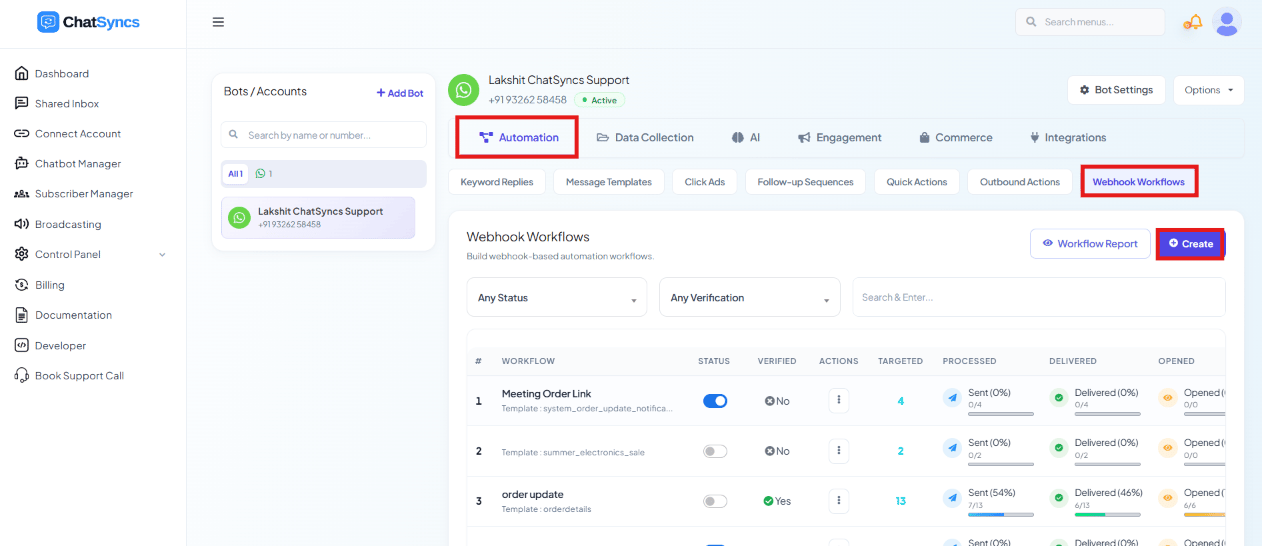
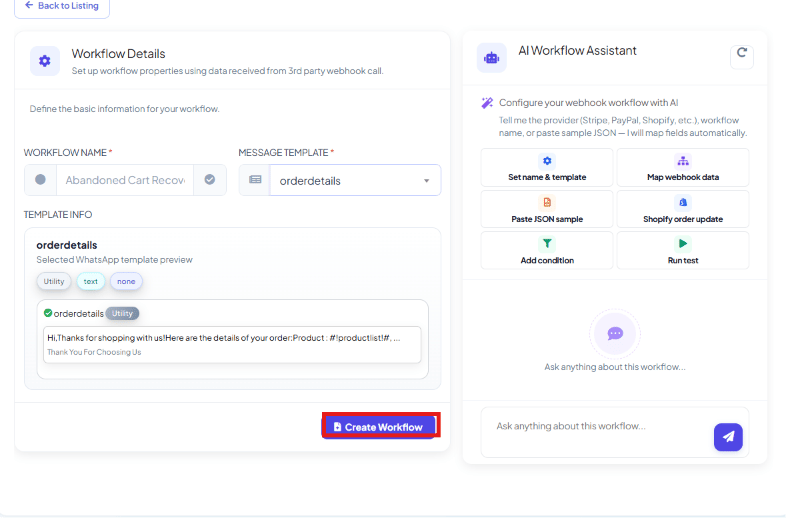
- Workflow Name — e.g.
Abandoned Cart Recovery - Message Template — the approved template to send, e.g.
orderdetails. If you want to create a new one, click here.
The AI Workflow Assistant panel alongside the form can configure most of this for you — tell
it the provider (Stripe, PayPal, Shopify, etc.), the workflow name, or paste a sample JSON
payload, and it offers shortcuts like Set name & template, Map webhook data, Paste JSON
sample, Shopify order update, Add condition, and Run test: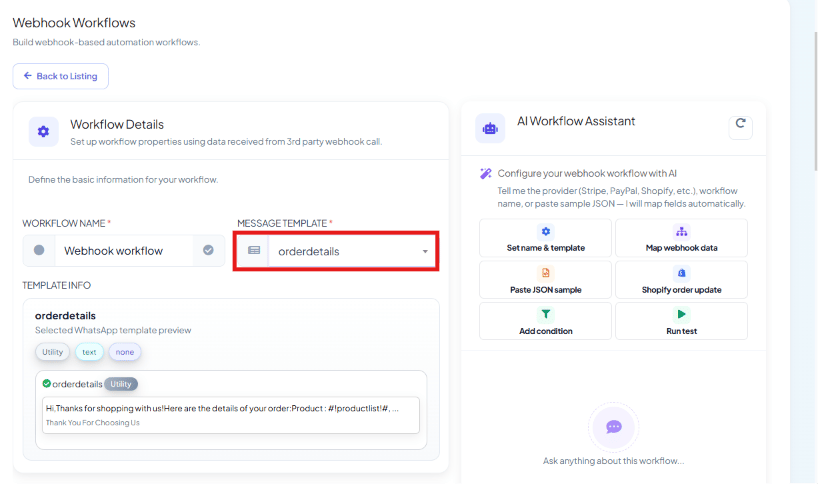
Step 2: Get the webhook URL
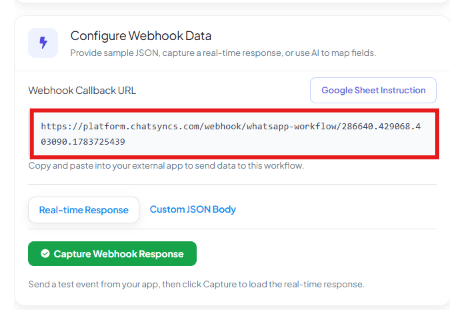
https://platform.chatsyncs.com/webhook/whatsapp-workflow/xxxxxxx. Copy it — you’ll paste it
into whatever external system will call it: Postman, Shopify, a custom script, or anything else
that can send an HTTP request. Each workflow has its own URL, so a test request sent to it only
affects this one workflow.
The Real-time Response / Custom JSON Body tabs let you either capture a live test call
(below) or paste a sample JSON body directly, if you don’t have a system ready to call the
webhook yet.
Step 3: Test with Postman (or any HTTP client) and map the fields
Send a raw JSON body straight to the webhook URL — for example, from Postman: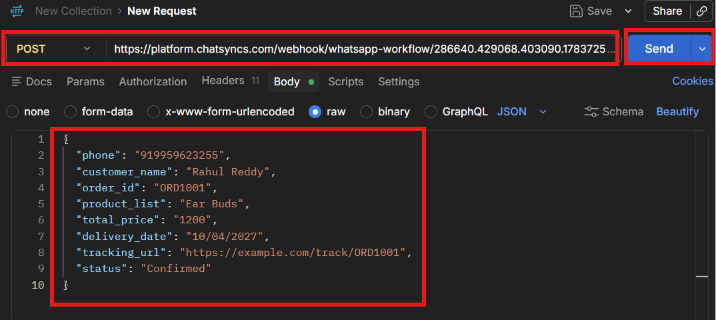
1
Click Capture Webhook Response first
In ChatSyncs, click Capture Webhook Response before sending the test request — this is
what tells ChatSyncs to start listening for the next call to this workflow’s URL.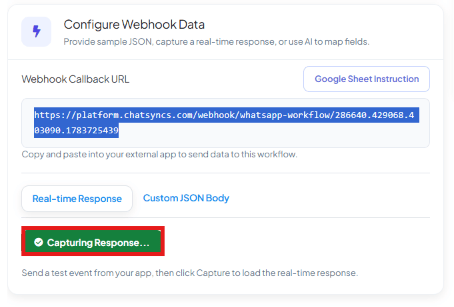
2
Send the request
With ChatSyncs still capturing, send the POST — e.g. from Postman, with a JSON body like:
3
Map the detected fields to template variables
ChatSyncs lists every field from that payload as a mappable Select Data Field dropdown,
one per template variable, with an optional Select Formatter: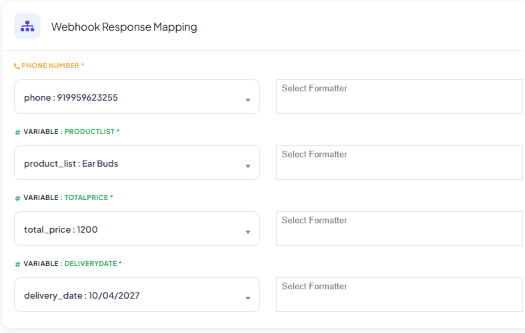
PRODUCTLIST →
product_list : Ear Buds, TOTALPRICE → total_price : 1200, DELIVERYDATE →
delivery_date : 10/04/2027.The dropdown shows a sample value, but ChatSyncs maps the field name (key), not that value.
product_list : Ear Buds means “use whatever comes in under the product_list key” — not
literally “Ear Buds” every time. A later request with "product_list": "Phone Case" fills the
template with Phone Case automatically, with no remapping needed, as long as the field name
stays the same. Only a renamed or removed field breaks the mapping.Worked example: it keeps working automatically
Say the template has variables for Phone Number, Customer Name, Order ID, and Delivery Date, mapped once tophone, customer_name, order_id, and delivery_date. The
first test payload that taught ChatSyncs these fields might look like:
That’s the entire point of mapping by field name — the first webhook call only exists to
teach ChatSyncs which fields are available. Every call after that just fills the same mapping
with whatever values arrive:
Step 4: Add a delay or send conditionally (optional)
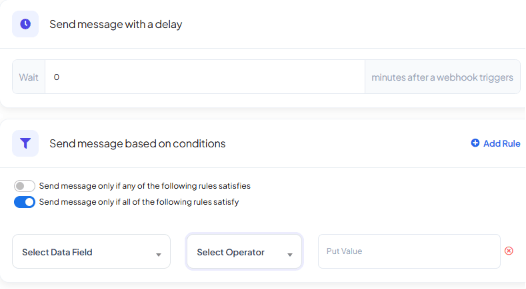
0 sends immediately.
Send message based on conditions
Instead of sending a WhatsApp message for every webhook call, conditions let you define rules that decide whether this particular call should actually trigger one. For example: send a confirmation only for paid orders, notify only once a meeting is confirmed, or trigger a message only for one specific event type, ignoring the rest.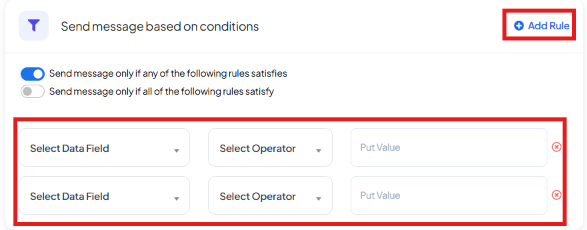
- Select Data Field — which webhook field to check (e.g. Customer Name, Phone Number, Event Type, Meeting Status, Booking Status, Payment Status, Appointment Date, Email, Order Status, or a Custom Field). The available fields depend on what your webhook actually sends.
-
Select Operator — how to compare that field to the value you enter:
Which operators show up can vary depending on the field selected.
-
Put Value — the value to compare against, e.g.
Event TypeEqualsBOOKING_CREATED, orPayment StatusEqualsPaid.
-
Any (OR logic) — the message sends if at least one rule matches. With rules
Event Type = Booking CreatedandPayment Status = Paid:Use Any when a single matching condition should be enough. -
All (AND logic) — every rule must match before the message sends. With the same two
rules:
Use All when every requirement has to be true before sending.
Worked examples
- Only confirmed meetings — one rule,
Meeting Status Equals Confirmed. Result: only confirmed meetings generate a message. - Only paid bookings — one rule,
Payment Status Equals Paid. Result: customers are notified only after payment succeeds. - Multiple AND conditions — mode set to All, rules
Event Type Equals Booking Created,Meeting Status Equals Confirmed,Payment Status Equals Paid. Result: the message only sends when a booking is created and confirmed and paid — if any one rule fails, nothing sends. - Multiple OR conditions — mode set to Any, rules
Event Type Equals Booking Created,Event Type Equals Booking Rescheduled. Result: the message sends for either a new booking or a rescheduled one.
Step 5: Configure actions after a successful call (optional)
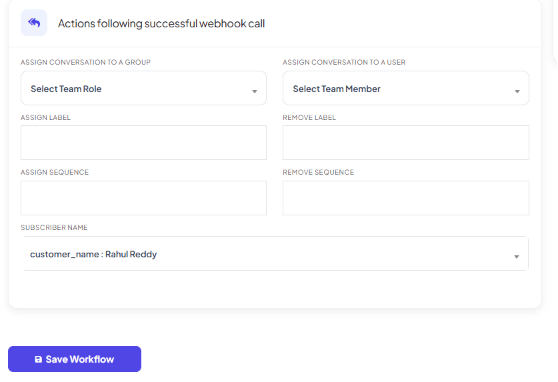
- Assign Conversation to a Group / Assign Conversation to a User — route the conversation to a team or a specific team member.
- Assign Label / Remove Label — tag or untag the subscriber for segmentation.
- Assign Sequence / Remove Sequence — start or stop an automation sequence for them.
- Subscriber Name — map a webhook field to update the subscriber’s display name in ChatSyncs.
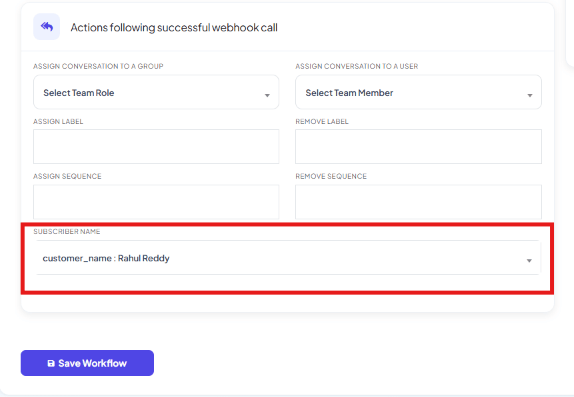
customer_name : Rahul Reddy) — not the phone field, which is only used to identify the subscriber. As with template
variables, this maps the field name: a later call with a different customer_name value
automatically updates the subscriber’s name to match. Leave it empty if your webhook doesn’t send
a name — the subscriber stays identified by phone number.
Click Save Workflow once everything above is configured.
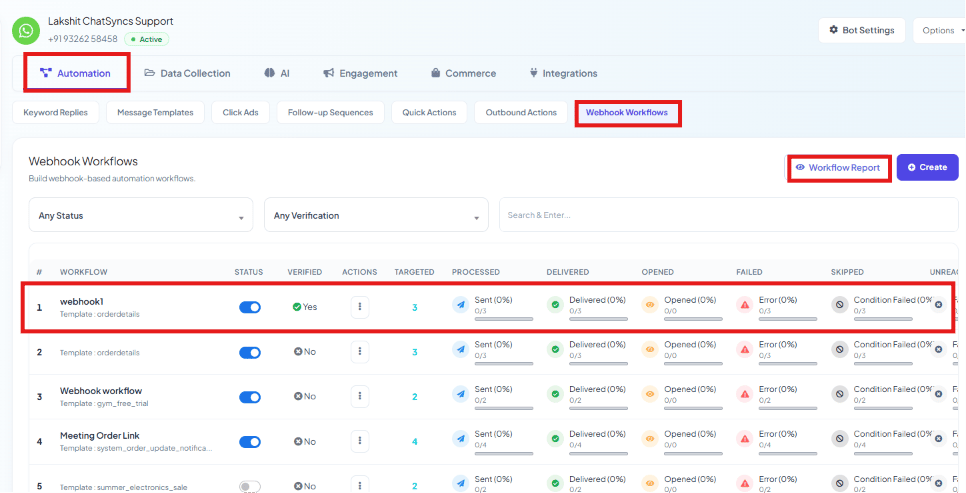
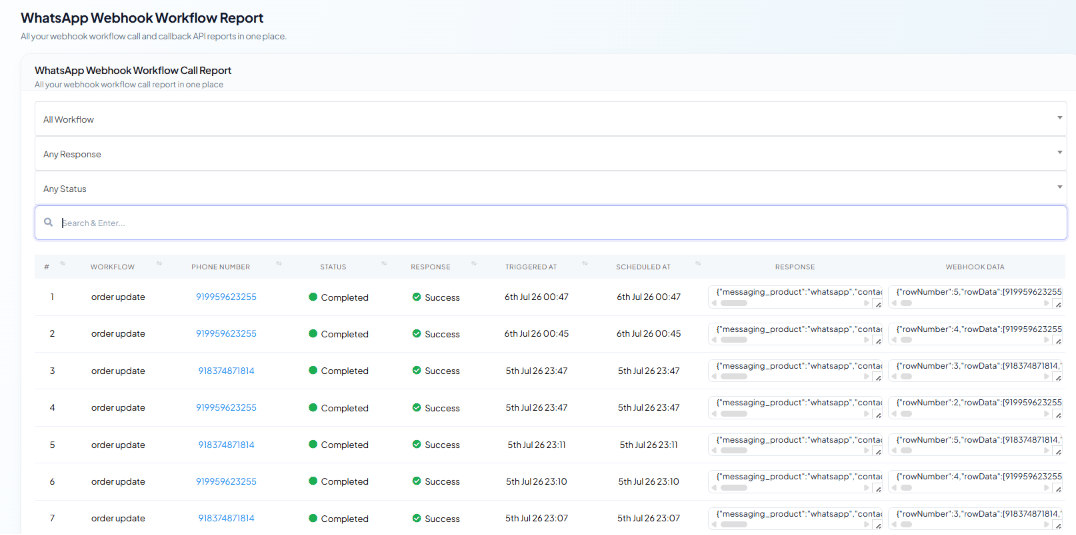
Monitoring workflows
Common use cases
- Order confirmation — notify a customer the moment a new order event arrives.
- Shipping updates — send tracking info when a dispatch event fires.
- Appointment reminders — trigger from a booking system’s webhook.
- Payment confirmation — notify once a payment event is received.
- Lead follow-up — instantly message a new lead captured by another system.
- Customer onboarding — welcome a new signup automatically.
- Event registration — confirm a signup with a personalized message.
Best practices
Frequently asked
How do I send a WhatsApp message automatically when an external event happens?
How do I send a WhatsApp message automatically when an external event happens?
Create a message template with the variables you need, create a Webhook Workflow pointing at
that template, copy its webhook URL into the external system (Postman, Shopify, a custom
script, …), then test with Capture Webhook Response.
Why isn't my workflow detecting my fields?
Why isn't my workflow detecting my fields?
Click Capture Webhook Response before sending the test request, not after — ChatSyncs
only detects fields from a call made while it’s actively capturing. If it still doesn’t show
your fields, check that you’re looking at the payload-fields group rather than the request’s
technical header data.
Can I test a workflow without writing any backend code?
Can I test a workflow without writing any backend code?
Yes — click Capture Webhook Response, then send a POST request to the workflow’s webhook
URL from any tool (Postman, curl, a no-code automation app) with your test JSON body.
What does the AI Workflow Assistant do?
What does the AI Workflow Assistant do?
It’s a chat panel next to the workflow form that can configure the workflow for you — tell it
a provider (Stripe, Shopify, etc.), paste a sample JSON payload, or use its shortcuts to set
the name/template, map webhook data, or run a test, instead of doing each step manually.
Can one workflow send to many different customers?
Can one workflow send to many different customers?
Yes — every call that triggers the webhook runs the workflow again for that call’s phone
number.
Where do I check if a specific message actually sent?
Where do I check if a specific message actually sent?
Open Webhook Workflow → Workflow Report and search by phone number — it shows the
Status, Response, and the exact Webhook Data received for that send.
Do I need to remap fields if a future webhook sends different values?
Do I need to remap fields if a future webhook sends different values?
No — ChatSyncs maps by field name (the JSON key), not the sample value you saw during
setup. As long as later calls use the same field names, new values fill the template
automatically with no changes needed.
Can I stop a workflow from sending on every single call?
Can I stop a workflow from sending on every single call?
Yes — use Send message based on conditions to only send when a field matches a rule (e.g.
status equals Confirmed), or Send message with a delay to wait a set number of
minutes after the webhook triggers.What's the difference between Any and All condition modes?
What's the difference between Any and All condition modes?
Any (OR logic) sends the message if at least one rule matches — use it when a single
matching event should be enough. All (AND logic) requires every rule to match before
sending — use it when every requirement has to be true, e.g. a booking that’s both confirmed
and paid.
Can a webhook call update the subscriber's name or assign them to a team?
Can a webhook call update the subscriber's name or assign them to a team?
Yes — under Actions Following Successful Webhook Call, map Subscriber Name to a
webhook field (e.g.
customer_name), and use Assign Conversation to a Group/User or
Assign/Remove Label and Assign/Remove Sequence to update the subscriber further.