
A keyword-based chatbot replies automatically when a customer types a specific word — that’s exactly what Keyword Replies, ChatSyncs’ flow builder, is built for.
  • Instead of one canned reply, you design a full customer journey on a visual canvas.
  • A keyword (a word or phrase the customer types) starts the flow.
  • Connected blocks then send messages, collect answers, save them, and route the conversation — all without writing code.
Example: A customer types menu. That single word triggers a flow: the bot greets them, shows your product categories as buttons, and routes them to the right next step — automatically, every time, with no typing required from your side.

Open the builder
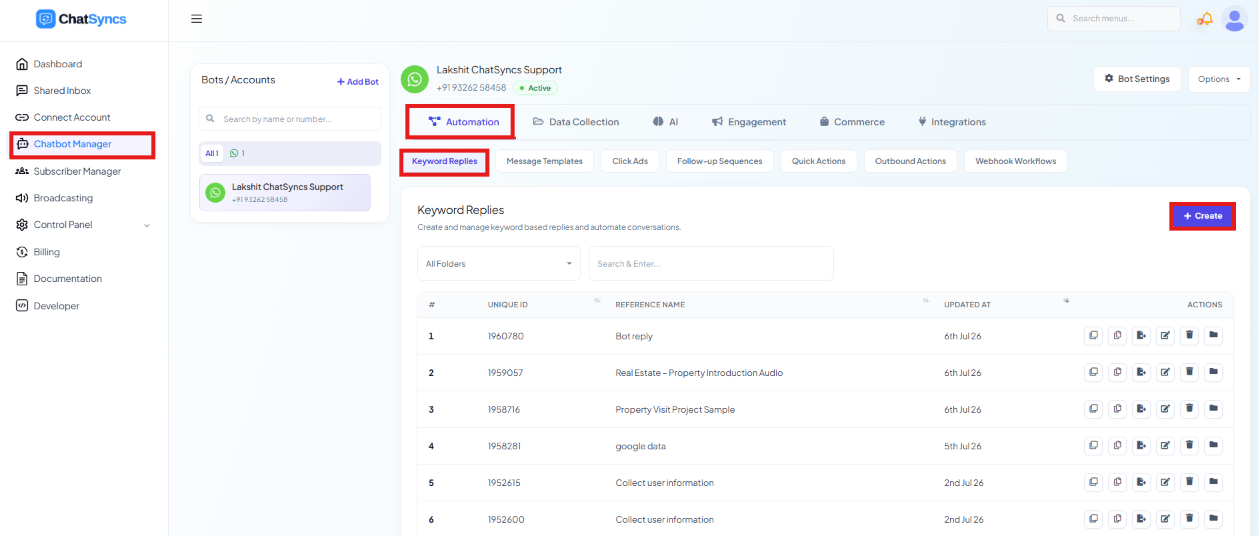
ChatSyncs left navigation with Chatbot Manager selected, the Automation tab highlighted, and the Keyword Replies sub-tab highlighted, showing a list of existing flows
Chatbot Manager → Automation → Keyword Replies opens the list of existing flows. Click Create on the Keyword Replies list to open a blank canvas.
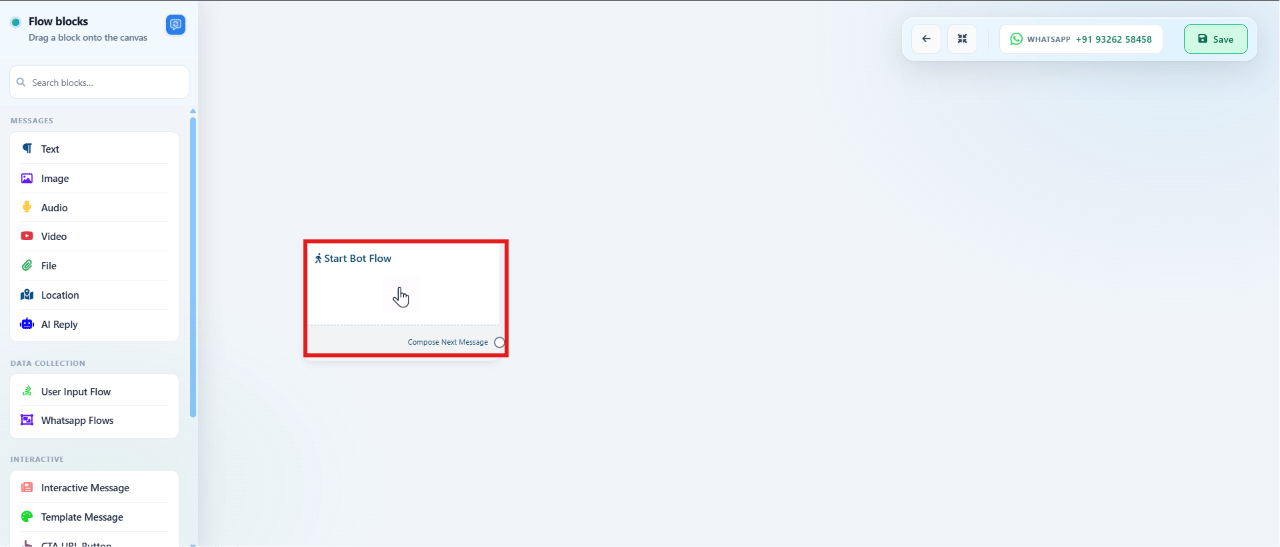
Keyword Replies canvas showing the Start Bot Flow block and the flow blocks sidebar
The canvas opens with a Start Bot Flow block already on it, and a Flow blocks panel on the left for dragging on messages, data-collection blocks, and interactive components.

Configure the trigger

Double-click Start Bot Flow to open its configuration panel, then:
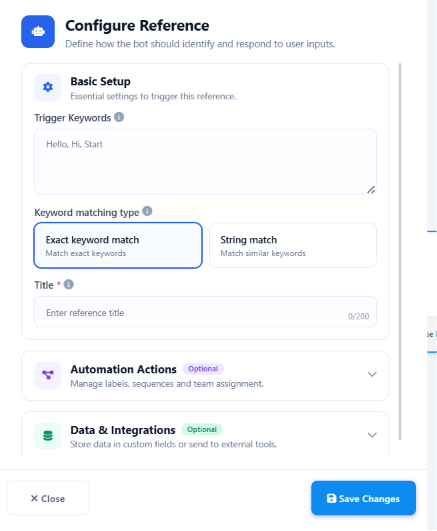
Configure Reference panel with Trigger Keywords, Keyword matching type, and Title fields
1

Set Trigger Keywords

Enter the words or phrases that should start this flow, e.g. menu, options, help. To pause the flow later without deleting it, just remove its trigger keywords here and save — with nothing to match, it stops firing but stays in your Keyword Replies list.
2

Choose a keyword matching type

Exact keyword match fires only on an exact word; String match also fires on similar/partial keywords.
3

Give the flow a Title

Use a clear, descriptive title such as welcome_bot, support_bot, or lead_capture_bot — this is how you’ll find it later in the Keyword Replies list.
4

Save

Click Save Changes to apply the configuration.
Pick keywords your customers actually type. A flow titled welcome_bot triggered on hi, hello, hey, start, help will catch most incoming first messages.

Automation Actions

The same configuration panel has an Automation Actions section for managing the contact without sending a visible message:
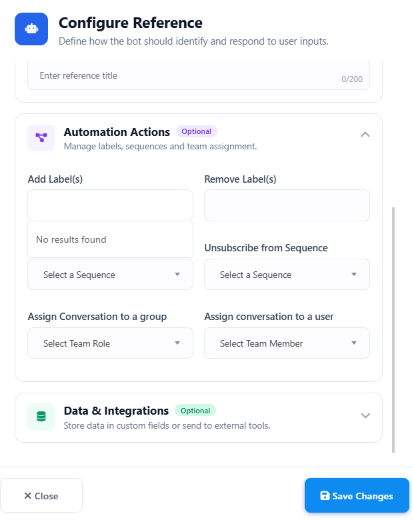
Automation Actions panel with Add Label, Remove Label, Unsubscribe from Sequence, and conversation assignment fields
  • Add / Remove Label(s) — tag contacts by demographic, interest, lead status, or purchase history so you can target them later with segmented campaigns. Labels themselves are created in Subscriber Manager — this just applies an existing one automatically when the flow runs.
  • Unsubscribe from Sequence — stop an automated message sequence (onboarding, lead nurturing, promotions, re-engagement) for this contact.
  • Assign Conversation to a group — hand the conversation to a team (e.g. Sales, Support, Executive) so any member of that team can pick it up.
  • Assign conversation to a user — hand the conversation to one specific team member.

Data & Integrations

The Data & Integrations section collects what the bot learns from the conversation and sends it where you need it:
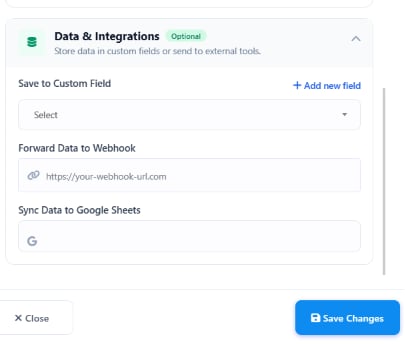
Data & Integrations panel with Save to Custom Field, Forward Data to Webhook, and Sync Data to Google Sheets fields
  • Save to Custom Field — store a user’s reply (name, email, phone, etc.) in a custom field you’ve created under Custom Fields.
  • Forward Data to Webhook — POST the collected fields to an external URL (a CRM, database, or custom app) as JSON, e.g. {"name": "{{user_name}}", "email": "{{user_email}}"}.
  • Sync Data to Google Sheets — connect a Google account, pick a spreadsheet and worksheet, and map each custom field to a column; every new submission adds a row automatically.
Example — a lead-capture flow:
1

User sends 'Hi'

The trigger keyword starts the flow.
2

Bot asks for Name, Email, and Phone

Each answer is captured as it arrives.
3

Responses save to custom fields

e.g. user_name, user_email, user_phone.
4

Data forwards to a webhook

For CRM processing.
5

Data syncs to Google Sheets

For reporting and tracking — no manual entry.

Add flow components

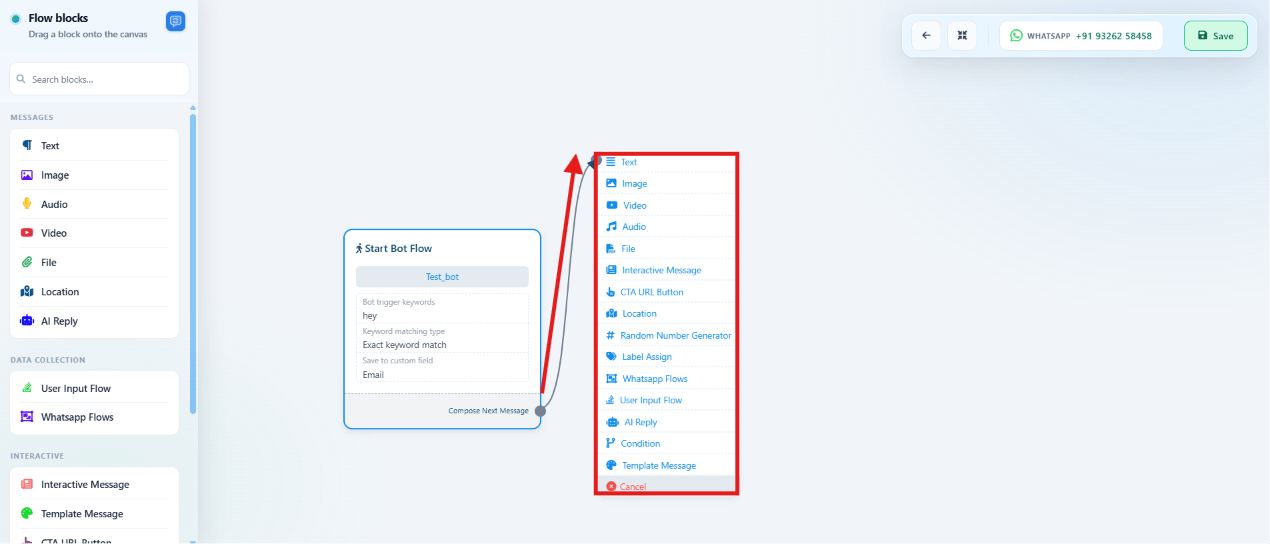
Flow blocks panel listing Messages, Data Collection, and Interactive components connected to Start Bot Flow
After saving Start Bot Flow, hover the block and drag its connector dot onto the canvas to open the list of components you can chain after it. Click each component below to see what it does and how to configure it.
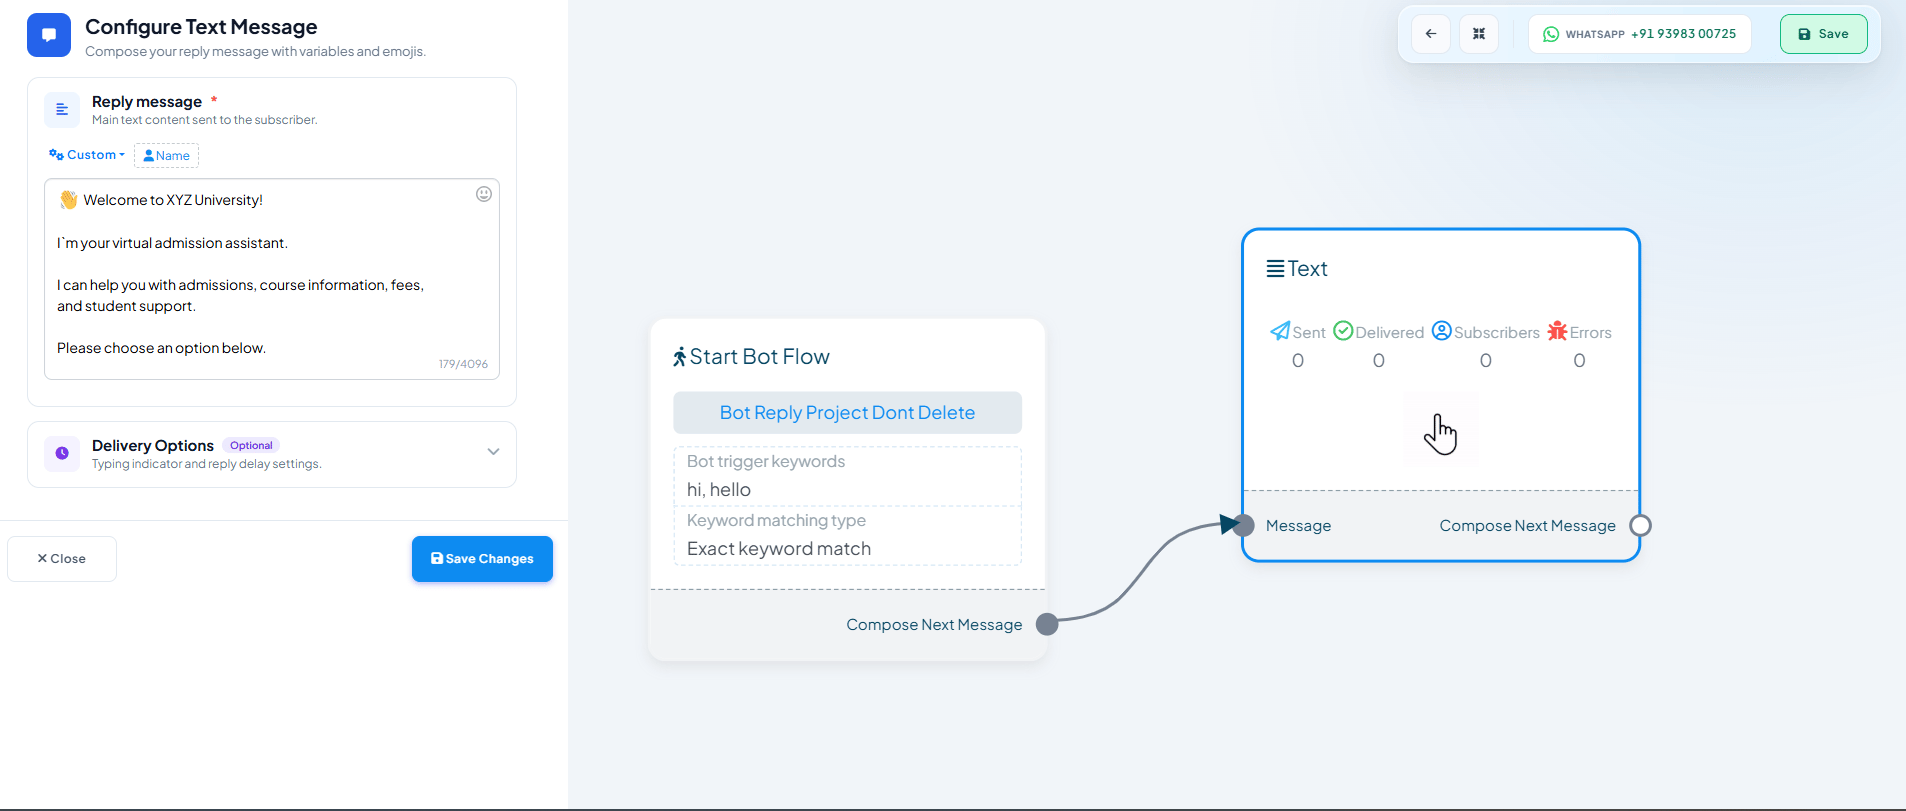
Configure Text Message panel with a Reply message textarea, Custom/Name toolbar for variables, and Delivery Options
Plain text — welcomes, instructions, FAQs, notifications. Type the Reply message directly, or click Name (or type #) to drop in a variable — this is the block used in the screenshot above.
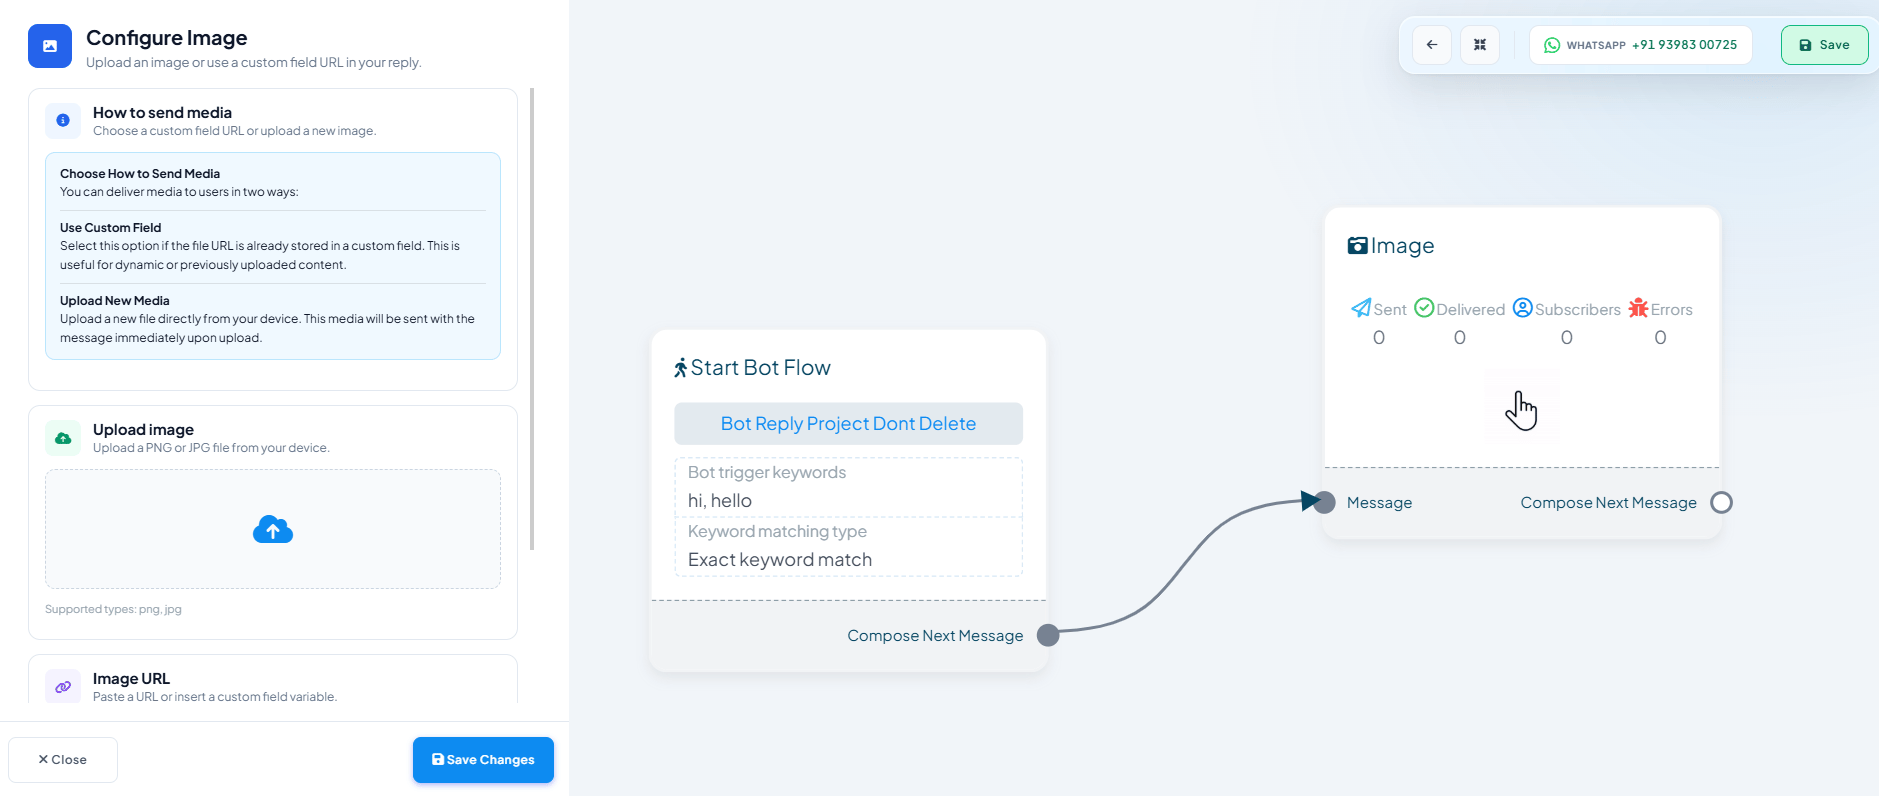
Configure Image panel with How to send media options (Use Custom Field or Upload New Media), an Upload image dropzone, and an Image URL field
PNG/JPG — product images, banners, promos. Either Upload image a file directly, or paste an Image URL (see Media upload options below).
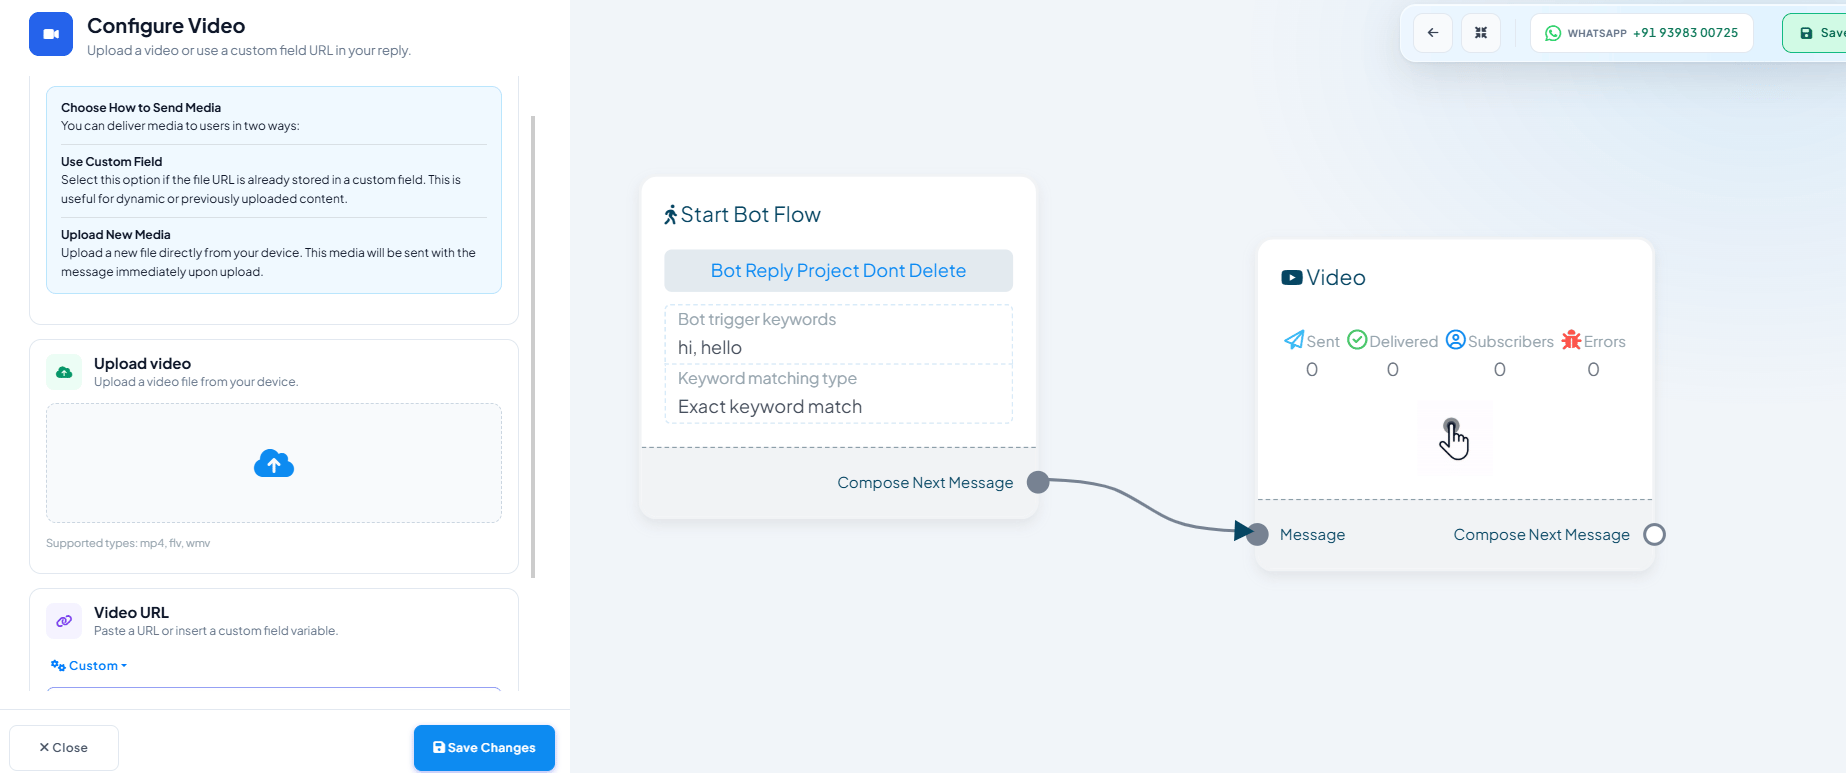
Configure Video panel with an Upload video dropzone and a Video URL field
MP4/FLV/WMV — demos, tutorials, marketing.
AAC/MP3/AMR/OGG, up to 16 MB — voice greetings, announcements.
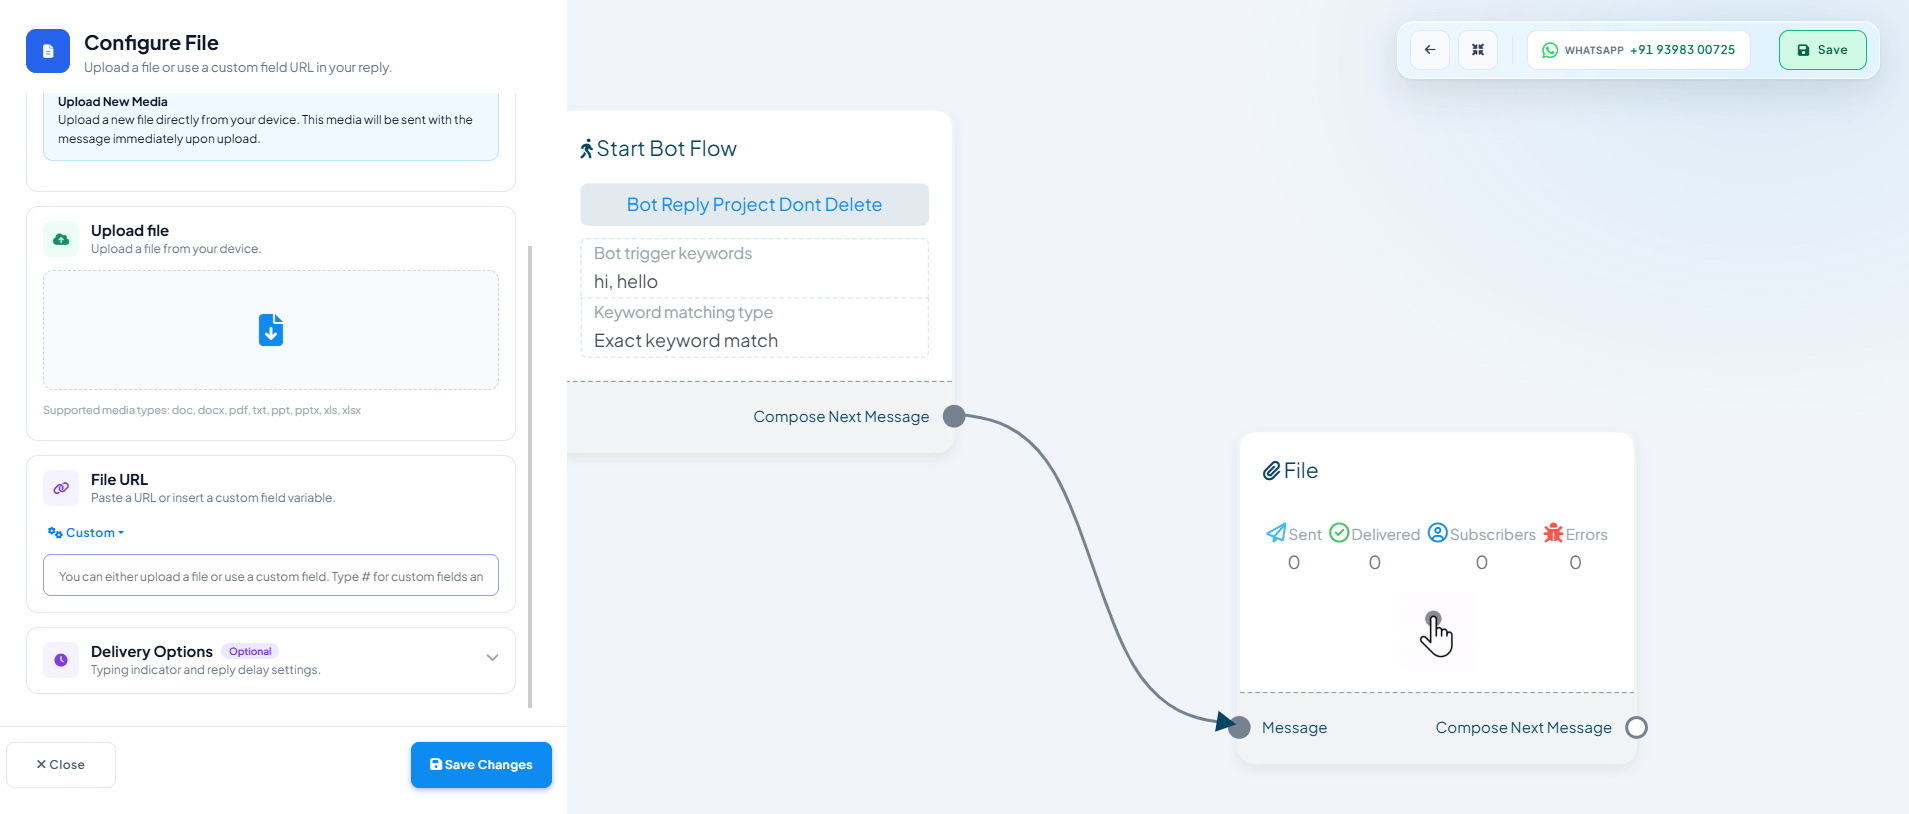
Configure File panel with an Upload file dropzone, a File URL field, and Delivery Options
DOC/DOCX/PDF/TXT/PPT/PPTX/XLS/XLSX — brochures, invoices, manuals.
All three media blocks share the same How to Send Media choice: Upload New Media (a file from your device, sent with the message) or Use Custom Field (a URL already stored in a custom field — useful for dynamic or previously uploaded content).
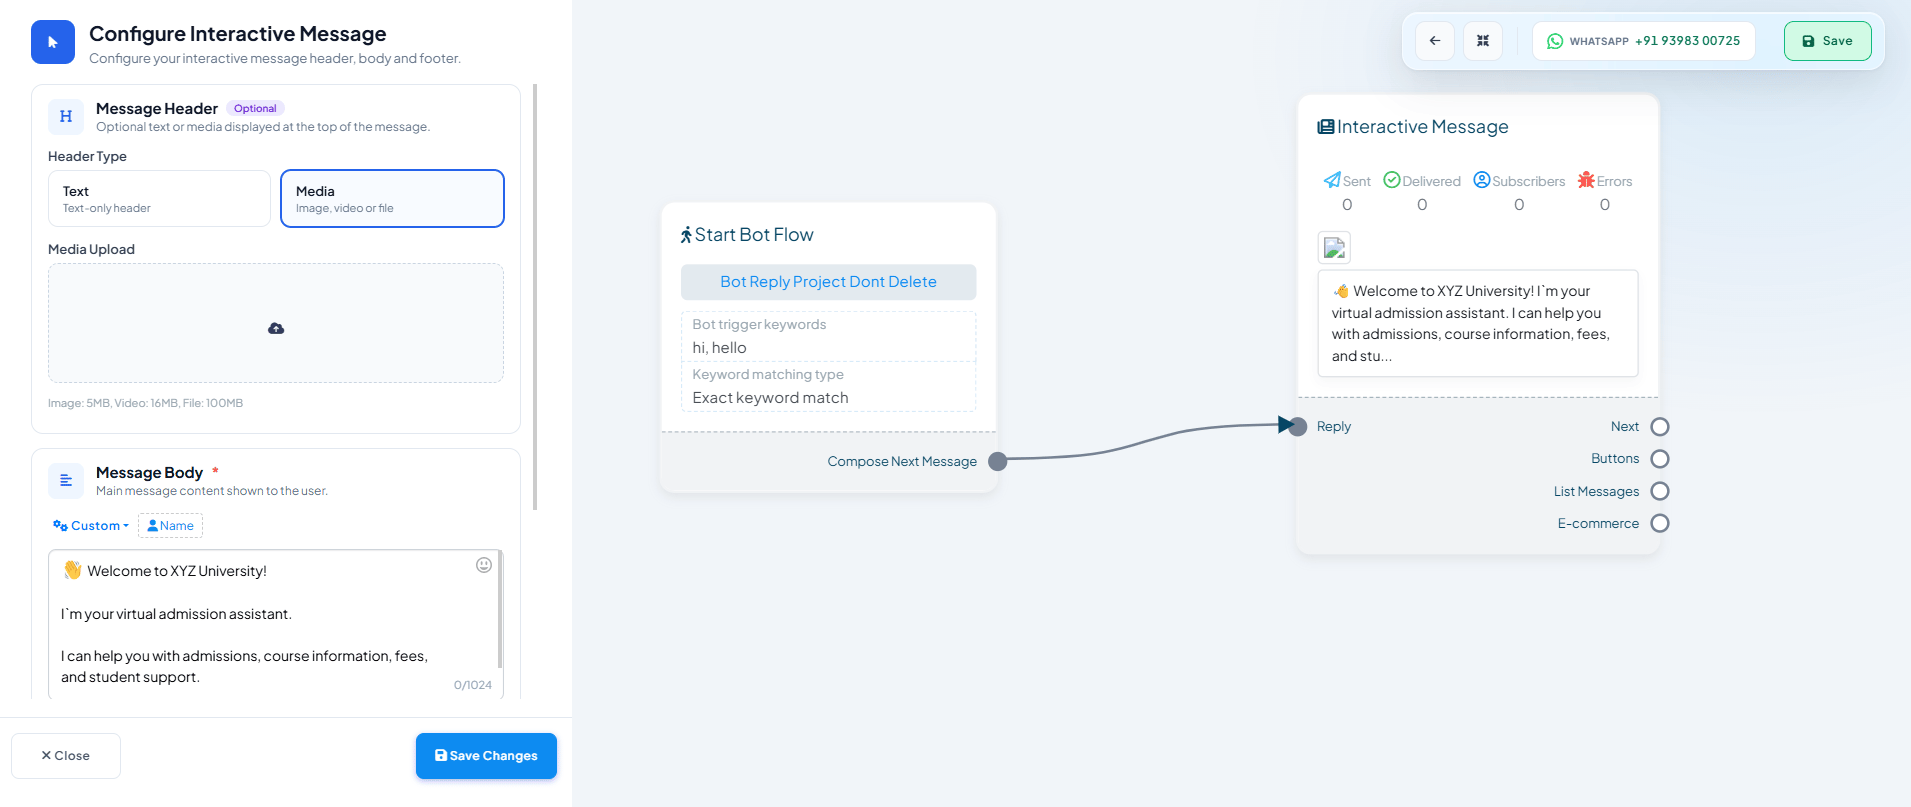
Configure Interactive Message panel with an optional Media header and the Message Body, next to the canvas node showing Reply, Buttons, List Messages, and E-commerce connectors
An Interactive Message has an optional Header (text or media), a required Message Body, and then branches into one of three reply types wired from its Reply connector:
  • Buttons — up to 3 tappable buttons, each wired to its own next step.
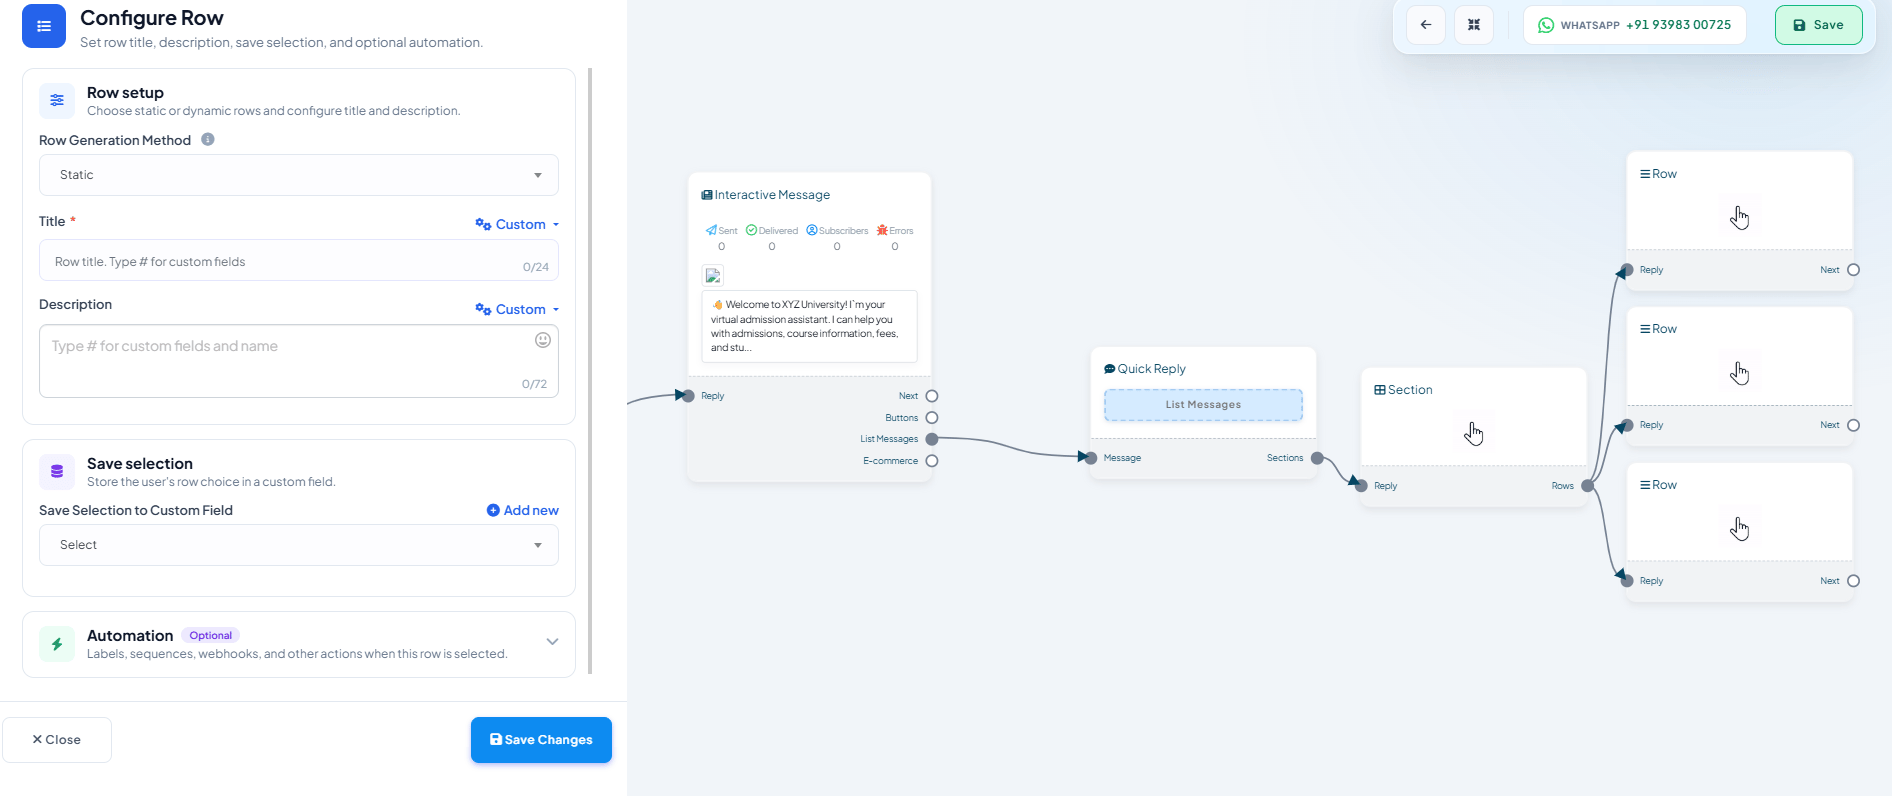
  • List Messages — a Section of up to 10 Rows; each row’s Row setup sets a Row Generation Method (Static text you write, or Dynamic, generated from data), a Title, and a Description.
  • E-commerce — attaches your product catalog to the message.
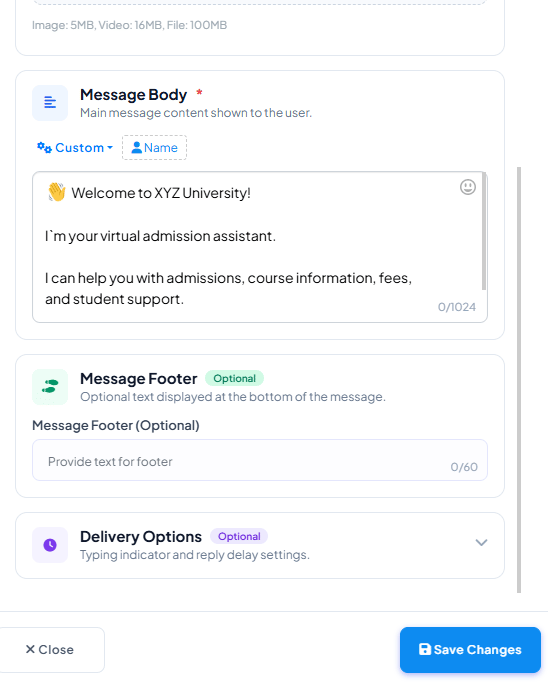
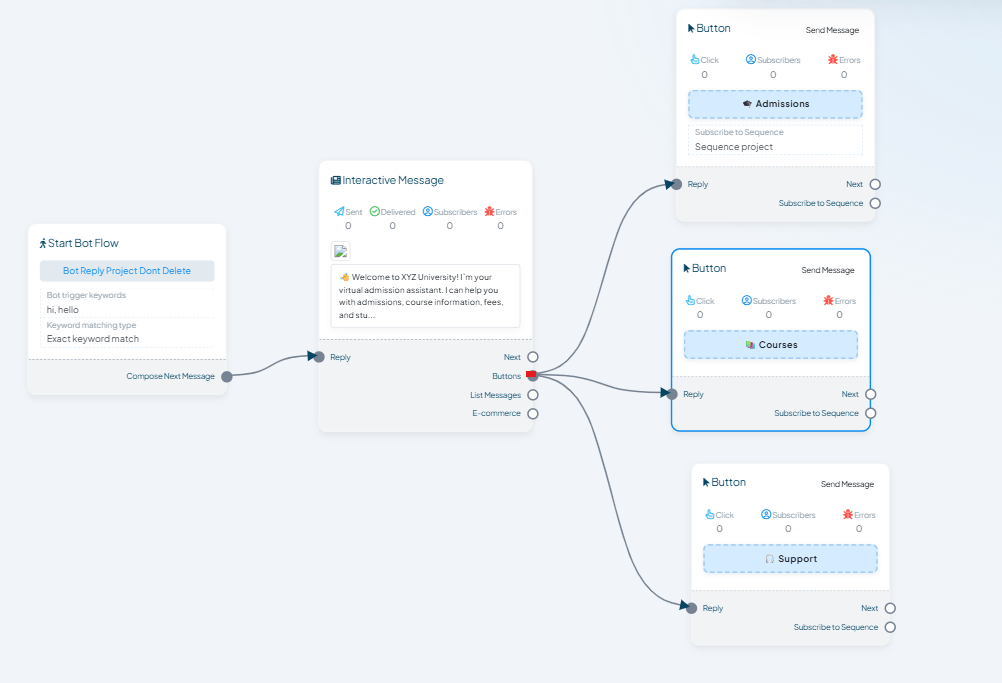
Interactive Message node on the canvas with three Buttons wired to it — Admissions, Courses, Support — each its own reply node
Each Button (and each list Row) has its own Button action — what happens when the customer taps it: Send Message (continue the flow), Start a Flow (jump into a different Keyword Replies flow), or System Default Action Button.
Button action dropdown open, showing Send Message highlighted alongside Select, Start a Flow, and System Default Action Button
Configure Row panel for a List Message with Row Generation Method set to Static, Title and Description fields, Save selection to a custom field, and an optional Automation section
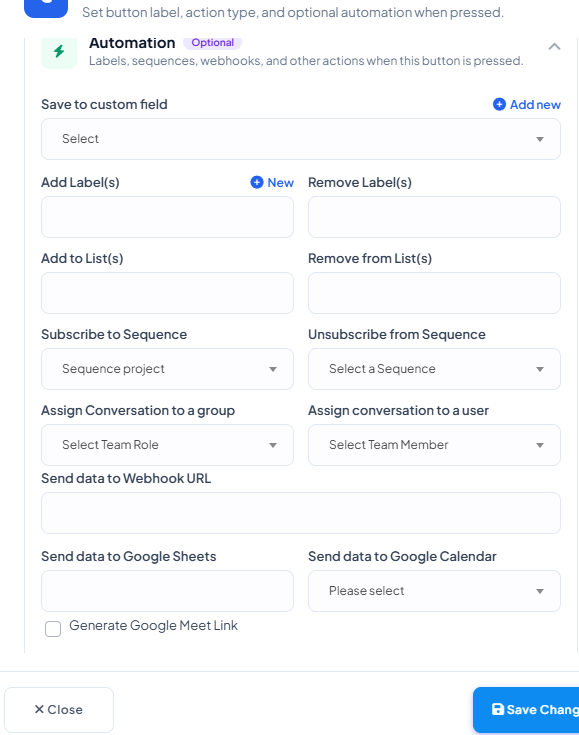
Every button or row also has its own Automation panel — the same kind of background actions available on Start Bot Flow, scoped to just that one option:
Button Automation panel with Save to custom field, Add/Remove Label(s), Add/Remove from List(s), Subscribe/Unsubscribe Sequence, Assign Conversation to a group or user, Send data to Webhook URL, Send data to Google Sheets, Send data to Google Calendar, and Generate Google Meet Link
  • Save to custom field, Add/Remove Label(s), Add/Remove from List(s)
  • Subscribe to Sequence / Unsubscribe from Sequence
  • Assign Conversation to a group / Assign conversation to a user
  • Send data to Webhook URL, Send data to Google Sheets, Send data to Google Calendar (with an option to Generate Google Meet Link)
This means a single button tap can save the customer’s choice, tag them, hand the conversation to Sales, and log a row in a spreadsheet — all before the next message sends.
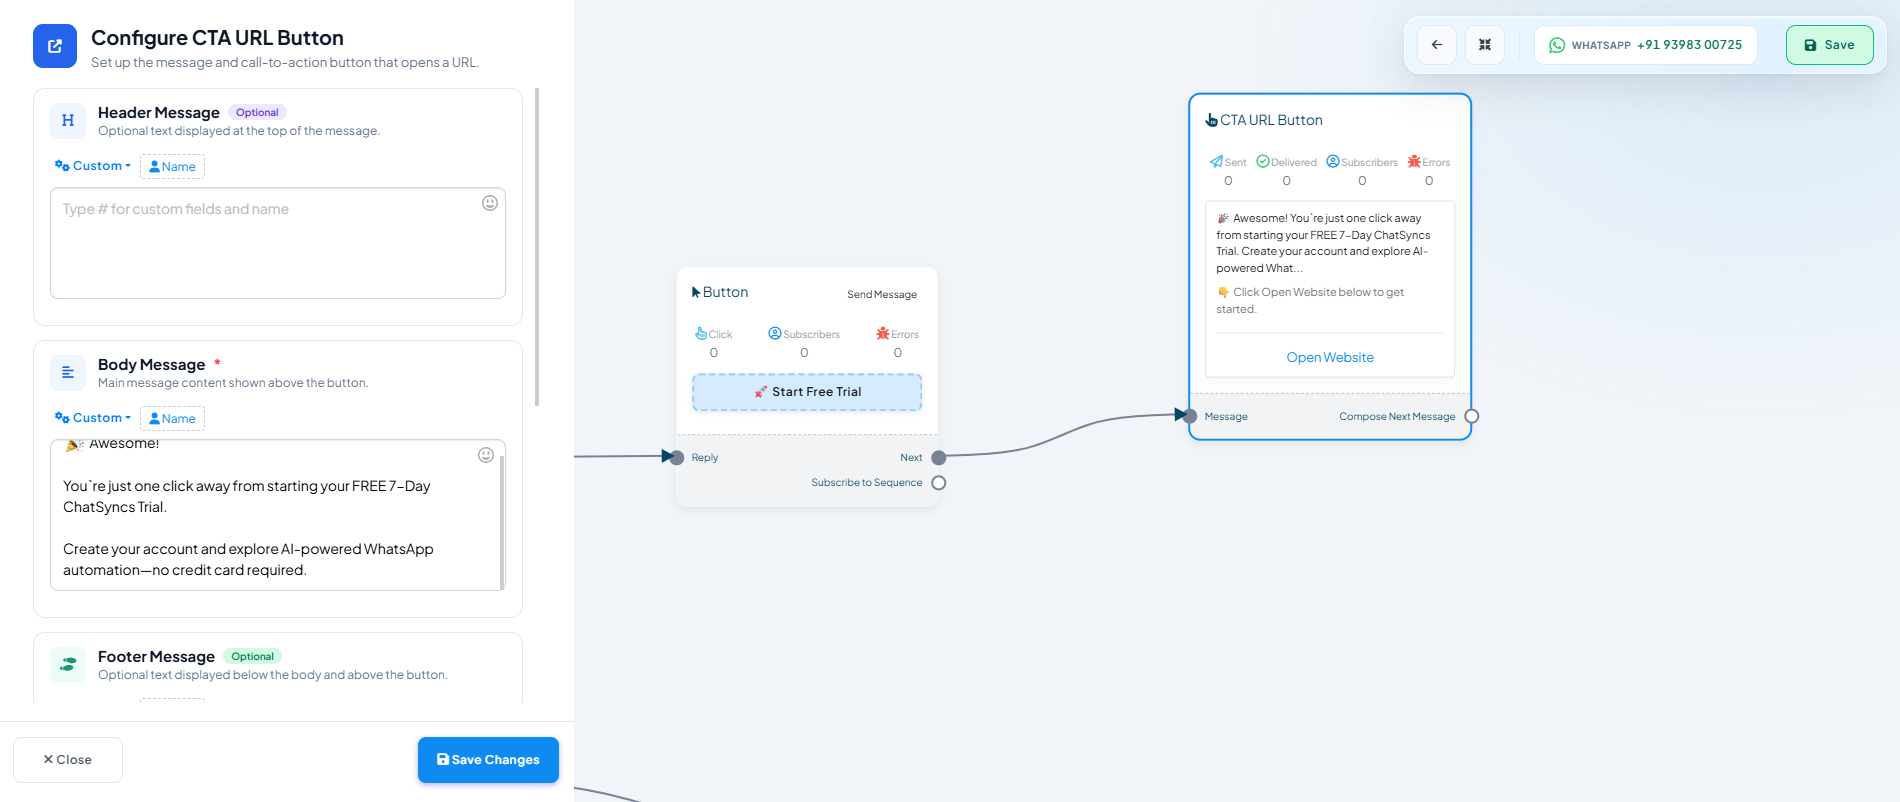
Configure CTA URL Button panel with Header Message, Body Message, and Footer Message fields, next to the canvas node showing the button text and Open Website link
A button that opens a website — landing, payment, or booking pages — instead of sending text back to the bot. Set an optional Header Message, a required Body Message, an optional Footer Message, and the Call to Action Button’s text and destination URL. See How to Add Clickable CTA Buttons for the full field-by-field walkthrough.
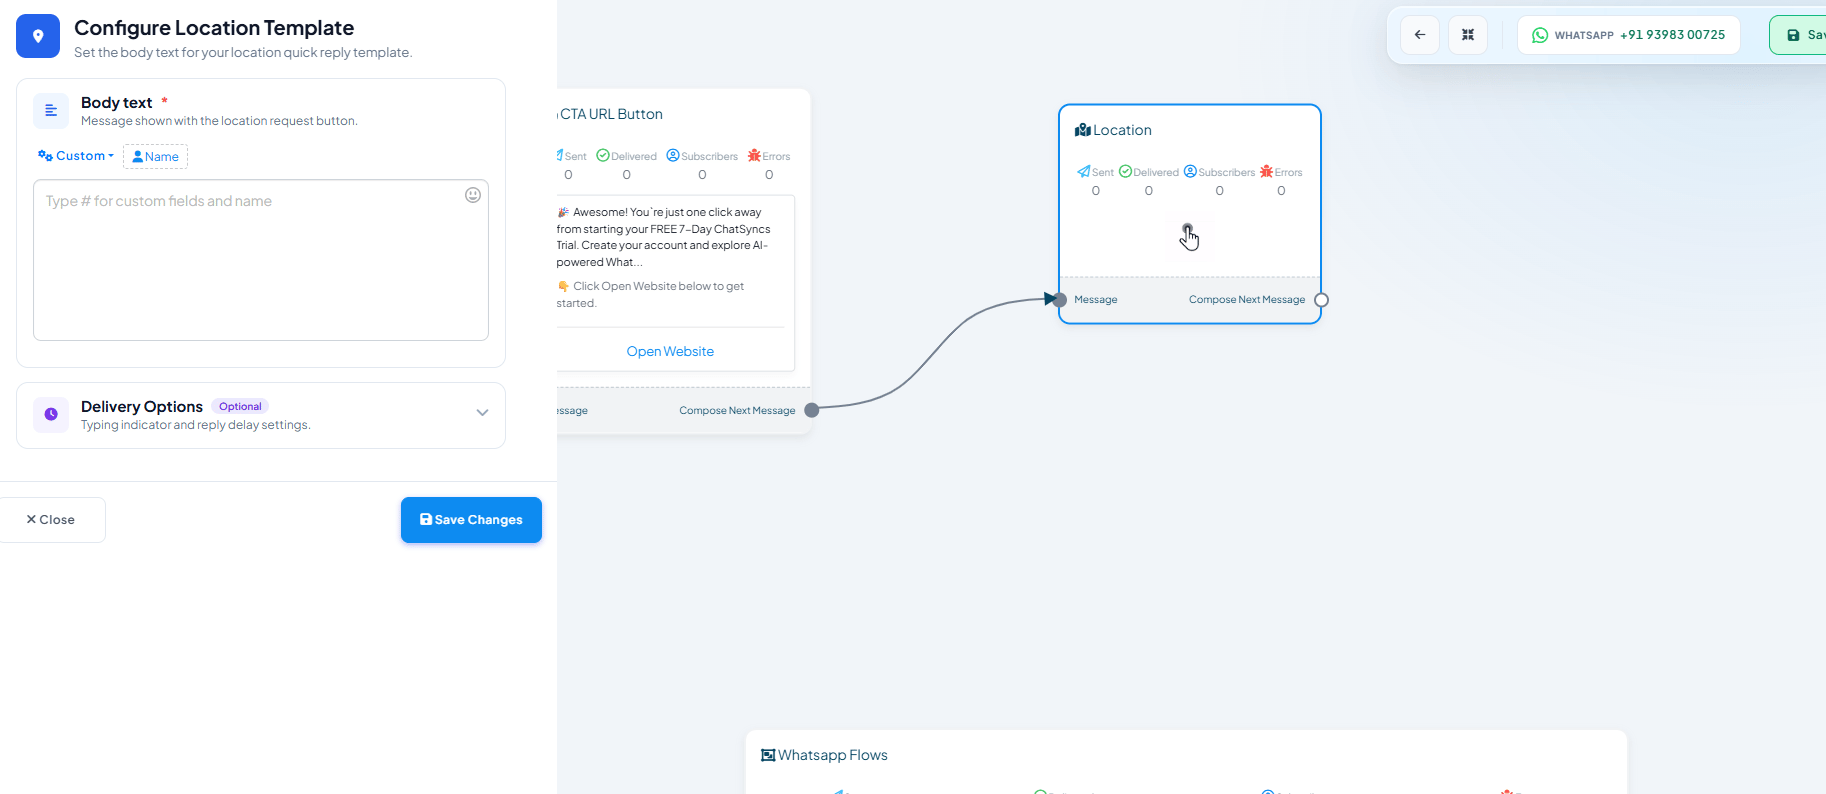
Configure Location Template panel with a Body text field for the location quick-reply request
Sends a quick-reply button that asks the customer to share their live location — useful for delivery address collection or finding the nearest store/branch. Just write the Body text shown alongside the request button.
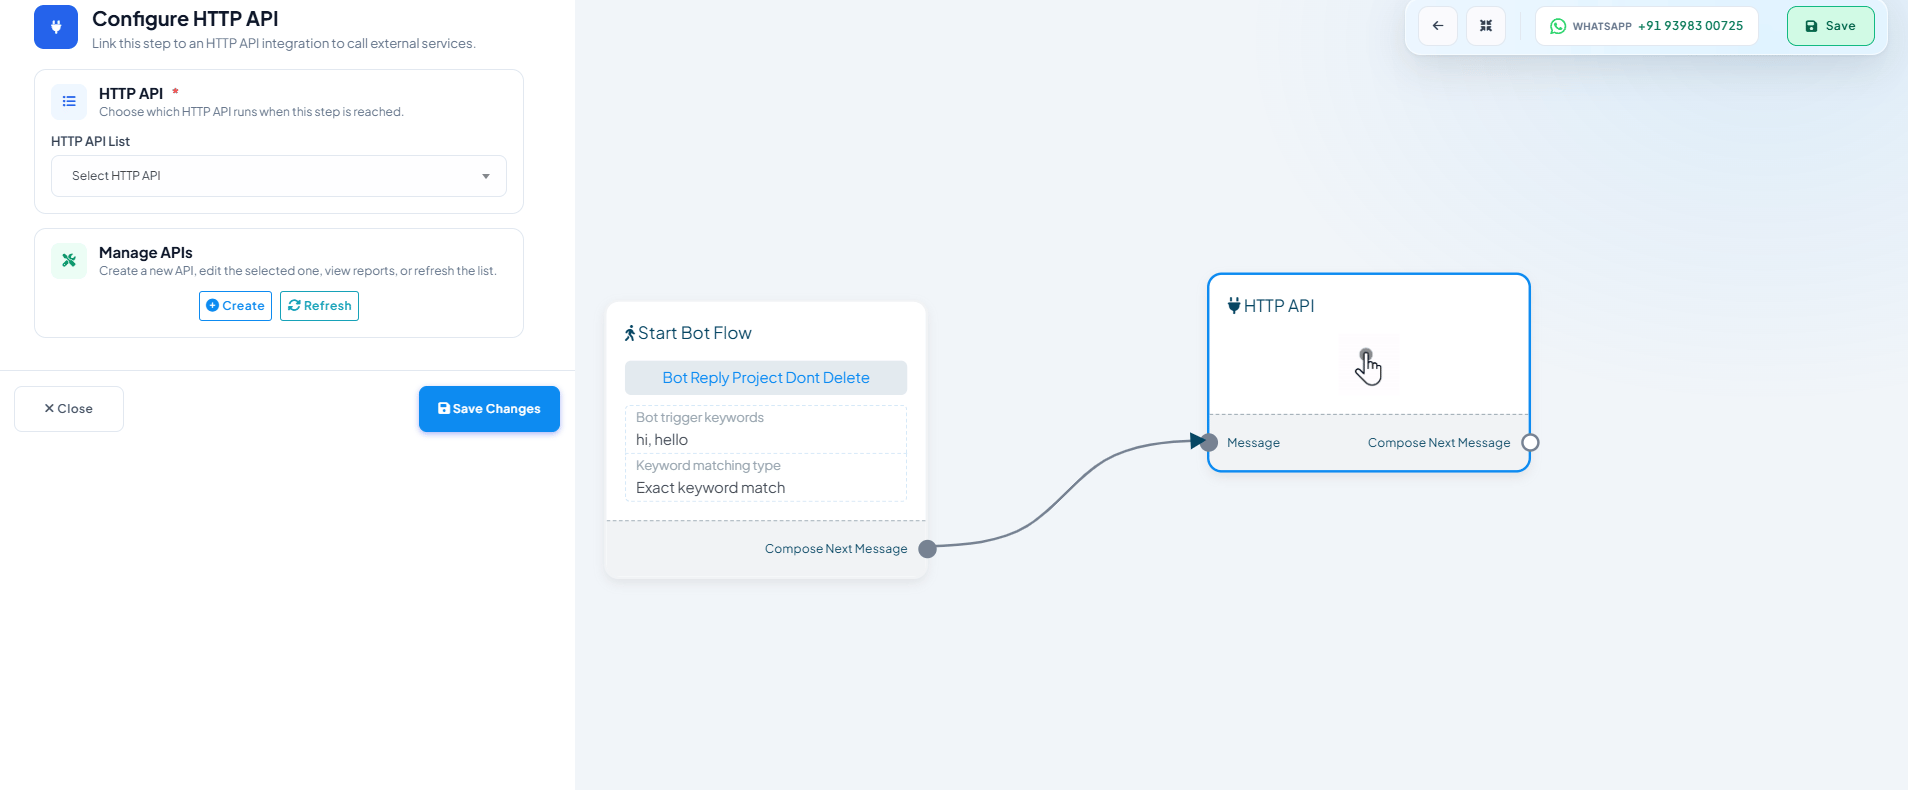
Configure HTTP API panel with an HTTP API List dropdown to choose which API runs at this step, and Create/Refresh buttons under Manage APIs
Calls an external service (your CRM, backend, or any API) at this step in the flow. Pick a previously-configured API from HTTP API List, or click Create under Manage APIs to set up a new one without leaving the flow. See How to Connect a Bot Flow to External Systems for the full setup.
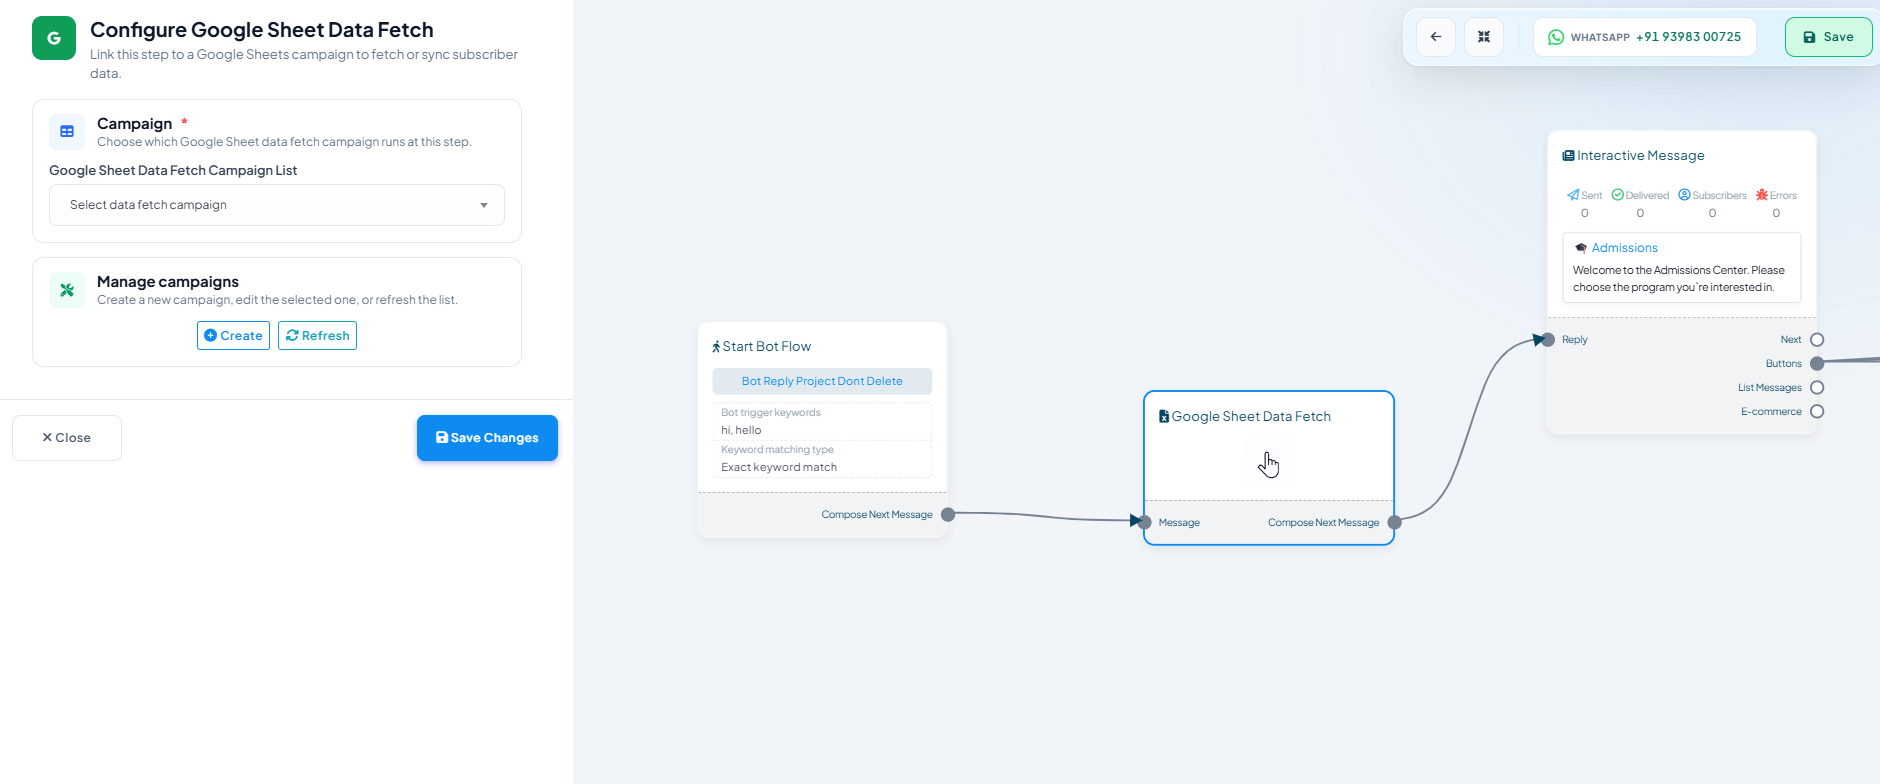
Configure Google Sheet Data Fetch panel with a Campaign dropdown to choose which data fetch campaign runs at this step, and Create/Refresh buttons under Manage campaigns
Pulls data from a connected Google Sheet campaign into the conversation. Pick a campaign from Google Sheet Data Fetch Campaign List, or click Create under Manage campaigns to set up a new one. See Google Sheet Fetch for how to connect and configure it.
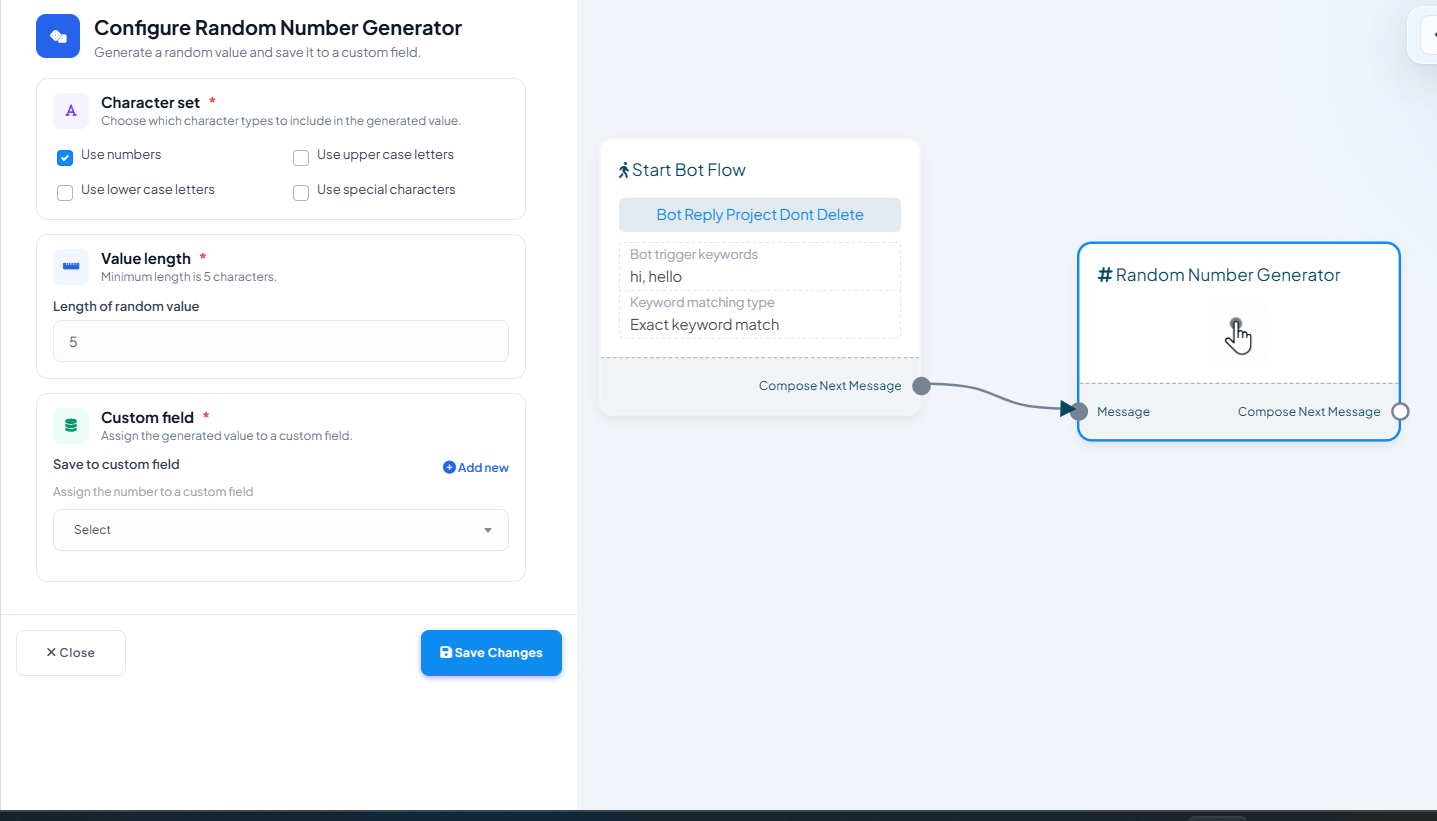
Configure Random Number Generator panel with Character set checkboxes (numbers, upper/lower case, special characters), a Value length field, and Save to custom field
Generates a random value and stores it in a custom field:
  • Character set — mix of numbers, upper-case letters, lower-case letters, and special characters.
  • Value length — minimum 5 characters.
  • Save to custom field — where the generated value is stored, ready to reference later (e.g. in a confirmation message as a token or ticket number).
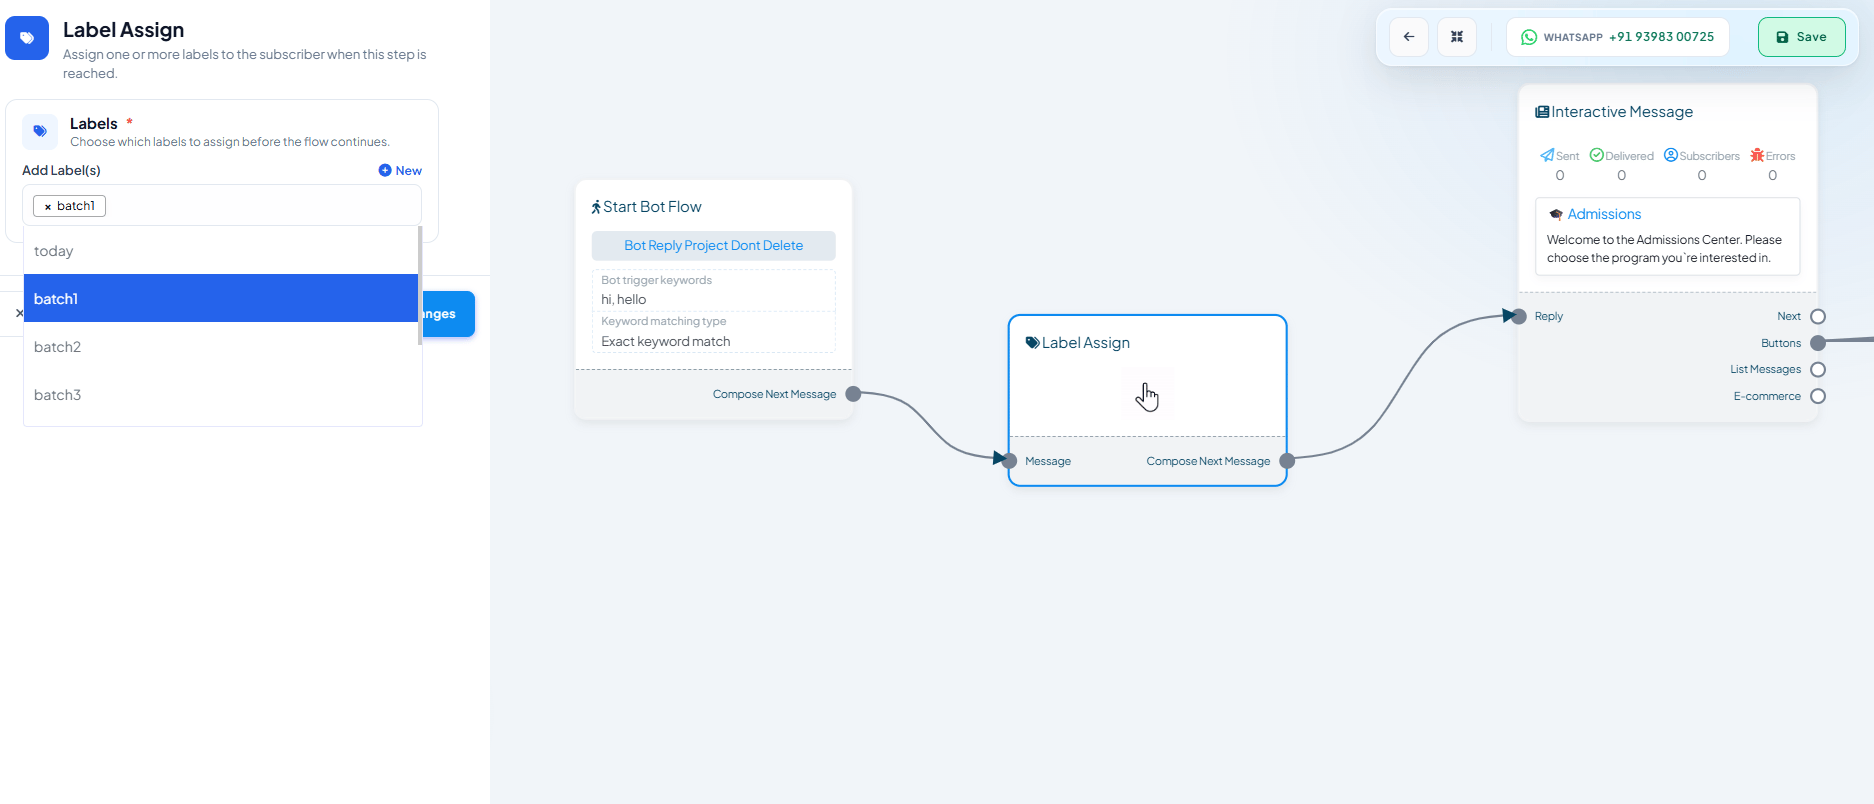
Label Assign panel with a multi-select Labels field showing existing labels like today, batch1, batch2, batch3
Assigns one or more existing labels to the subscriber the moment the flow reaches this step — no visible message is sent. Useful for segmenting contacts by which path they took through a flow (e.g. everyone who picked “Admissions” gets tagged batch1).
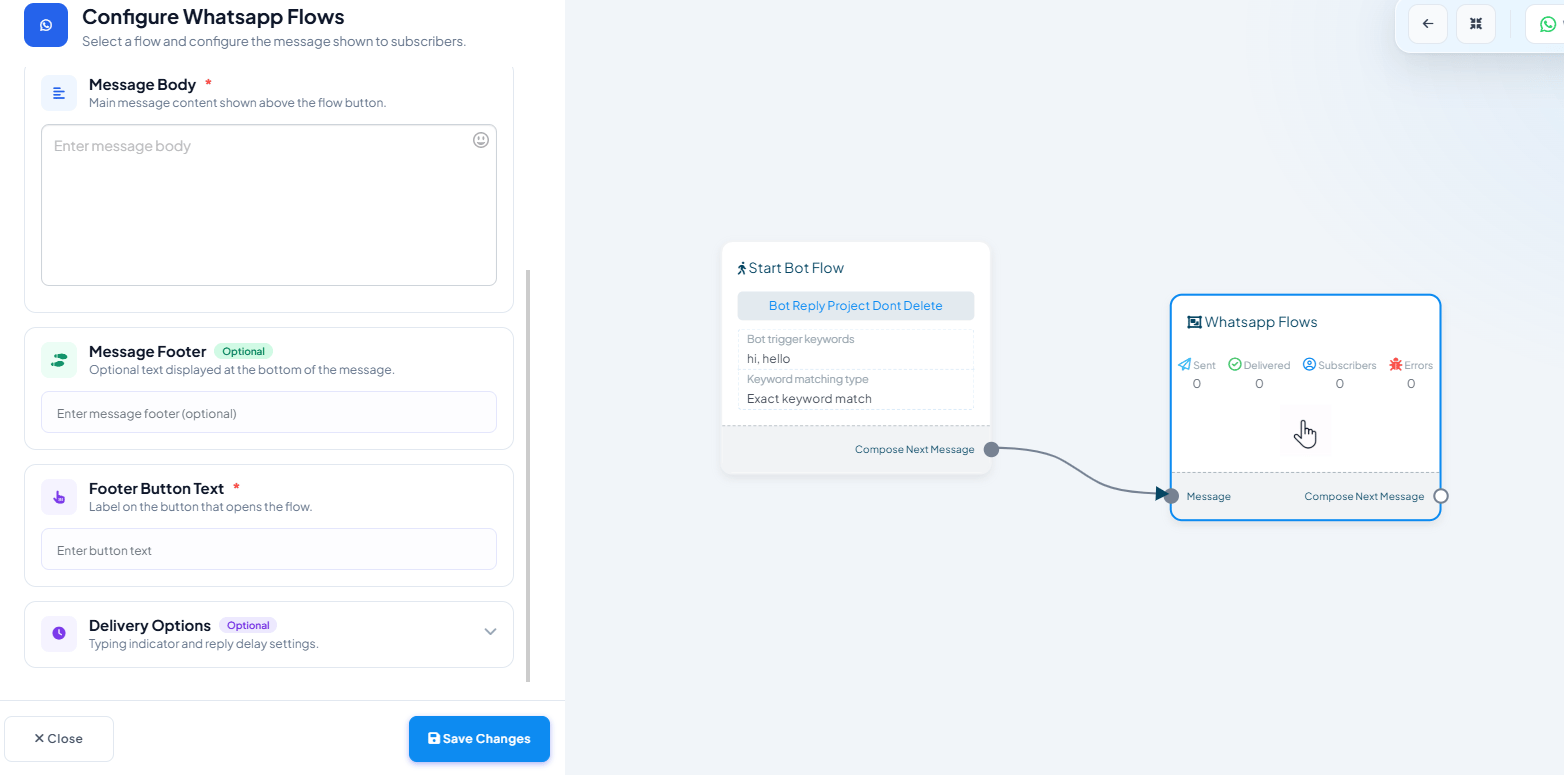
Configure Whatsapp Flows panel with Message Body, Message Footer, and Footer Button Text fields
Launches a Meta WhatsApp Flow — lead forms, bookings, surveys, registration. Pick the flow to send, then write the Message Body shown above the flow button, an optional Message Footer, and the Footer Button Text that opens it. See WhatsApp Flow Forms for the full builder walkthrough.
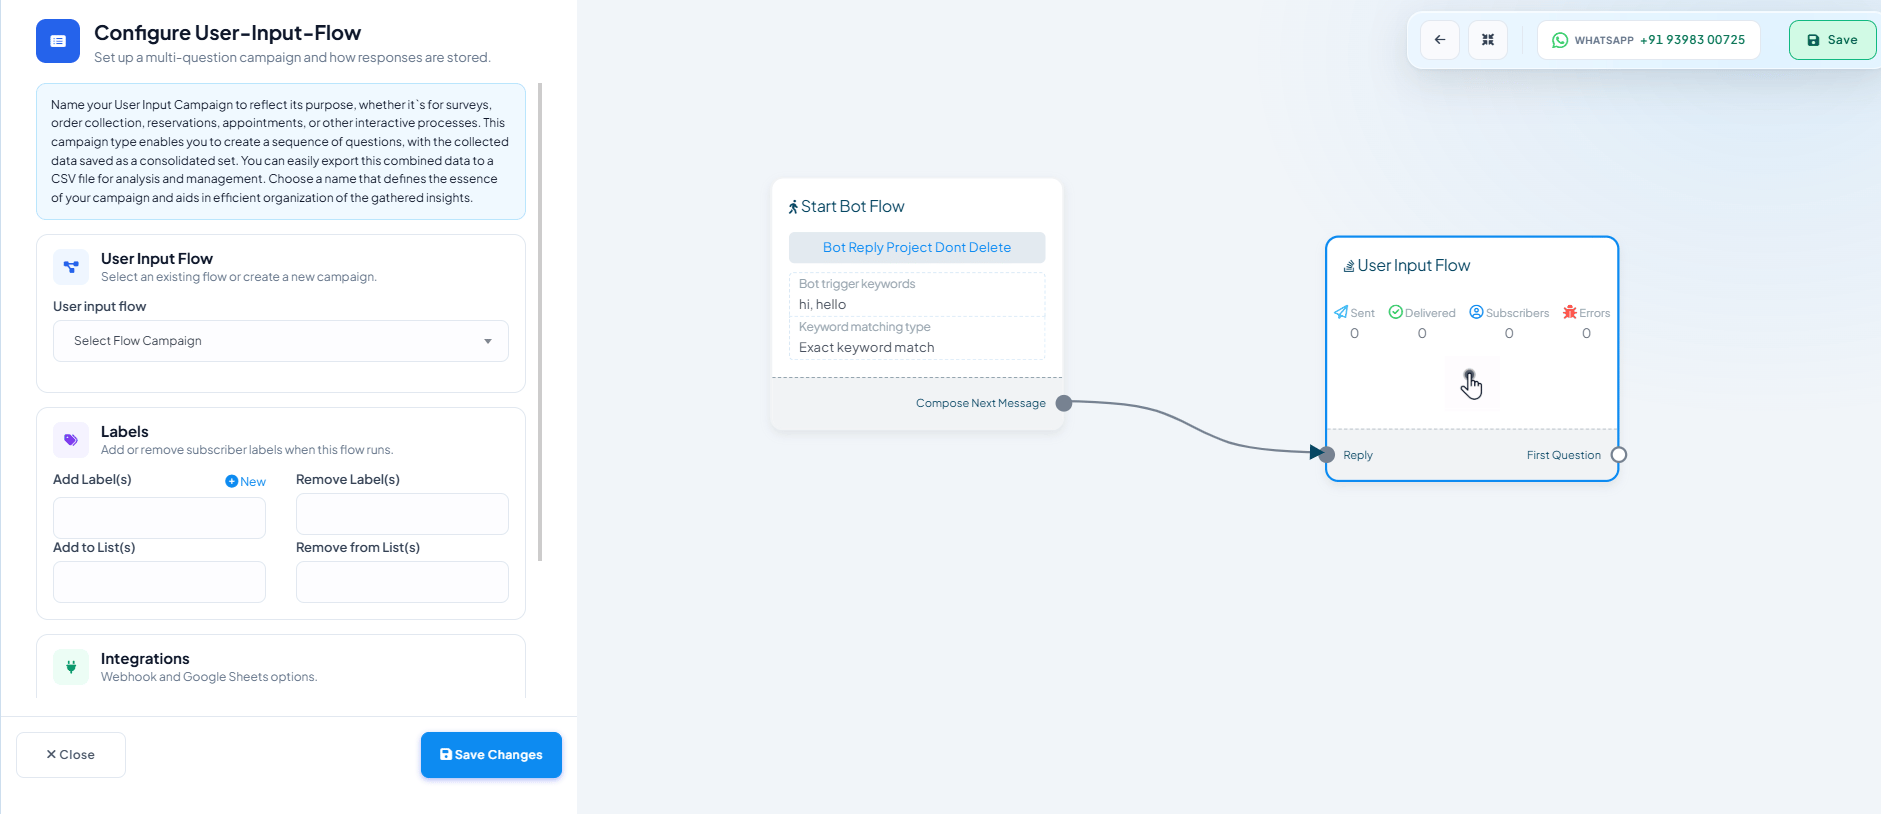
Configure User-Input-Flow panel with a User input flow campaign dropdown, and Labels and Integrations sections for the flow's Automation
Runs a multi-question campaign and saves each answer to a custom field — good for surveys, order collection, reservations, and appointments. Pick an existing campaign from User input flow, or create a new one; the same panel lets you add/remove labels and wire up webhook or Google Sheets integrations for the whole campaign. See User Input Flow for how to build one.
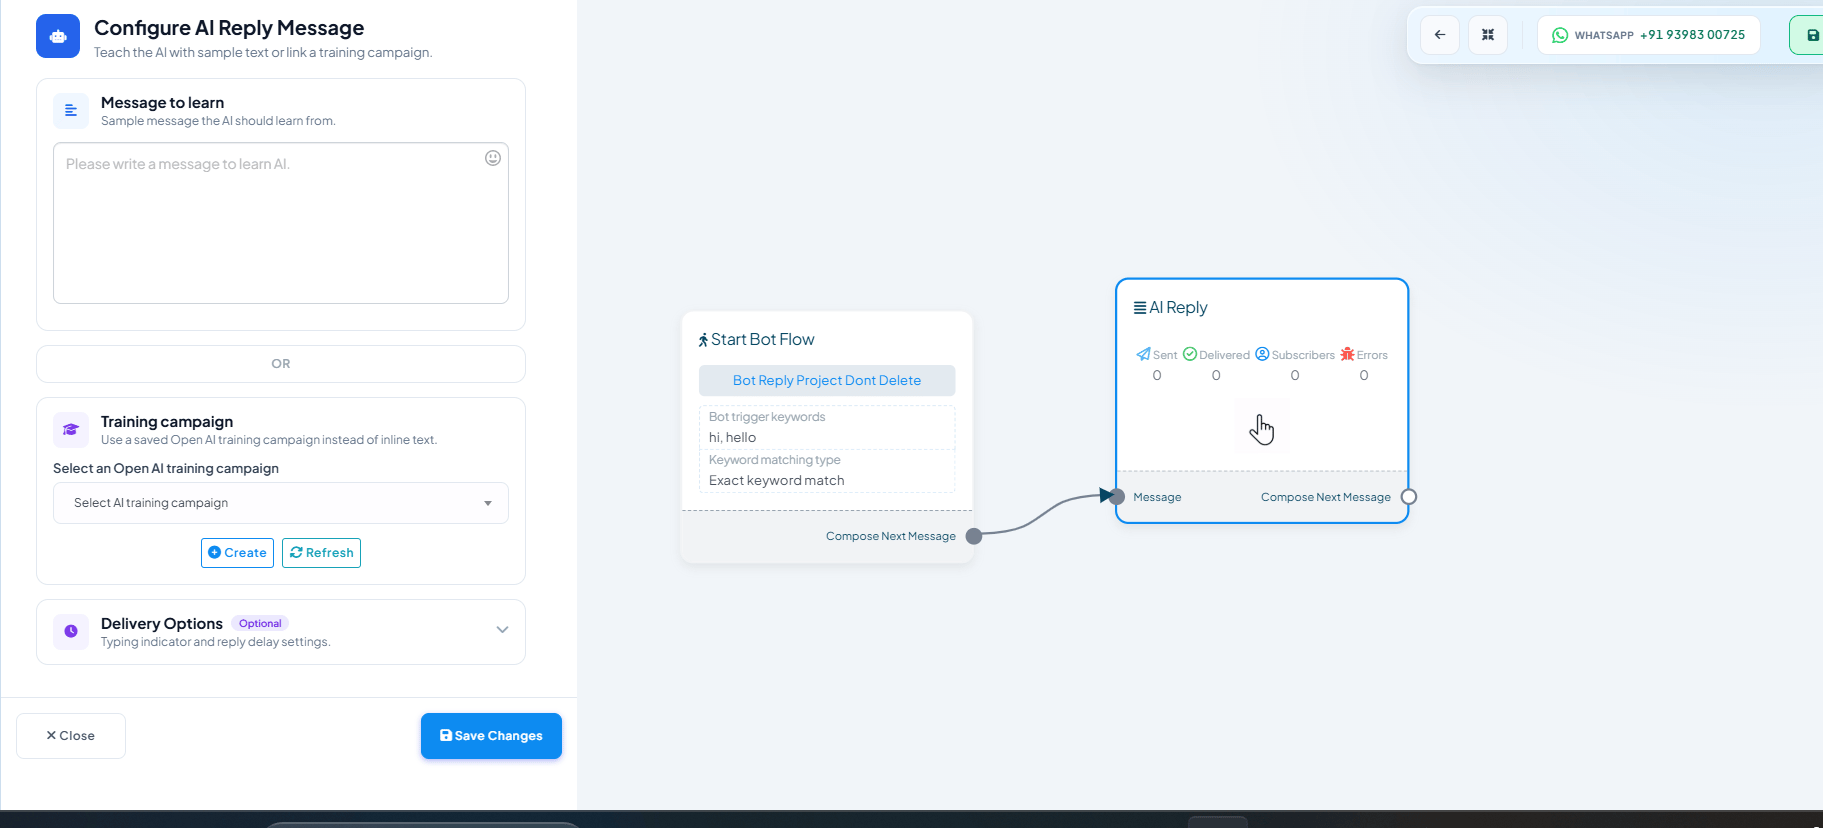
Configure AI Reply Message panel with a Message to learn text box, an OR divider, and a Training campaign dropdown to select a saved Open AI training campaign
Lets this step of the flow answer with AI instead of a fixed message, taught one of two ways:
  • Message to learn — paste a sample message inline for the AI to learn from.
  • Training campaign — pick an existing AI Knowledgebase campaign instead of retyping its training data.
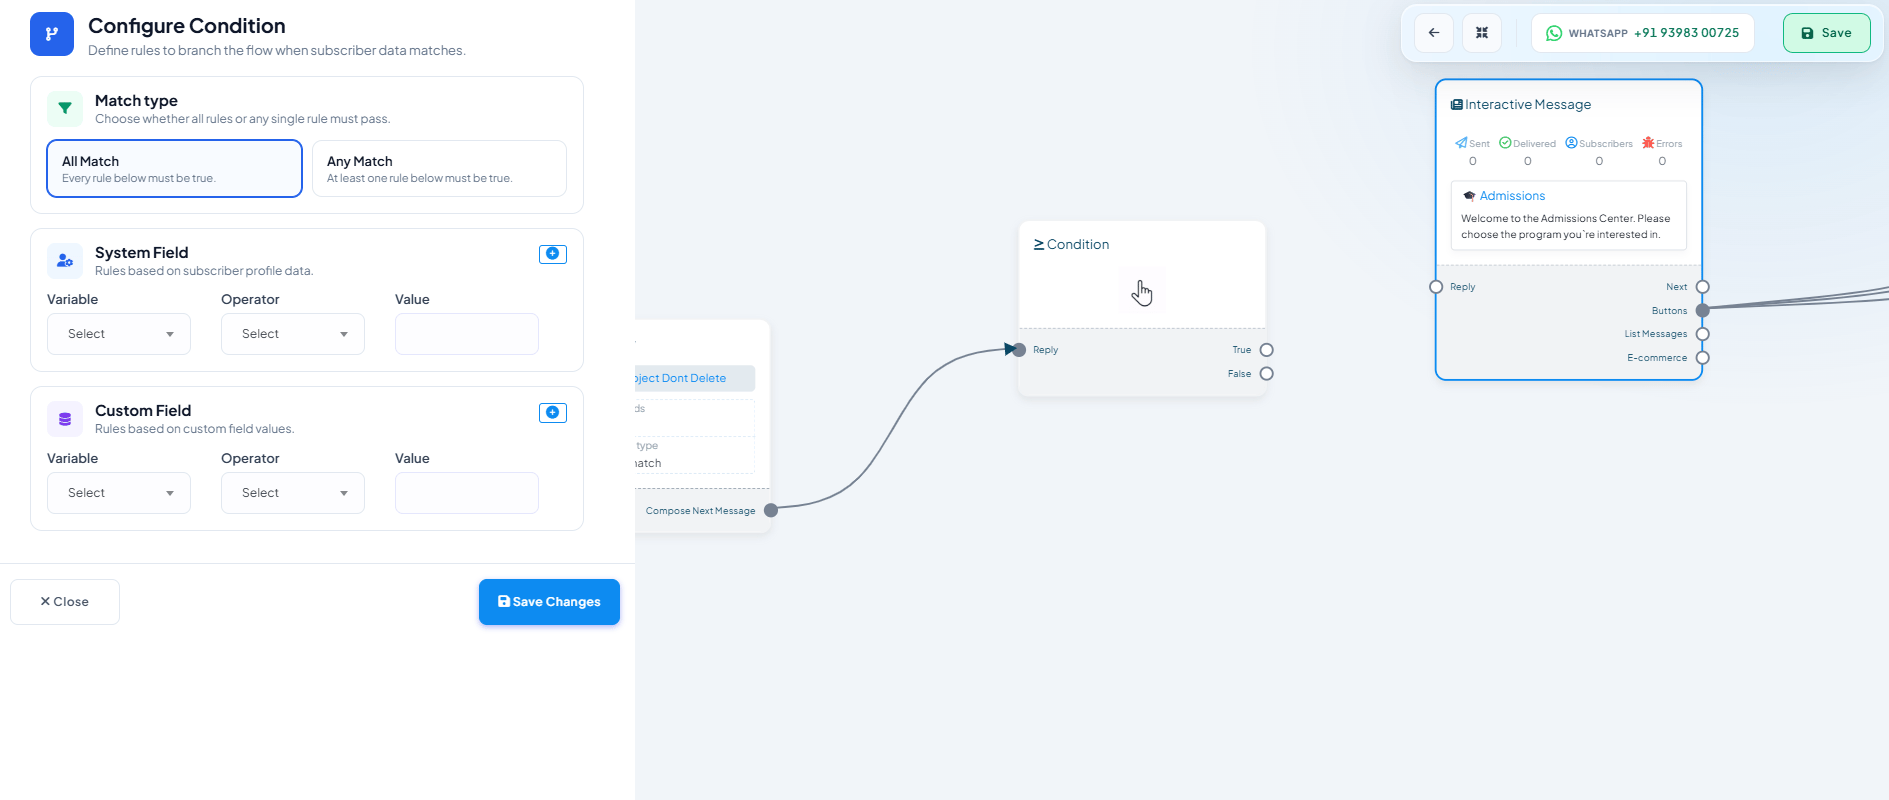
Configure Condition panel with Match type (All Match / Any Match), a System Field rule row, and a Custom Field rule row, each with Variable, Operator, and Value
Branches the flow into True and False paths based on rules you define:
  • Match typeAll Match (every rule must pass) or Any Match (at least one rule must pass).
  • System Field rules — based on subscriber profile data (variable, operator, value).
  • Custom Field rules — based on values saved in your own custom fields.
Wire the True connector to one path and False to another — e.g. If User Interest = Sales → Sales Flow, otherwise fall through to a generic reply.
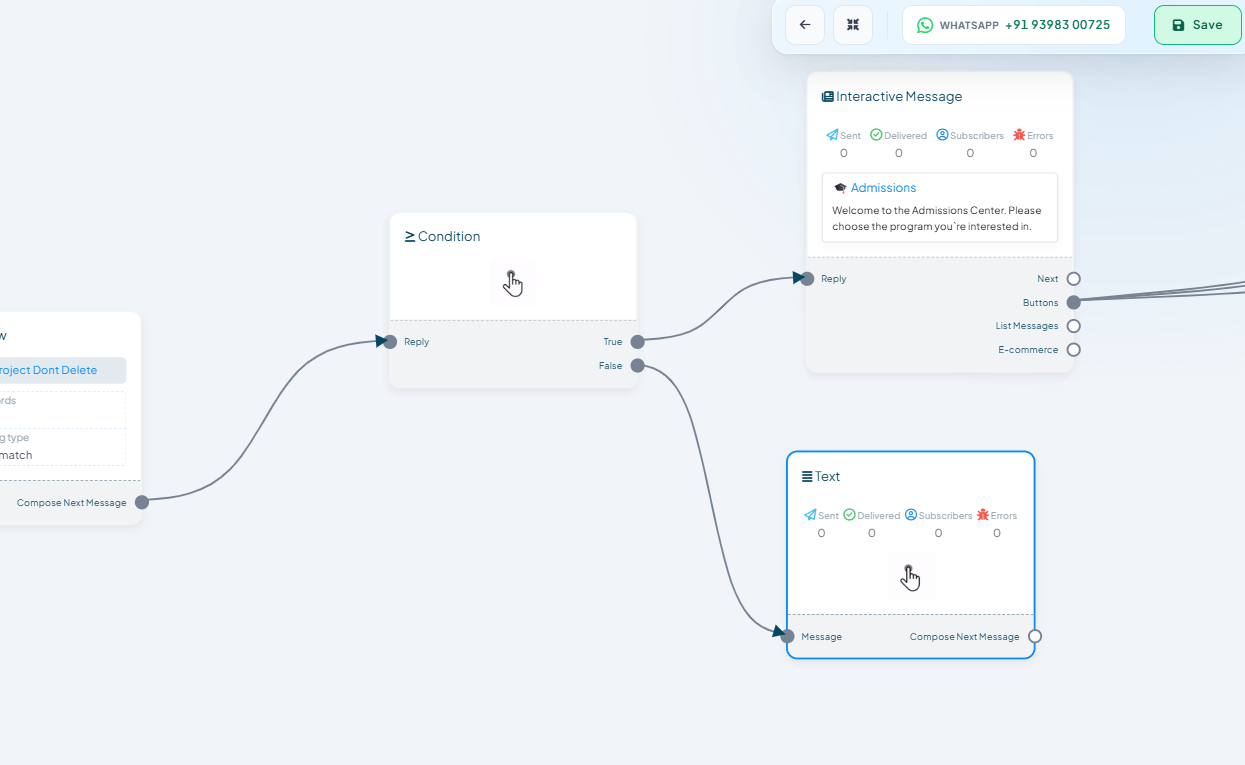
Condition node on the canvas with its True connector wired to an Interactive Message and its False connector wired to a Text message
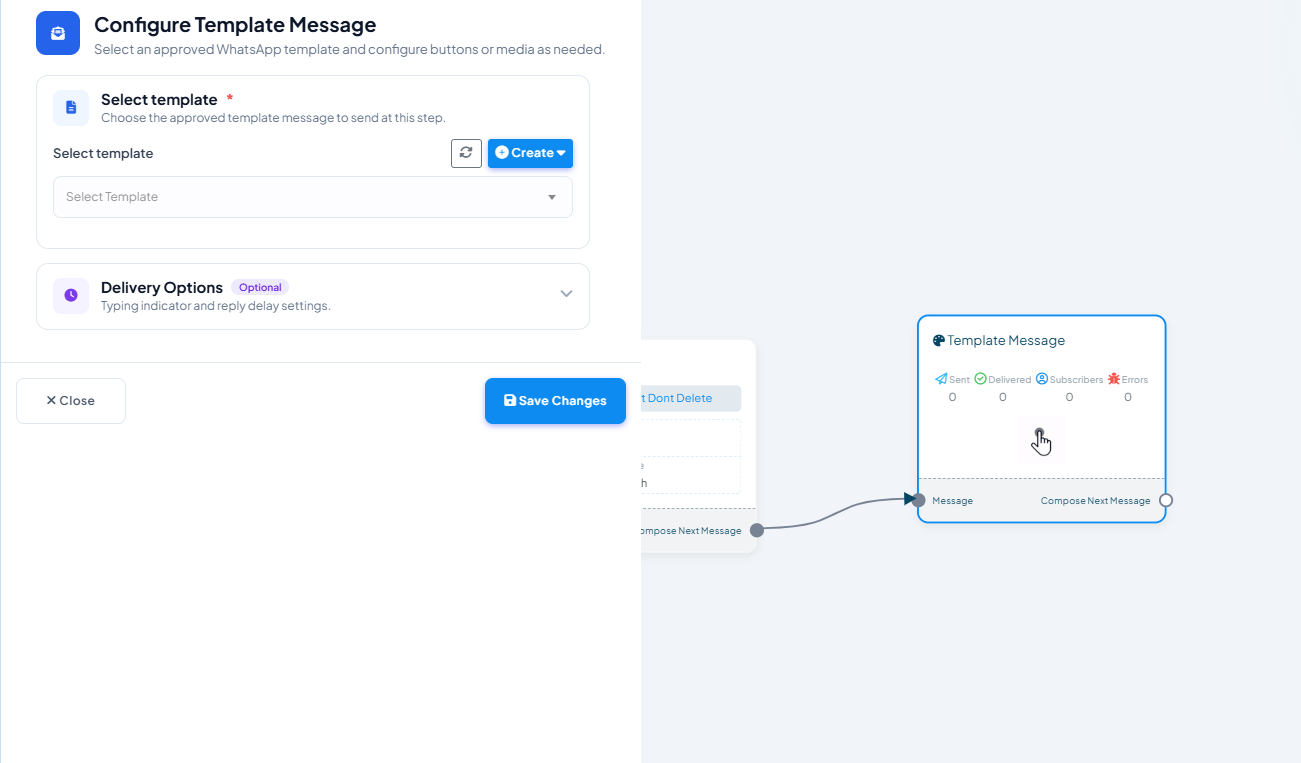
Configure Template Message panel with a Select template dropdown and a Create button for approved WhatsApp templates
Sends an approved WhatsApp template from this step — pick one from Select template, or click Create to start a new one without leaving the flow.
Template Messages must be approved by Meta before a flow can send them — see Creating a WhatsApp Message Template.
A typical flow chains several of these:

Personalize messages

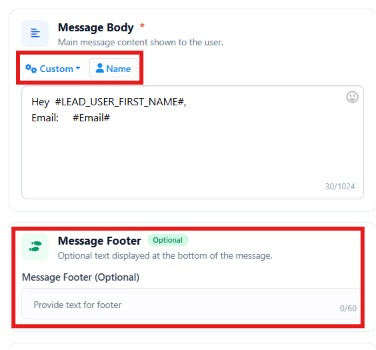
Message Body with custom-field variables and an optional Message Footer field
Inside a Text Message block, click Name to insert the user’s name, or type # to insert any custom field as a variable — e.g. Hey #LEAD_USER_FIRST_NAME#, welcome back!. You can also add optional Message Footer text, commonly used for branding or disclaimers (e.g. Powered by ChatSyncs).

Delivery options

Each message block has Delivery Options for a more natural pacing:
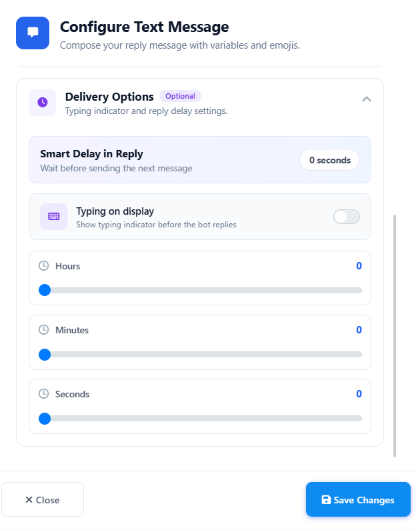
Configure Text Message panel showing Smart Delay in Reply and Typing on display options
  • Smart Delay in Reply — wait a set number of hours/minutes/seconds before sending.
  • Typing on display — show WhatsApp’s typing indicator before the reply lands.
A 1–3 second typing delay before a reply makes the bot feel more human without slowing the conversation down.

Clone or delete a component

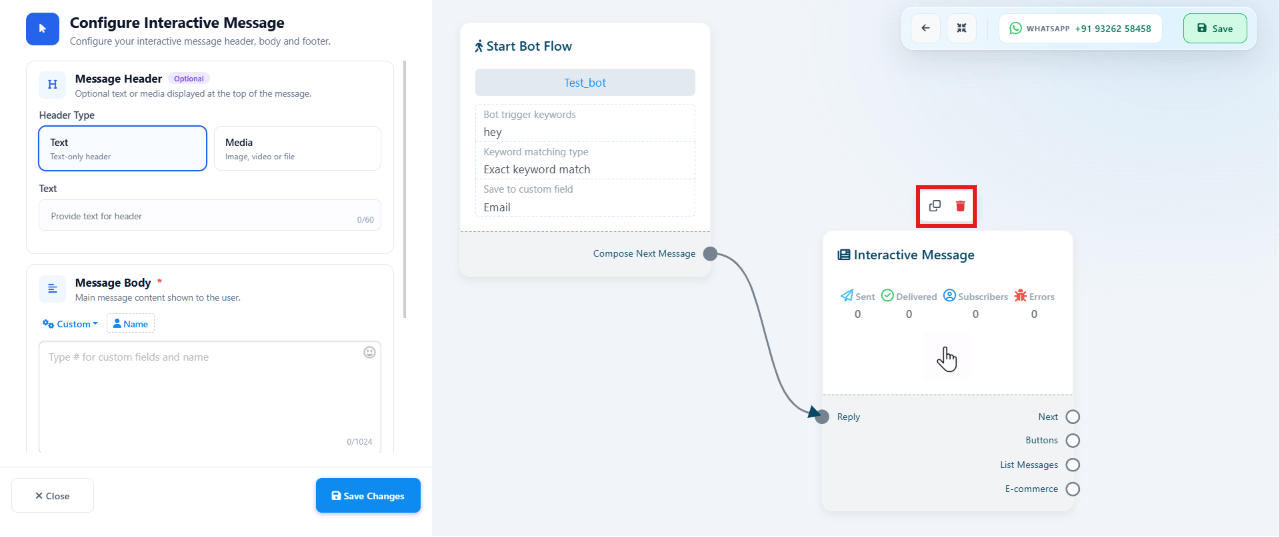
A flow block with clone and delete icons visible on hover
Hover any block on the canvas to reveal two small icons above it: the first clones the block (handy for reusing a configured component without rebuilding it), the second deletes it permanently.
Clone a block before making a major change to it — that keeps a backup copy on the canvas in case you want to revert.

Save & validation

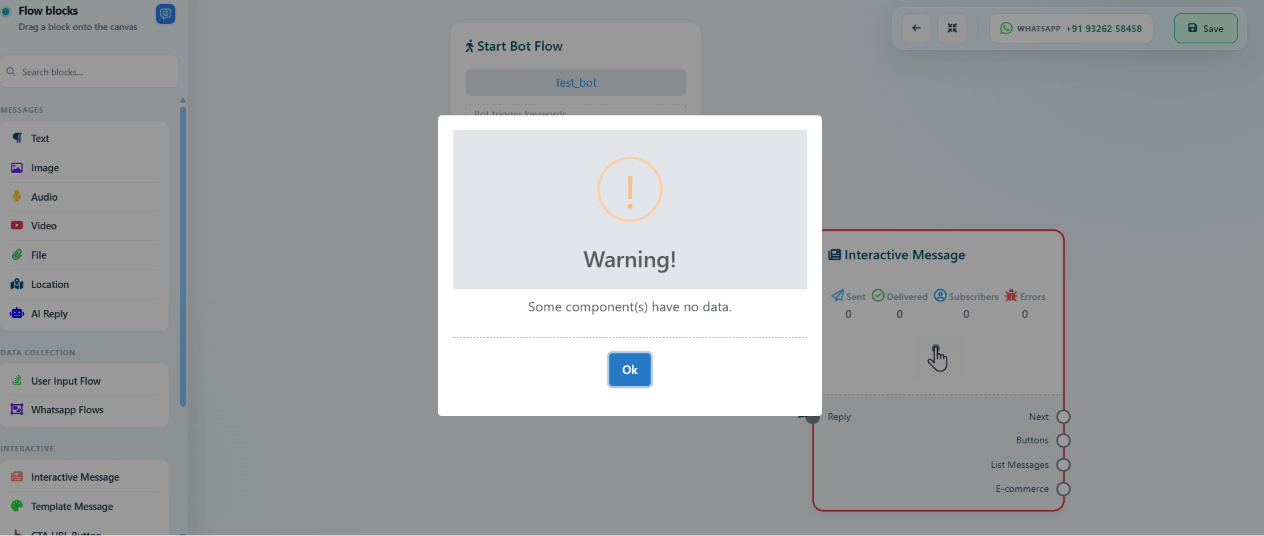
Warning dialog: Some component(s) have no data
Before saving, every required field on every connected component must be filled in — a missing button text on an Interactive Message, or empty content on a Text Message, blocks the save and shows a validation warning.
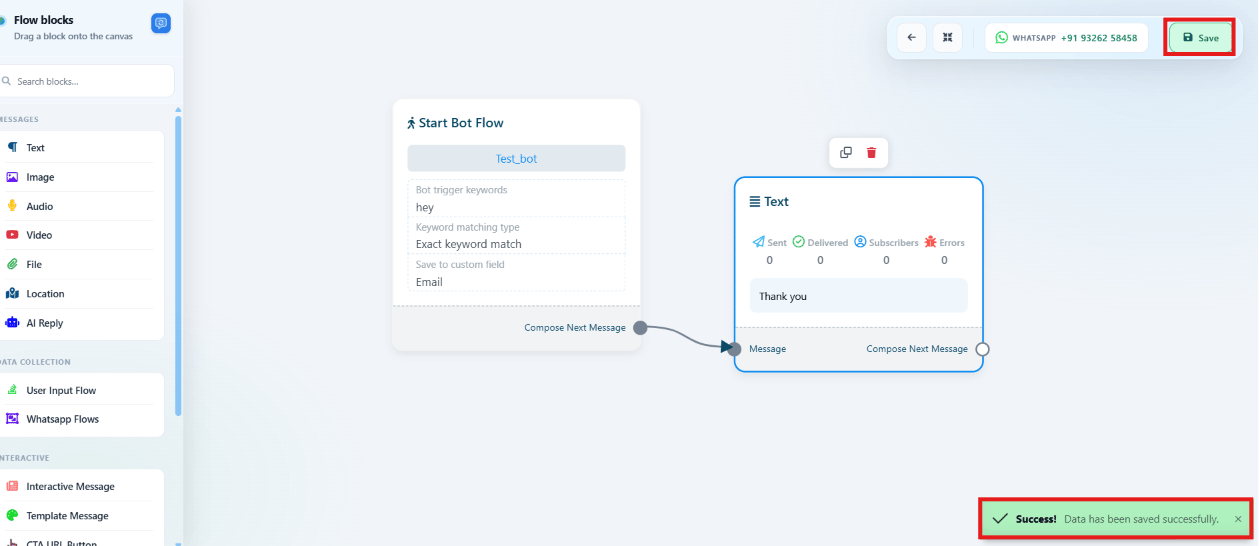
Start Bot Flow connected to a Text reply with a Data has been saved successfully toast
Once every component is complete, click Save — a success confirmation appears and the flow is live.

Manage your flows

Back on the Keyword Replies list, each flow has its own row of action icons:
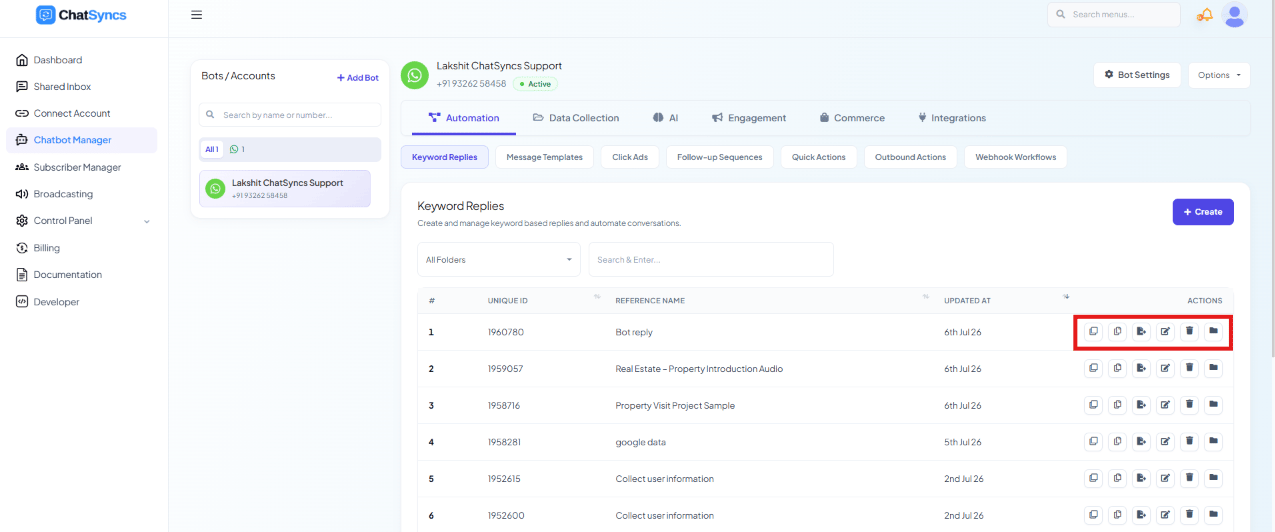
Keyword Replies list row with six action icons highlighted: duplicate, copy to other bot, export flow data, edit, delete, and move to folder

Frequently asked

A trigger keyword — the word or phrase that starts the flow, set on the Start Bot Flow block. Connect a Text Message or Interactive Message block after it, save, and it fires whenever a customer’s message matches.
Yes — build a separate flow per keyword (or group of keywords), each with its own trigger and its own reply.
Yes — use User Input Flow blocks to ask for each value, and map each answer to a Custom Field under Data & Integrations. You can then forward the data to a webhook or sync it to Google Sheets automatically.
A connected component is missing required data — e.g. an Interactive Message with no button text, or an empty Text Message. ChatSyncs shows a validation warning naming the incomplete component; fill it in and save again.
Exact keyword match fires only when the customer’s message is exactly one of your trigger keywords. String match also fires if a trigger keyword appears anywhere inside a longer message. If your bot isn’t firing on messages you expected, check which matching type the Start Bot Flow block is set to — Exact match is stricter and will miss typos or extra words.
Open Start Bot Flow → Configure Reference, remove its Trigger Keywords, and save. With no keywords left to match, the flow stops firing for any customer message, but it stays in your Keyword Replies list — add the keywords back any time to turn it on again.

Learn From a Use Case