How to Set Up Quick Actions (No Match, Get Started, and More) in ChatSyncs
How to set a fallback reply, welcome new chats, and use ChatSyncs’ 9 built-in Quick Actions instead of building automation for them from scratch.
Quick Actions are 9 ready-made triggers for common events — instead of building automation
from scratch, you just wire a flow to an event ChatSyncs already recognizes. Two of the most
common ones shape a customer’s first impression of your bot:
No Match Reply — what the bot sends when a customer’s message doesn’t match any trigger
keyword.
Frequency — how often the Get Started message is allowed to repeat for the same
customer.
Example: A customer types pizza, but no flow is set up for that word. Instead of silence,
No Match Reply fires: “Sorry, I didn’t quite get that — type ‘menu’ to see what I can
help with.”
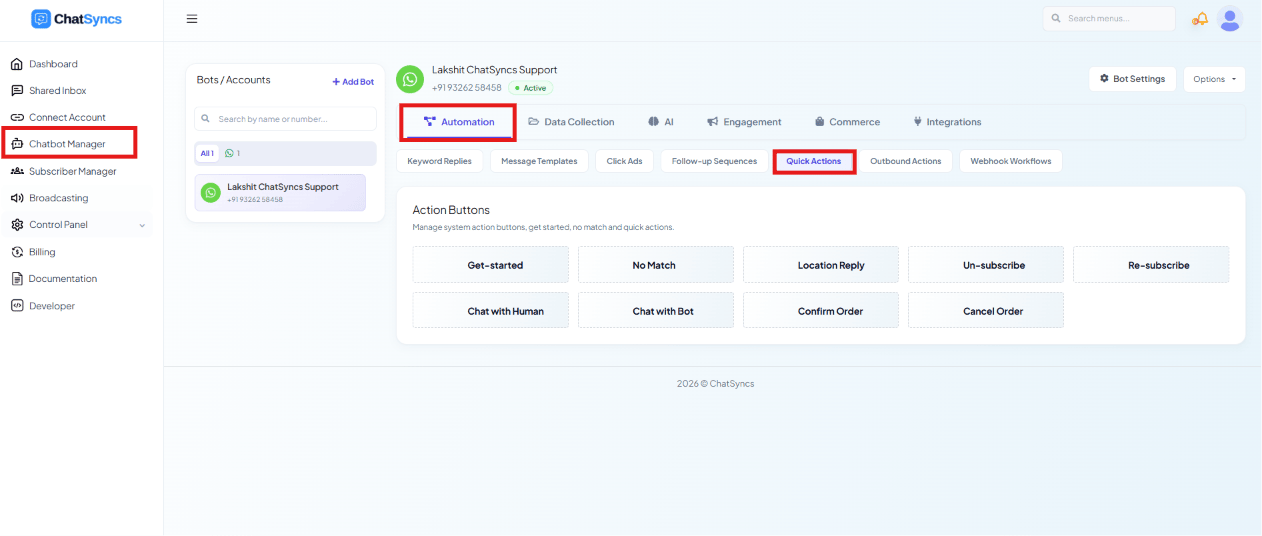
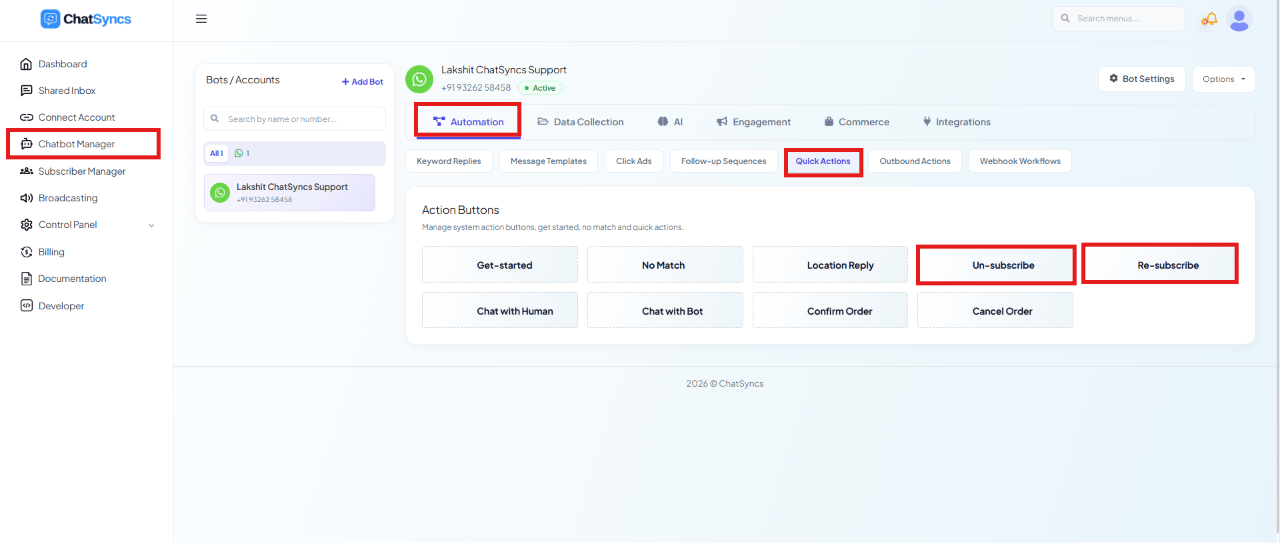
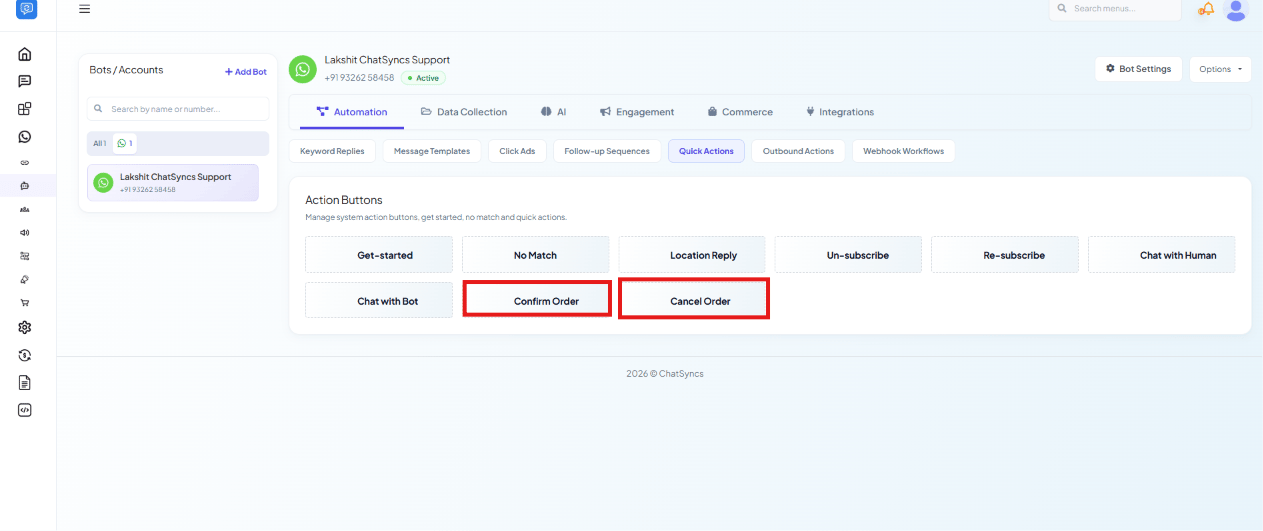
The 9 tiles: Get-started, No Match, Location Reply, Un-subscribe,
Re-subscribe, Chat with Human, Chat with Bot, Confirm Order, and Cancel
Order.
Get-started, No Match, and Location Reply fire automatically from a system event —
click their tile to build the flow that runs when that event happens. The other 6
(Un-subscribe, Re-subscribe, Chat with Human, Chat with Bot, Confirm Order,
Cancel Order) only run when you add them as the action on a button inside an Interactive
Message block — they can’t be added to a Text, Image, or other message block.
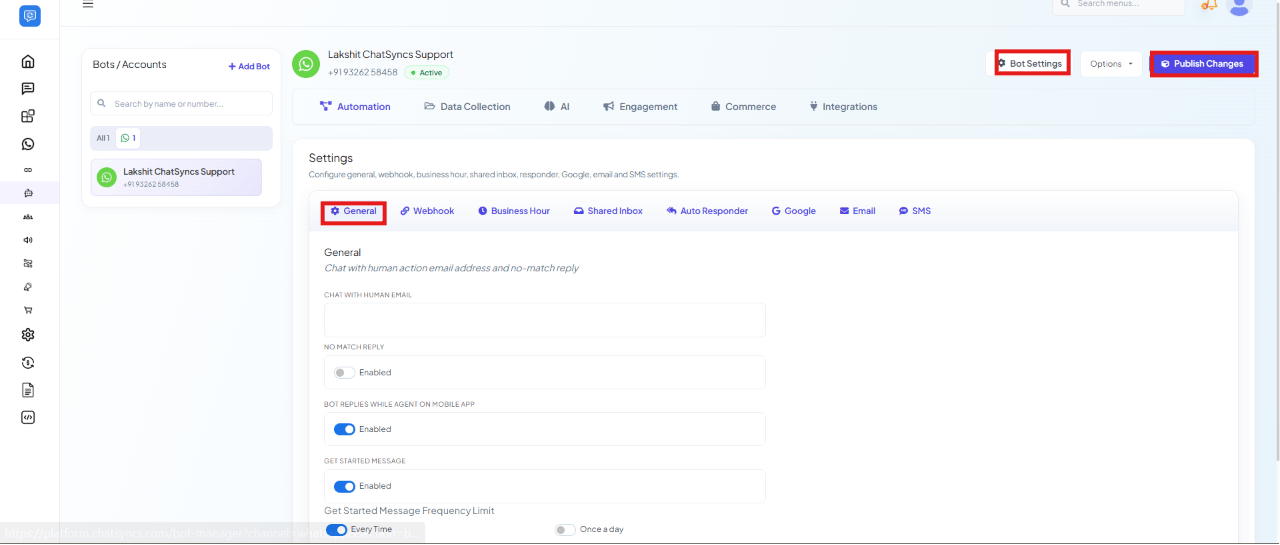
To use the Get-started and No Match actions, first go to Bot Settings → Settings →
General and turn their Enable toggle ON. Chat with Human doesn’t have a toggle —
it works as soon as you fill in the Chat with Human Email field below.
If the Enable toggle for Get Started Message or No Match Reply is turned OFF, the
matching action button will not work.
1
Open Bot Settings
Click the Bot Settings button.
2
Go to Settings
Open the Settings page.
3
Open the General tab
It’s the first tab, selected by default.
4
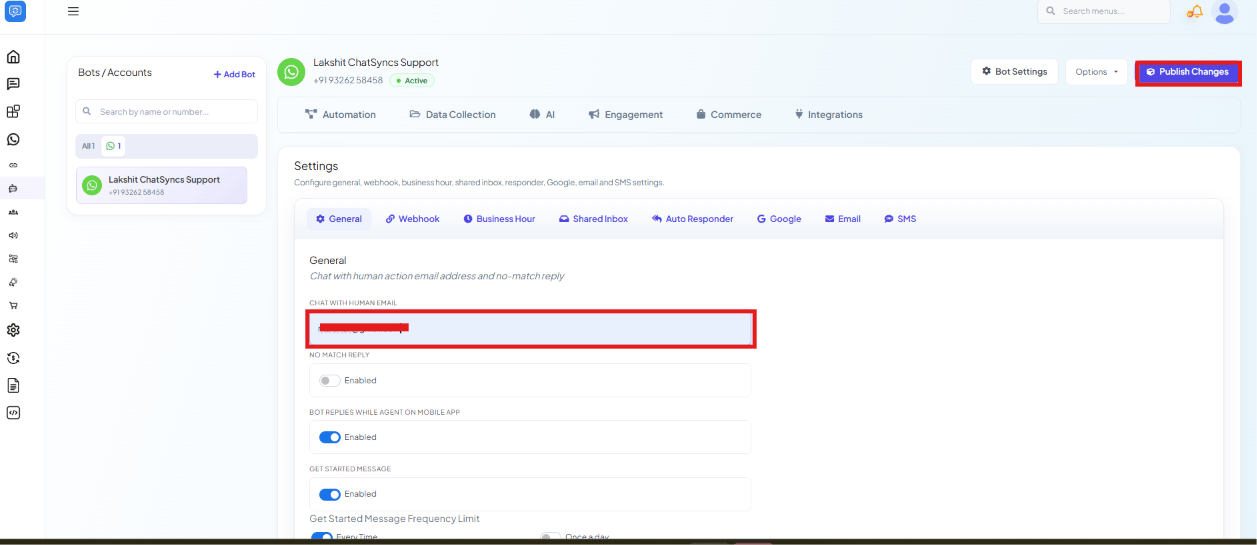
Set the fields you need
See the table below.
5
Publish
Click Publish Changes — a confirmation banner confirms it.
Field
What it does
Chat with Human Email
The email address notified whenever a customer requests Chat with Human.
No Match Reply
Enable/disable the bot’s automatic reply when it can’t match the customer’s message to any automation.
No Match Response Frequency Limit
How often the No Match reply is sent to the same customer: Every Time, Once a Day, Once a Month, or Once a Year.
Bot Replies While Agent on Mobile App
Whether the bot keeps replying while a live agent is handling the chat from the mobile app.
Get Started Message
Enable/disable the Get-started action button. Must be on before the Get-started flow will run.
Get Started Message Frequency Limit
How often the Get Started message is sent to the same customer: Every Time or Once a Day.
Disable Bot Replies While Agent on Mobile App so the bot and a live agent don’t reply to the
same customer at the same time.
When someone opens a chat with your WhatsApp number for the very first time — say, they found
your number on your website and tapped it to open WhatsApp — they haven’t sent you a message
yet, so WhatsApp shows a green Get Started button on the chat screen instead of a normal
text box. This button is built into WhatsApp itself, not something ChatSyncs adds. The
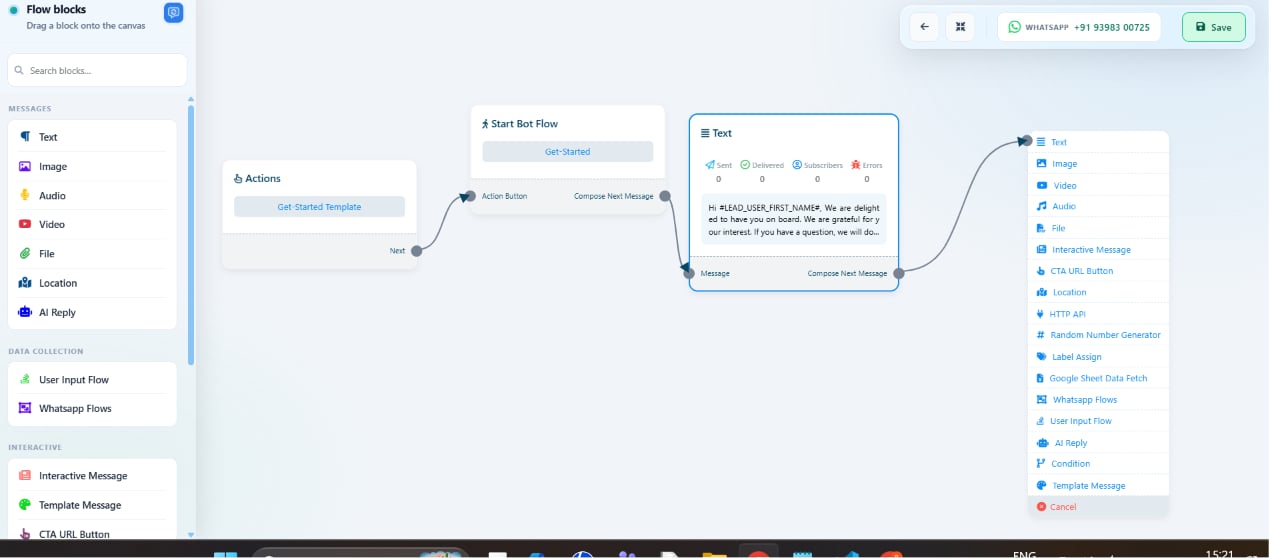
Get-started action fires the moment that customer taps it.
Get Started Message must be enabled in General Settings (above) before this button will
trigger anything.
1
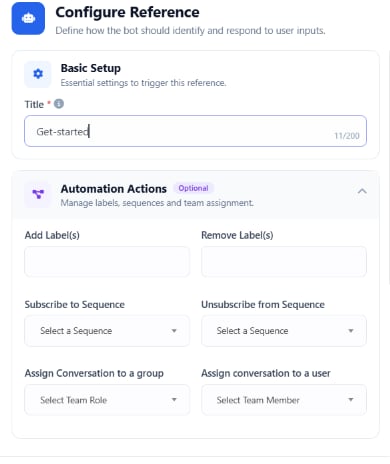
Open the Get-started tile
In Quick Actions, click Get-started to open its Configure Reference panel.
2
Give it a title
e.g. Get-started — just for your own reference in the flow list.
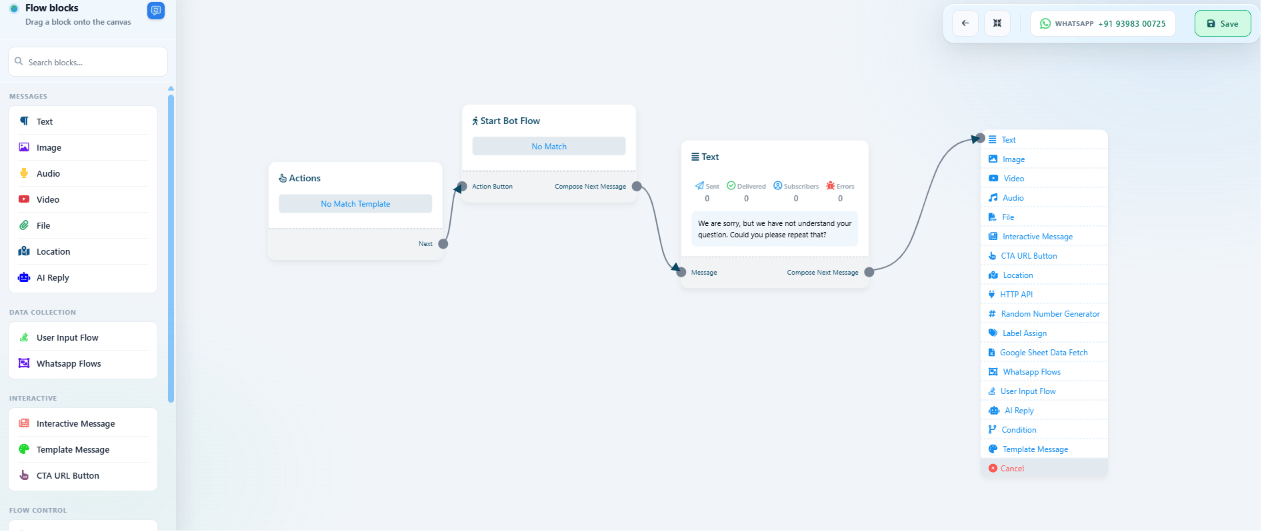
The No Match button fires whenever a customer’s message doesn’t match any keyword, intent,
or automation. Click its tile, then build the fallback reply the same way:
1
Open the Text block
It’s already connected to the No Match trigger.
2
Write a fallback message
Replace the default text with something specific to your business, e.g. “Hello! We
couldn’t understand your request. Please select one of the available options below or
rephrase your question.”
3
Connect further blocks (optional)
e.g. Interactive Message, AI Reply, Human Support, or any other automation block.
4
Save
Click Save to publish the flow.
The No Match Response Frequency Limit (in General Settings above) controls how often
the same customer receives this fallback — pick Once a Day or longer to avoid sending it
repeatedly to someone who keeps sending unrecognized messages.
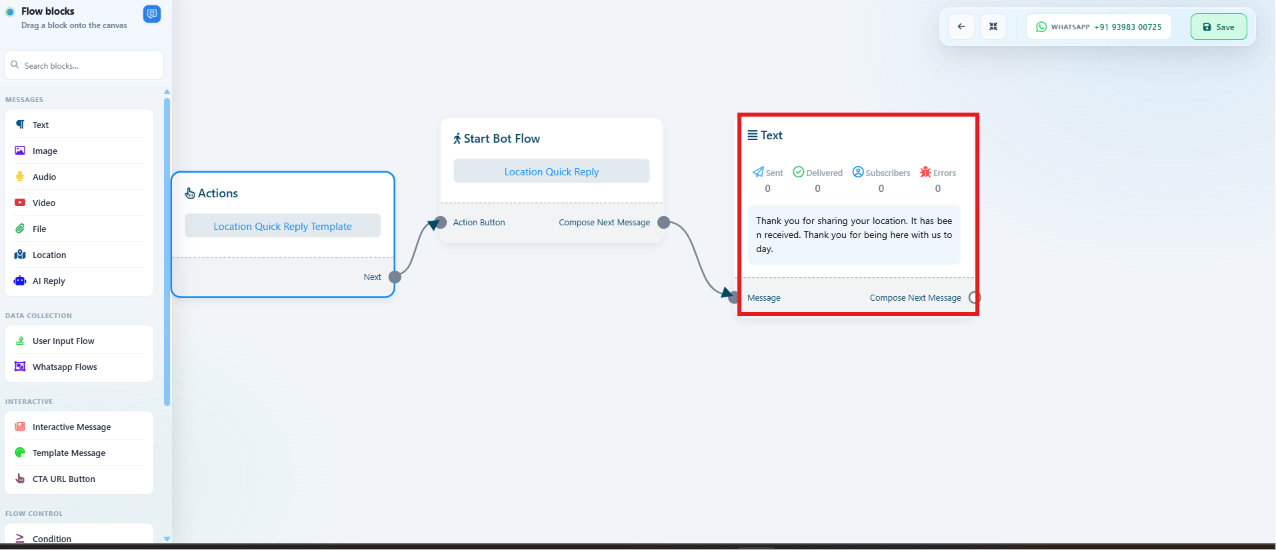
The Location Reply button fires automatically whenever a customer shares their live
location or a location pin — no toggle to enable, just build the flow:
Example:
Customer
shares a location
Bot
”Thank you for sharing your location. Our team has received it and will assist you shortly.”
Unlike the three buttons above, Un-subscribe and Re-subscribe aren’t standalone triggers
— they’re button actions you add inside an Interactive Message block.
1
Go to Keyword Replies
Open Keyword Replies — see How to Create a Keyword-Based WhatsApp
Chatbot — and create a new flow (or open an existing one) — this is the flow the
Interactive Message and its button will live in.
2
Add an Interactive Message block
Drag it onto the canvas and connect it to your flow.
3
Add a button
Open the Interactive Message block and click Add Button.
4
Set the button's title and generation method
e.g. Static, title Unsubscribe.
5
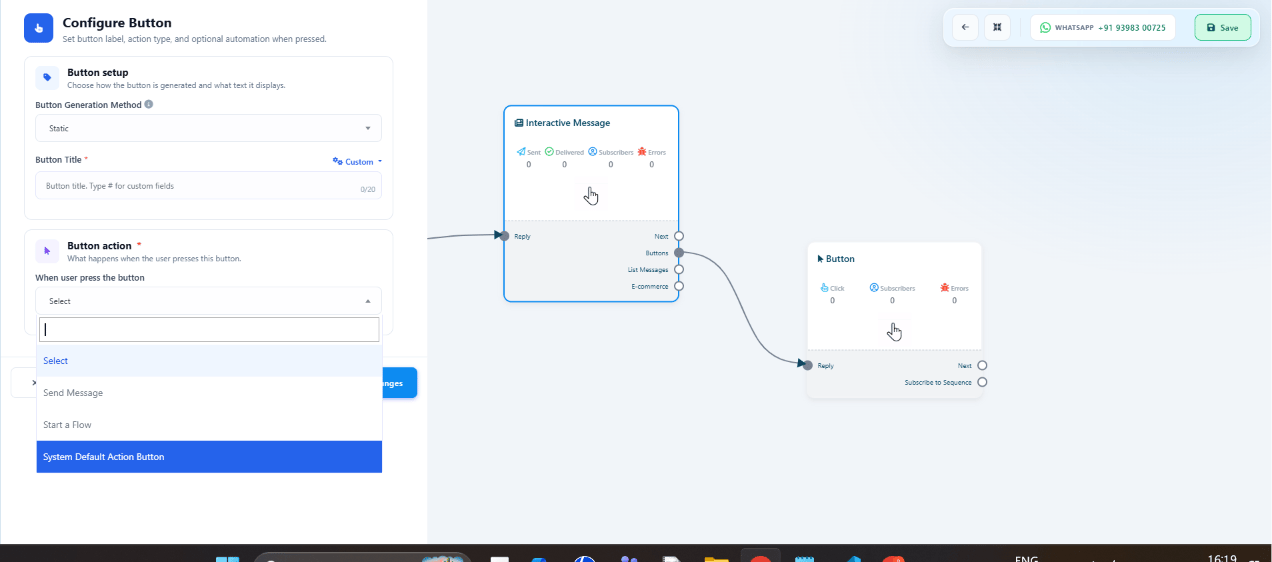
Choose System Default Action Button
Under When user presses the button, select System Default Action Button.
6
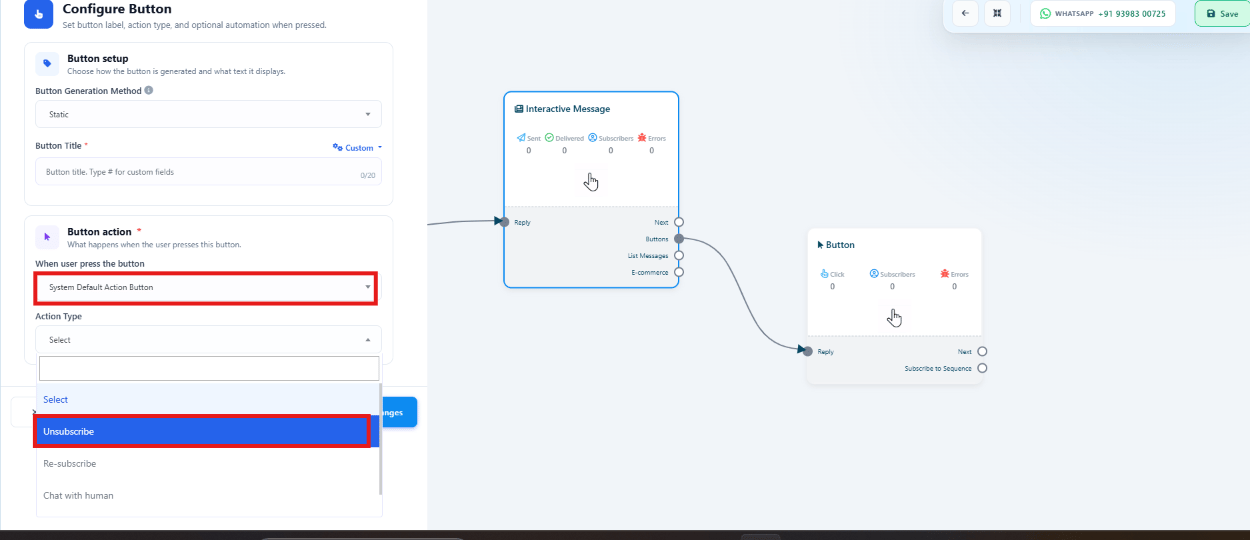
Pick the action
Choose Unsubscribe (or Re-subscribe) from the Action Type list.
7
Connect and save
Connect the button to any follow-up flow (e.g. a confirmation message), then click Save.
Unsubscribe stops sequences and broadcasts for that contact. Re-subscribe is its mirror
— it re-adds the contact to the sequences/broadcasts they’d opted out of, configured the exact
same way except for choosing Re-subscribe as the Action Type.
These same steps work for every other System Default Action Button — Get Started, No
Match, Location Reply, Chat with Human, Chat with Bot, Confirm Order, and
Cancel Order — just select the matching Action Type instead of Unsubscribe.
The Chat with Human button lets a customer request a live agent. ChatSyncs emails the
address set as Chat with Human Email in General Settings and starts the Chat with
Human flow.
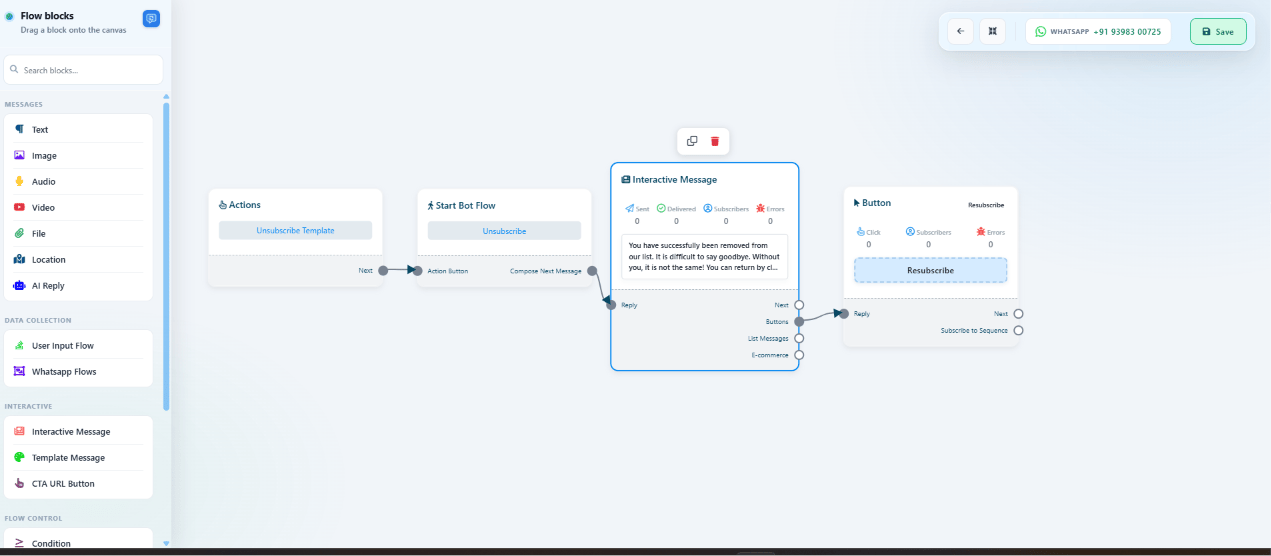
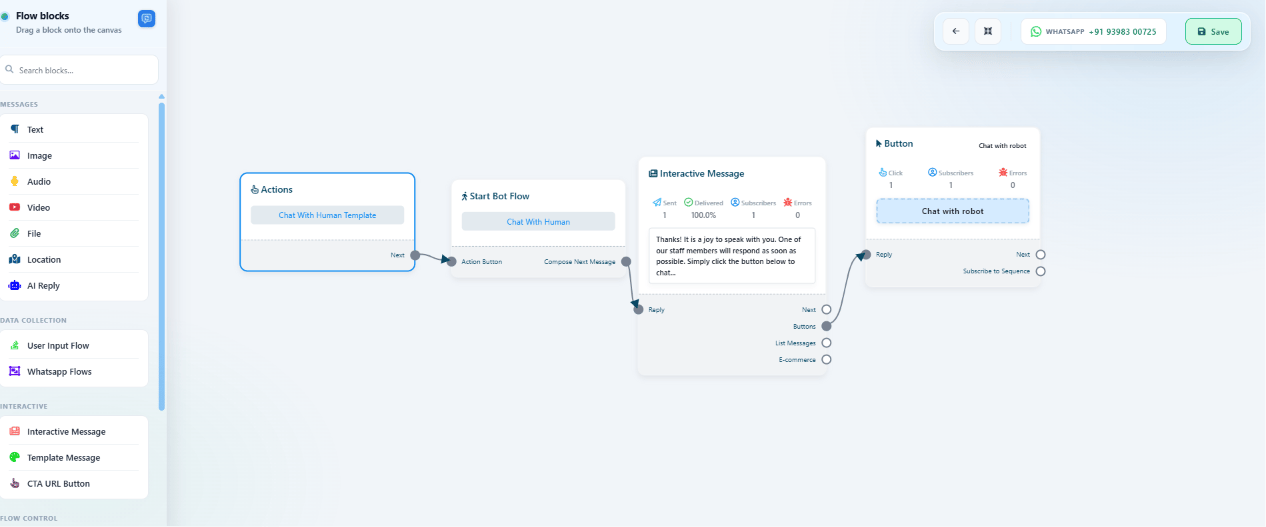
Build the flow with an Actions block selecting the Chat With Human Template, connected
to Start Bot Flow, then an Interactive Message thanking the customer with a button to switch
back to the bot (configured as a System Default Action Button → Chat with Bot):
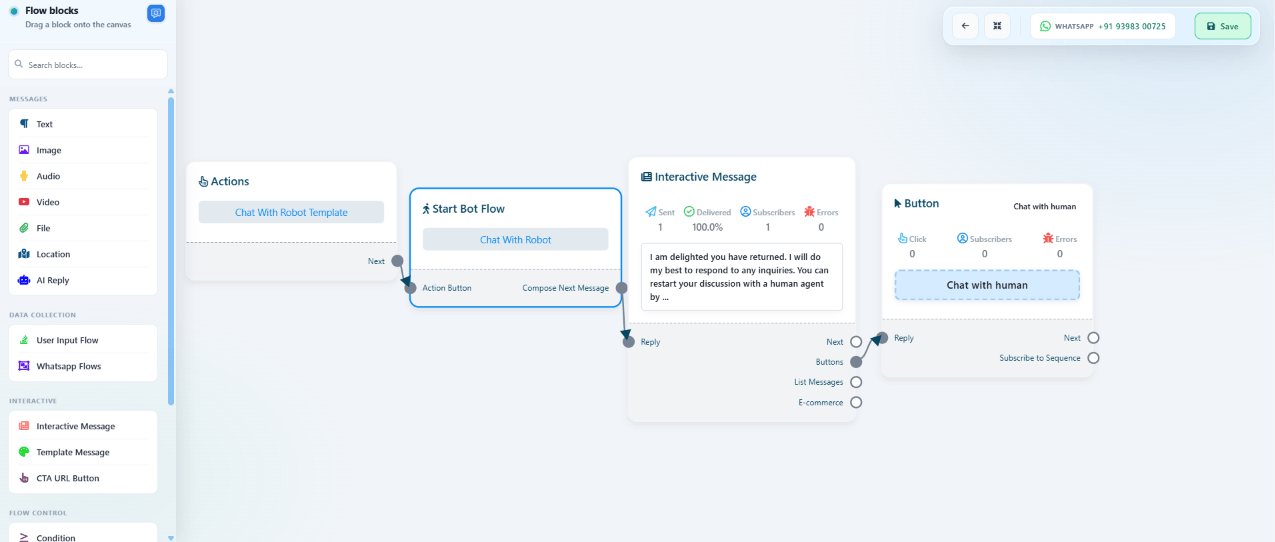
The Chat with Bot button is the reverse — it lets a customer who’s talking to a live agent
switch back to automated replies. Build it the same way: Actions block selecting the Chat
With Robot Template, connected to Start Bot Flow, then an Interactive Message welcoming
the customer back with a button to switch to a human agent again (System Default Action
Button → Chat with Human):
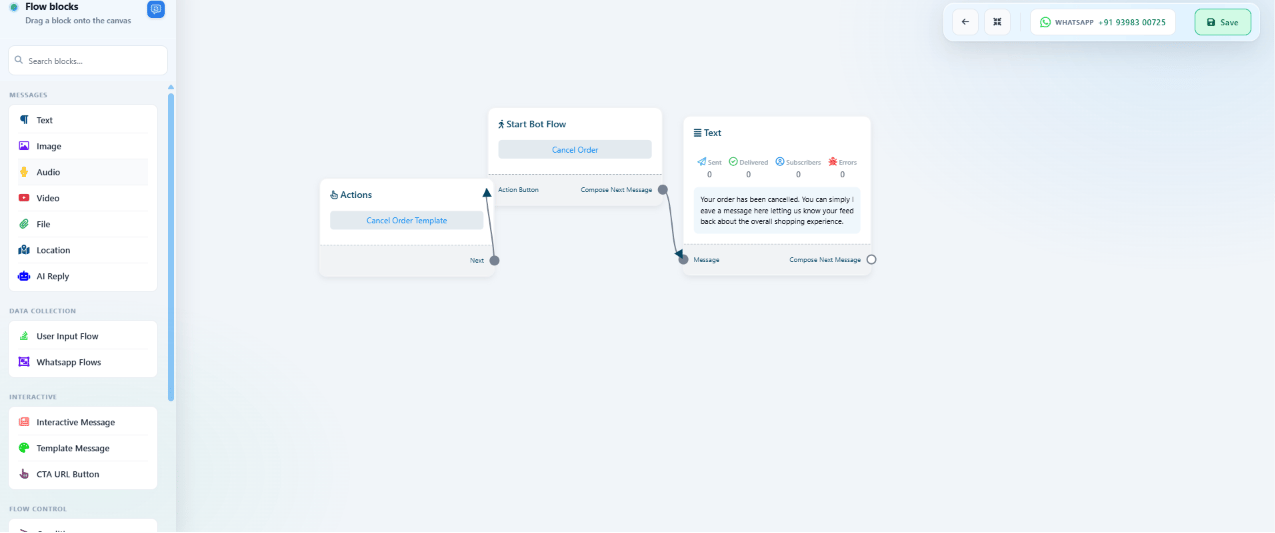
Confirm Order and Cancel Order are system default action buttons for eCommerce
integrations only — they fire from order events on a connected Shopify or WooCommerce
store, not from a normal chatbot conversation.
Confirm Order works the same way, triggered when the customer confirms instead of cancels.
If your store isn’t on Shopify or WooCommerce, you don’t need to configure either button.
My bot doesn't reply when it doesn't understand a message — how do I fix that?
Enable No Match in General Settings above and build a fallback flow for it — otherwise
unmatched messages get no reply at all.
Why does my Get Started message keep repeating for the same customer?
Check the Get Started Message Frequency Limit in Bot Settings → Settings →
General — it controls how often it’s allowed to resend to the same person.
How do I add an Unsubscribe button to my bot?
Add an Interactive Message block with a button, set When user presses the button to
System Default Action Button, choose Unsubscribe as the Action Type, then connect
and save. See Un-subscribe & Re-subscribe above.
Where do I change the email that gets notified when a customer asks for a human?
Bot Settings → Settings → General → Chat with Human Email. Every Chat with Human
request emails that address.
Why isn't my Get-started flow running?
Check that Get Started Message is enabled in Bot Settings → Settings → General —
the Get-started action button does nothing while that toggle is off.
What's the difference between Get-started/No Match/Location Reply and the other action buttons?
Get-started, No Match, and Location Reply trigger automatically from a system event — you
build a flow directly off their tile. The rest (Unsubscribe, Re-subscribe, Chat with Human,
Chat with Bot, Confirm Order, Cancel Order) only run when added as a button’s action inside
an Interactive Message block.
Can I use Confirm Order or Cancel Order without Shopify or WooCommerce?
No — they’re only triggered by order events from a connected Shopify or WooCommerce store
and aren’t meant for regular chatbot flows.
Get-started silently does nothing if Get Started Message is disabled in General
Settings — enable it first.
No Match needs No Match Reply enabled in General Settings, or the fallback never
sends.
System Default Action Buttons only work inside Interactive Message blocks — you can’t add
one to a Text, Image, or other message block.
Confirm Order / Cancel Order are eCommerce-only — they don’t fire from a normal chatbot
conversation.