

Business Problem
- Many clinics receive appointment requests through WhatsApp, and receptionists spend significant time asking every patient the same basic details — name, mobile number, department, preferred doctor, date, and time.
- This manual back-and-forth creates long response times and repetitive conversations.
- Information collected this way is often missing or incomplete.
- Reception staff face increased workload, especially during peak hours.
- Appointments become difficult to track and manage consistently across a busy day.
Solution
- Patients tap a Book Appointment button and complete one structured form instead of a back-and-forth conversation.
- Keyword Replies and Reply Buttons present a welcome menu, and tapping “Book Appointment” launches a WhatsApp Flow that collects Patient Name, Mobile Number, Department, Preferred Doctor, Appointment Date, Time, and any notes in a single screen.
- Submitted information is automatically stored as Custom Fields and can be synced to Google Sheets, email, or a hospital management system.
Business Benefits
- 24/7 appointment booking
- Faster response time
- Better patient experience
- Organized booking process
- Reduced receptionist workload
- Structured patient information
- Easy integration with existing systems
- Improved operational efficiency
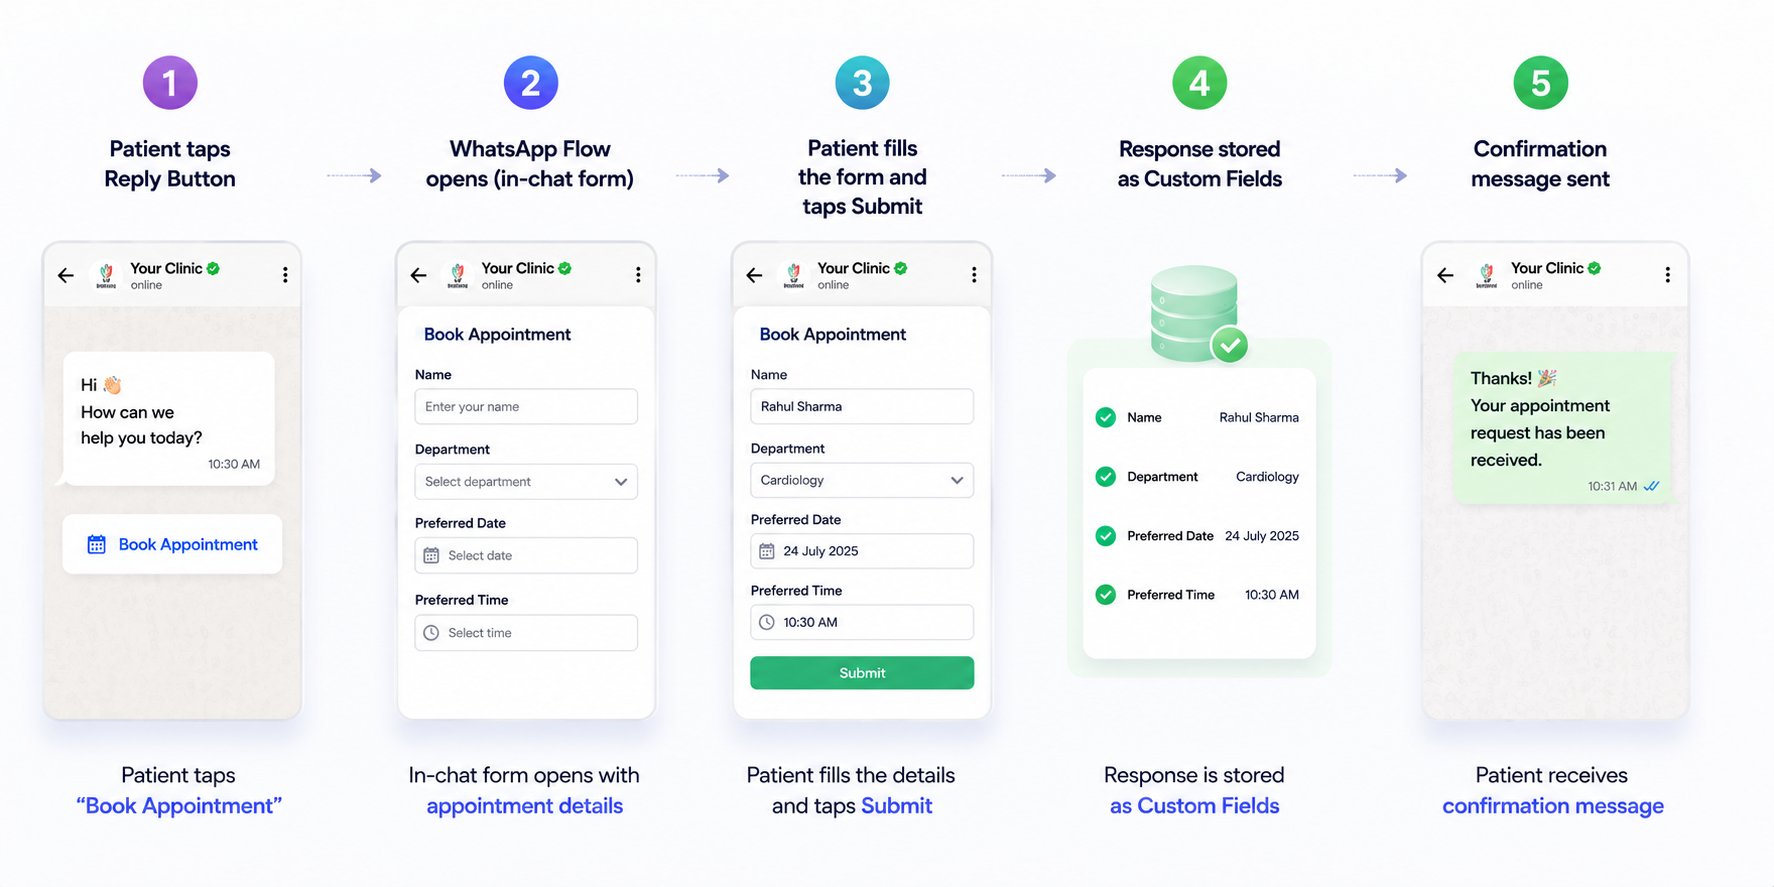
Workflow Diagram
Prerequisites
- Read Keyword Replies first to understand the flow builder these blocks connect through.
- Read WhatsApp Flows first to understand the in-chat form feature itself — this guide only covers what’s specific to this project.
- A WhatsApp number connected to ChatSyncs.
- The appointment fields decided in advance — Patient Name, Mobile Number, Department, Preferred Doctor, Appointment Date, Preferred Time, and any Additional Notes.
Implementation Guide
Step 1 — Send a welcome menu with Reply Buttons
Objective: Greet the patient and offer a menu of options, one of which starts the booking. Explanation: An Interactive Message can carry a welcome body and several Reply Buttons in one message, so the patient sees all their options immediately. Actions to perform:- Trigger the flow on a keyword (e.g. “hi”).
- Send an Interactive Message with body text like “Welcome to ABC Multispeciality Clinic. How can we assist you today?”.
- Add Reply Buttons for Book Appointment, Doctor Availability, Clinic Location, and Contact Reception.
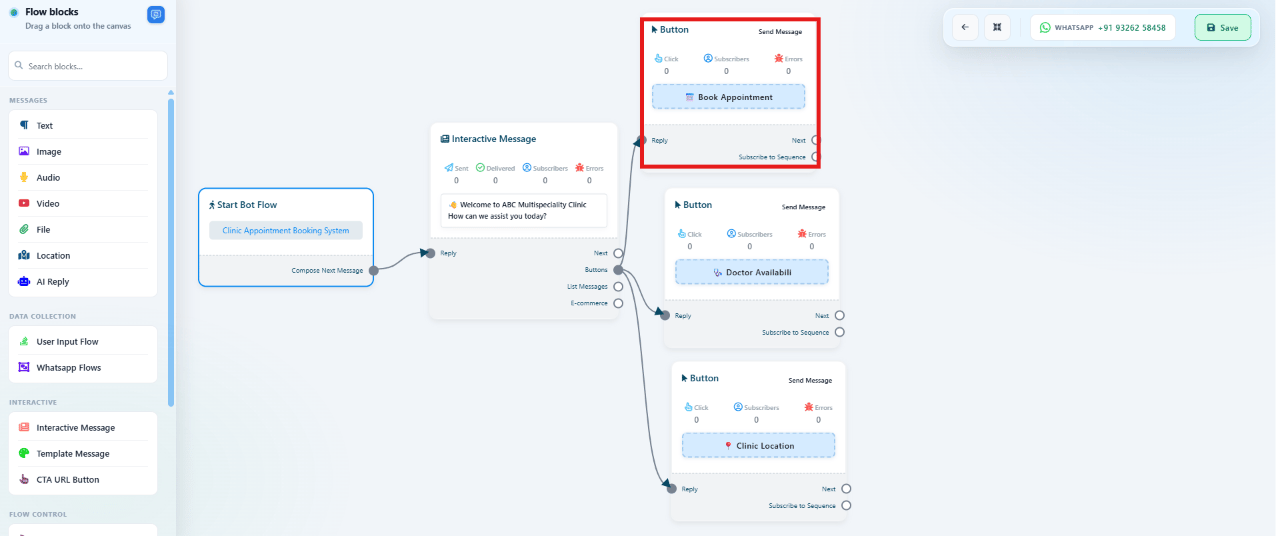
Step 2 — Connect “Book Appointment” to a WhatsApp Flow
Objective: Launch the structured booking form when the patient taps Book Appointment. Explanation: Instead of the bot asking each question one message at a time, the Book Appointment button connects directly to a WhatsApp Flow block, which opens the entire form at once. Actions to perform:- Connect the Book Appointment Reply Button’s Next output to a WhatsApp Flows block.
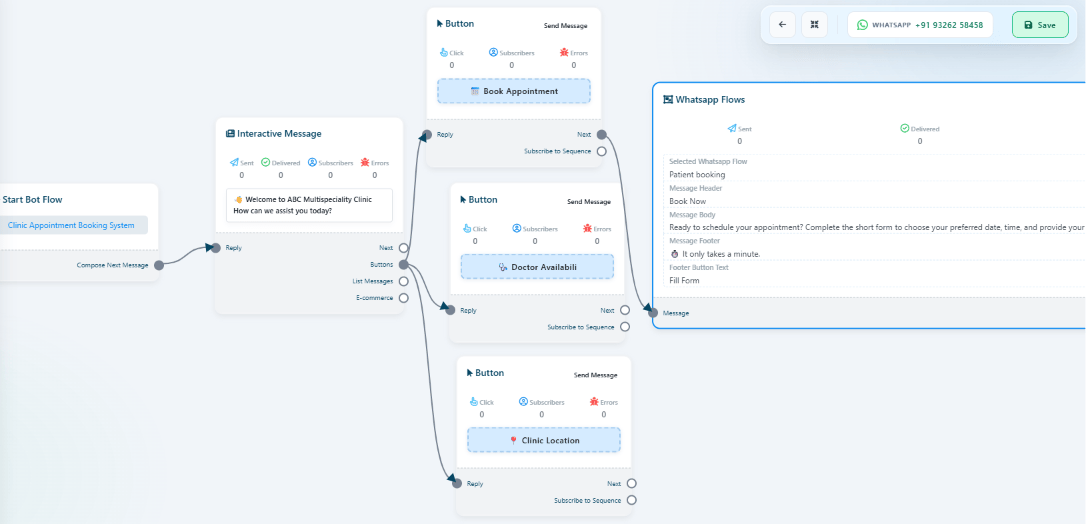
Step 3 — Configure the WhatsApp Flow’s form and messages
Objective: Build the actual appointment form the patient fills in. Explanation: The WhatsApp Flows block’s settings define which Flow is used and the message text shown before the form opens. Actions to perform:- Select the Flow (e.g. Patient booking).
- Set the Message Header and Message Body to introduce the form — e.g. inviting the patient to choose a preferred date, time, and provide their details.
- Set the Footer text (e.g. reassuring the patient it only takes a minute).
- Add the form fields: Patient Name, Mobile Number, Department, Preferred Doctor, Appointment Date, Preferred Time, Additional Notes.
![WhatsApp Flow builder showing Flow Name (Patient booking), Reply Sent After Form Submit (Booking appointment), Select HTTP API, WhatsApp Flow Data in Google Sheet connected to Customer Details [Sheet1], and the Booking appointment form with Full name, Contact no, Email ID, and Date Field](https://mintcdn.com/chatsyncs/Zr6osLEvJTtw61d3/images/learn/whatsapp-flows-use-case-clinic-appointment/step-03-flow-form-builder.png?fit=max&auto=format&n=Zr6osLEvJTtw61d3&q=85&s=f7fdcd67c0dc07d2a4a576bb472a46fc)
Step 4 — Map form fields to Custom Fields
Objective: Store every answer so it can be used in confirmations, reports, or integrations. Explanation: Each form field needs a place to be saved — Custom Fields are what make the submitted data usable afterward instead of disappearing into the chat log. Actions to perform:-
Map each form field to a Custom Field:
Custom Field Purpose patient_name Store patient’s name patient_phone Store contact number department Selected department doctor Selected doctor appointment_date Requested appointment date appointment_time Requested appointment time notes Additional patient notes
patient_name, not name1) — they’ll be reused
in the confirmation message and any Google Sheet or email integration.
Step 5 — Sync the submission to Google Sheet and notify staff by email
Objective: Get the booking out of ChatSyncs and in front of the reception team the moment it’s submitted, instead of someone having to check the chat. Explanation: While building the form itself, the same Custom Fields captured in Step 4 can be pushed straight out through a Google Sheet Integration and an Email Integration — no separate project needed, it’s just two more blocks on the same flow. Actions to perform:- Add a Google Sheet Integration block right after the WhatsApp Flow submission, and map each Custom Field to a sheet column: Patient, Phone, Department, Doctor, Date, Time, Status (see Google Sheet Integration).
- Add an Email Integration block on the same path, so the relevant department’s inbox gets notified with the patient’s details the moment the form is submitted (see Email Integration).
Step 6 — Send the confirmation message
Objective: Let the patient know their request was received. Explanation: A brief confirmation closes the loop for the patient while the reception team reviews the request on their end. Actions to perform:- After the Flow submission, send a Text Message:
Features Used
| Feature | Purpose | Documentation |
|---|---|---|
| Keyword Replies | Runs the welcome menu and the whole flow | Keyword Replies |
| Reply Buttons | Menu options (Book Appointment, Doctor Availability, Clinic Location) | Keyword Replies |
| WhatsApp Flows | The structured, multi-field appointment form | WhatsApp Flows |
| Custom Fields | Stores each submitted answer | Subscriber Manager |
| Google Sheet Integration | Syncs every appointment to a spreadsheet the front desk uses | Google Sheet Integration |
| Email Integration | Notifies staff the moment a booking comes in | Email Integration |
| Feature | Purpose | Documentation |
|---|---|---|
| HTTP API | Connect to an external hospital management system | HTTP API |
| AI Agent | Answer common questions (timings, fees, insurance) before or after booking | AI Agent |
| Sequence | Send appointment reminders or follow-ups | Follow-up Sequences |
Expected Result
- Patients can book an appointment at any hour without waiting for a reply.
- Every booking captures the same complete set of fields — no missing information.
- Reception staff review structured, consistent booking requests instead of scattered chat messages.
- The process scales the same way during peak hours as it does during quiet ones.
FAQs
What happens to the information the patient submits?
What happens to the information the patient submits?
Each field is stored as a Custom Field on the subscriber — see Step 4 above — ready to use
in confirmations, reports, or synced out to a Google Sheet or email notification.
Can this notify staff automatically instead of them checking ChatSyncs?
Can this notify staff automatically instead of them checking ChatSyncs?
Yes — this project already does, via the Email Integration and Google Sheet Integration
built in Step 5. For a deeper integration, an HTTP API call can also push the booking into an
external hospital management system — see the Optional integrations table above.
Can an AI Agent answer questions before or after booking?
Can an AI Agent answer questions before or after booking?
Yes — an AI Agent can handle common questions like clinic timings, doctor availability,
consultation fees, accepted insurance, required documents, or parking, and hand off to a
human receptionist if the patient needs more help.
Can this same setup work for a business that isn't a clinic?
Can this same setup work for a business that isn't a clinic?
Yes — any business that collects a small, fixed set of details before a booking (a salon, a
gym, a real estate agency) can use the same welcome-menu → WhatsApp Flow → Custom Fields
pattern, just with different fields.