

Three pillars, one workforce
Every agent you build rests on three pieces. Skip any one of them and the chain breaks.Knowledge Sources — the foundation
This is where an agent’s training data lives: FAQs, URLs, files, a Google Sheet, an API, or uploaded media. Different agents need different knowledge — a Support agent needs troubleshooting docs, a Sales agent needs pricing, a Media agent needs a product photo library. See How to Train Your AI Chatbot for the full walkthrough of each source type.AI Agent — the brain
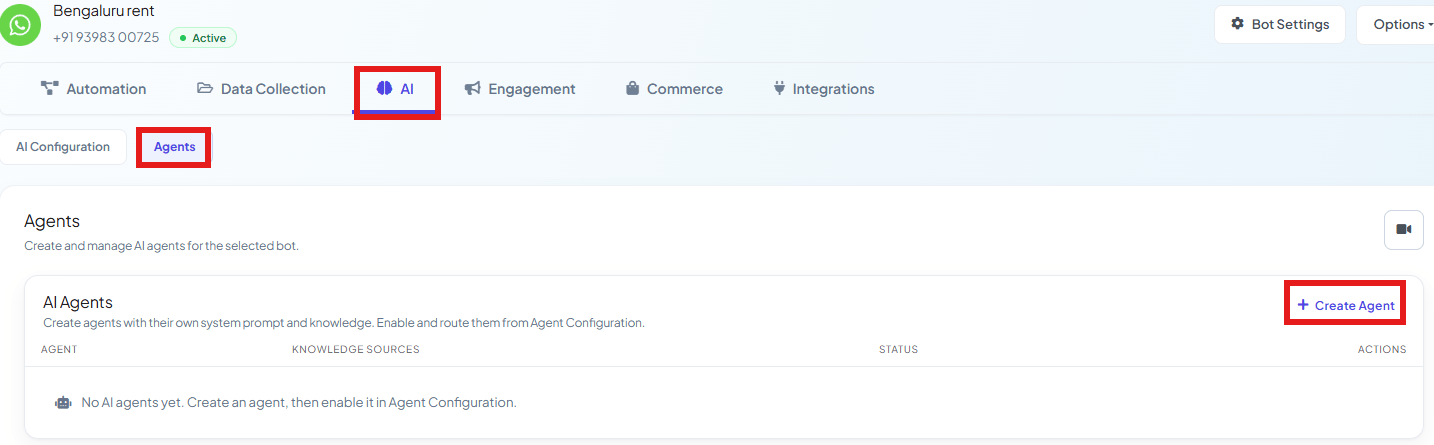
##action## it triggers — is what turns
a passive chatbot into a digital worker that actually completes tasks.
Worked example: Support, Sales, and Media agents
Three specialized agents, each with a narrow job:Step 1: Train each agent’s Knowledge Sources
1
Sales Agent — Content or FAQ
Paste your pricing plans, feature lists, and qualification criteria straight into the
Content/FAQ box — the fastest way to get a sales agent answering accurately. (A connected
Google Sheet works too, if your pricing changes often and you want it to stay in sync
automatically.)
2
Support Agent — URL
Point it at your help center or documentation pages. Use the Fetch/Remove Content
Configuration selectors to strip navigation, footers, and ads so only the real
troubleshooting content gets learned.
3
Media Agent — Media
Upload product photos directly under Media, with a short, accurate description for each
one (e.g. “Red cotton kurti, size M, price 1200”). ChatSyncs uses these descriptions to
match the right photo to what a customer asks for.
Step 2: Write each agent’s System Prompt

Step 3: Set up the Media Agent
Step 4: Activate agents and set up routing
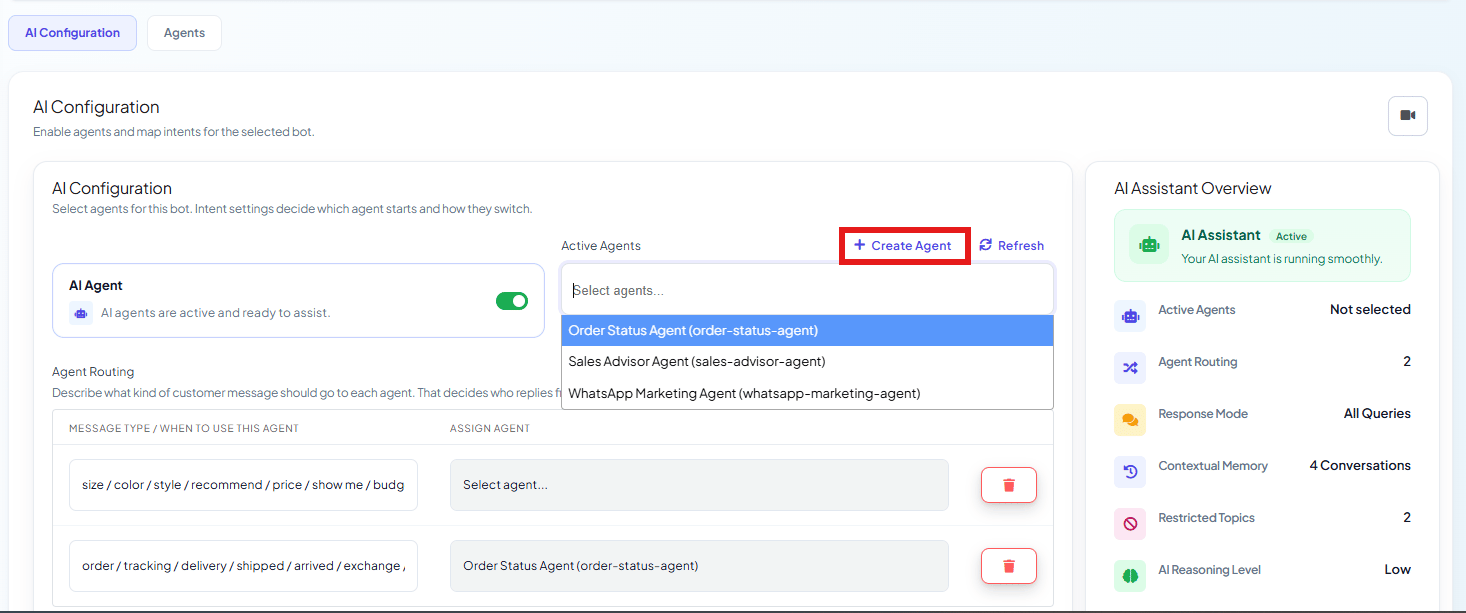
Routing reads intent, not just exact keywords — “How much would this cost for a small
business?” routes to the Sales Agent without containing the word “pricing.” And if a
customer’s intent shifts mid-conversation, the conversation can hand off to a different agent’s
rule automatically — see Agent Routing for how transfers work.
Step 5: Finish the global settings
A few settings from How to Create Your First AI Agent are worth setting deliberately for a multi-agent setup:- Contextual Memory — on, so agents remember earlier messages instead of asking the same question twice.
- Enable Typing on Indicator — on, for a more natural pace between message and reply.
- Restricted Topics — set per agent so each one stays inside its lane — see How Do I Restrict AI on Specific Keywords?.
Test before going live
Run each agent through a full conversation before activating it for real customers. Confirm it:- Answers accurately from its own Knowledge Source, not another agent’s.
- Asks for missing information naturally, without repeating questions already answered.
- Saves data to the correct custom fields.
- Triggers the right action at the right condition — not too early, not missed.
- Sends images only when explicitly asked (Media agent).
- Escalates or labels a contact without duplicating the action on a retry.
- Handles an ambiguous or unexpected message without inventing an answer.
Why this is worth the extra setup
- Precision training eliminates noise — each agent only draws from its own Knowledge Source, so the Support agent never confuses a pricing question with a refund policy.
- Autonomous actions replace manual work — labeling, escalation, and follow-up enrollment happen the moment their condition is met, without a human reviewing every conversation first.
- Conditional media delivery keeps conversations clean — images only arrive once a customer actually asks, instead of cluttering every reply.
Frequently asked
How many agents should I actually build?
How many agents should I actually build?
Start with one broad agent. Split into specialized agents once you notice one prompt trying
to juggle clearly different jobs — e.g. sales vs. support vs. sending media — each with
different knowledge and different actions.
Can I send an image directly from the System Prompt with a URL?
Can I send an image directly from the System Prompt with a URL?
Not confirmed for ChatSyncs — the product’s own System Prompt Actions reference says not to.
Upload images under Knowledge Sources → Media instead; the agent fetches them from there.
What stops two rules from both matching the same message?
What stops two rules from both matching the same message?
Write routing rules around distinct message types so overlap is rare. Where a message could
reasonably match more than one, put the more specific rule first — see Agent
Routing.
Can one agent hand off to another mid-conversation?
Can one agent hand off to another mid-conversation?
Yes — either through matching a different Agent Routing rule as the conversation moves on, or
explicitly via a
##transfer_agent## action in the System Prompt. See AI Agent
Actions.Do I need to build all agents before testing any of them?
Do I need to build all agents before testing any of them?
No, but build at least two before testing routing specifically — with only one agent active,
every message goes to it regardless of any rule, so you can’t actually see routing decide
anything.