Say Rahul runs a clothing store with 500 WhatsApp subscribers and wants to tell all of them about a weekend sale. Opening 500 separate chats isn’t realistic — so instead, he creates one broadcast: a single message that ChatSyncs sends to every subscriber he picks, all at once. Every campaign he creates shows up in the WhatsApp Broadcasting list afterward, along with how many people actually received and opened it.

Before you start

  • A WhatsApp Business Account connected to ChatSyncs, with an active phone number.
  • A subscriber list already in ChatSyncs — import one first if you haven’t, via How Do I Import Subscribers Using a CSV File?, How Do I Import Subscribers from Google Sheets?, or How Do I Add a Subscriber Manually?.
  • An approved Message Template, if you’re sending an Anytime broadcast (the type most people use). Meta has to approve a template before it can be used, and that can take anywhere from a few minutes to a full day. Example: you want to send a “Diwali Sale” message to 1,000 customers today, but your template still shows Pending — the broadcast can’t go out until Meta approves it, so it’s faster to get the template approved before you sit down to build the campaign, not while you’re building it.
  • Read WhatsApp Rules: How to Never Get Banned first — a broadcast is exactly the kind of send that can hurt your quality rating if the audience didn’t opt in or isn’t engaged. See What WhatsApp API Pricing Really Means too, since every broadcast recipient outside their Customer Service Window is a paid template send.

Create a broadcast campaign

In the left-side menu of ChatSyncs, Broadcasting has its own button, separate from Chatbot Manager and Subscriber Manager — it’s not hidden inside either of those. Click Broadcasting directly to get started.
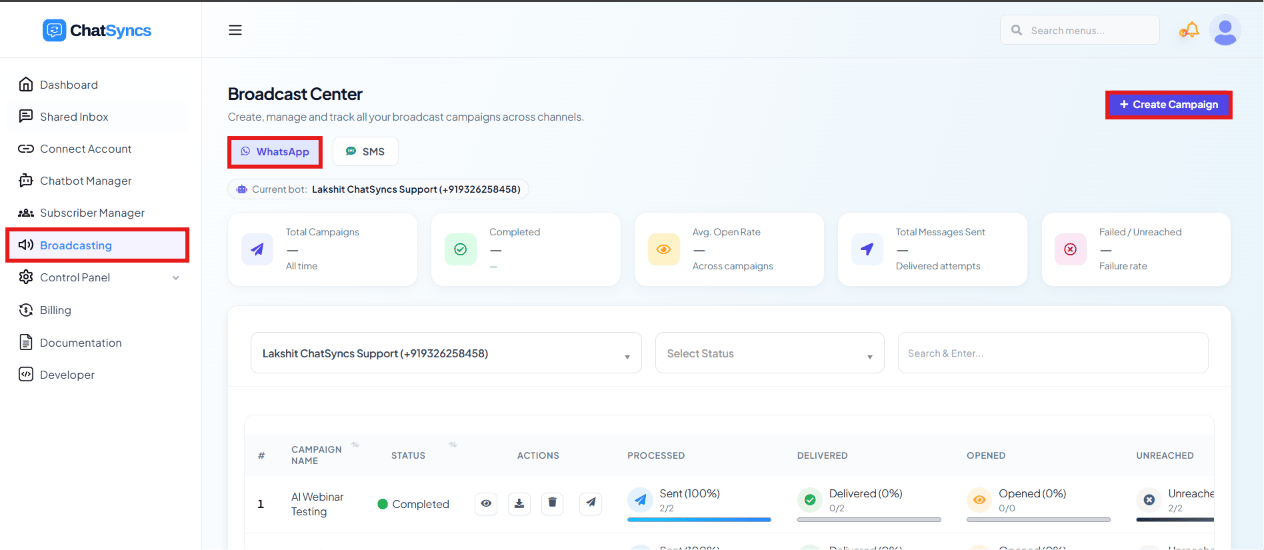
ChatSyncs left navigation with Broadcasting selected (as a sibling to Chatbot Manager and Subscriber Manager), the WhatsApp channel tab highlighted, and the Create Campaign button highlighted on the Broadcast Center page

The Broadcast Center — Broadcasting selected in the left navigation, with the WhatsApp channel tab and the Create Campaign button highlighted.

1

Open Broadcasting

Select Broadcasting in the left navigation.
2

Choose the channel

The Broadcast Center opens, with WhatsApp and SMS channel tabs and any campaigns already created for the selected channel.
3

Click Create Campaign

Click Create Campaign to start a new one.
Don’t have any subscribers to broadcast to yet? See How Do I Import Subscribers Using a CSV File? before creating a campaign.

Configure the campaign

Clicking Create Campaign opens the broadcast canvas directly, with a Start Bot Flow block already connected to an empty Actions block. Click that Actions block to open its configuration panel:
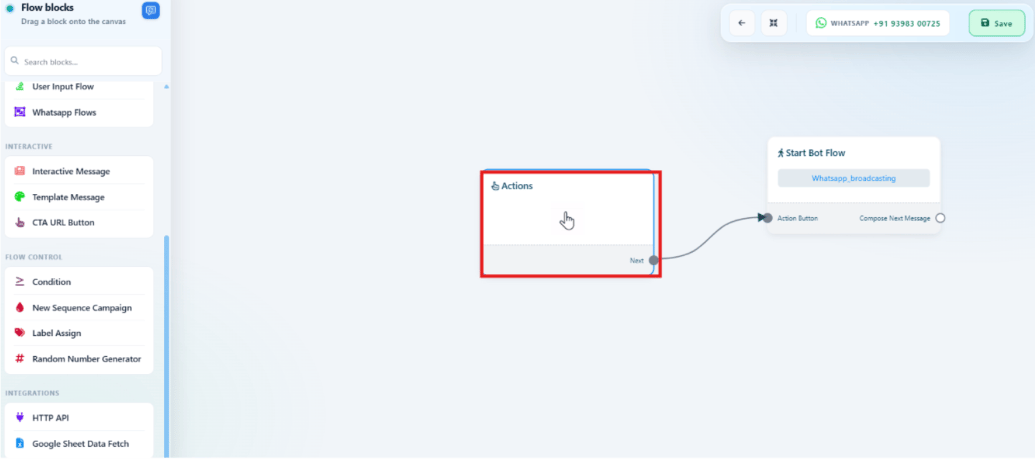
Broadcast canvas with Start Bot Flow connected to an empty Actions block, the Actions block highlighted and being clicked

The broadcast canvas right after Create Campaign — an empty Actions block connected to Start Bot Flow, clicked to open its settings.
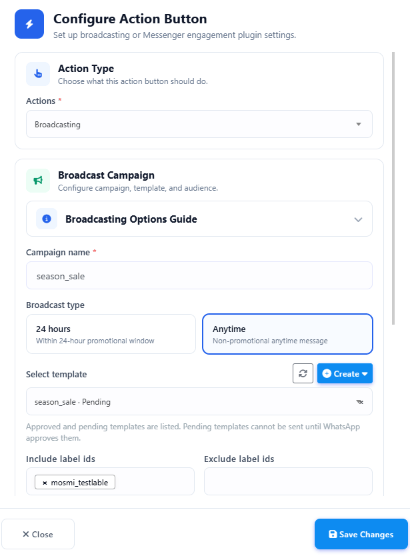
This opens the Action Button configuration panel set to Broadcasting — fill in the campaign here:
Configure Action Button panel set to Broadcasting, showing a season_sale campaign with Anytime broadcast type and a pending template

The Configure Action Button panel for a Broadcasting action, filled in with a real example — Campaign Name 'season_sale', Broadcast Type 'Anytime', and a pending template selected.

1

Campaign Name

An internal name to identify the campaign, e.g. Summer Promotion Campaign or season_sale.
2

Broadcast Type

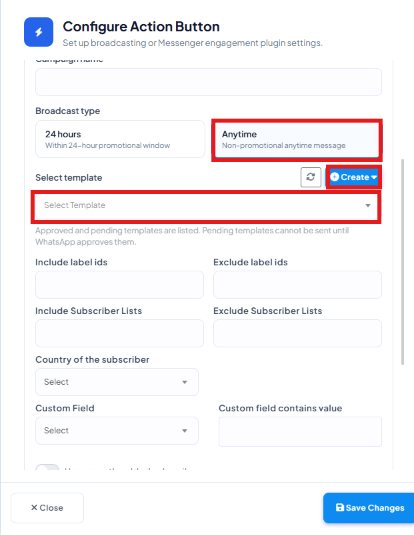
24 Hours sends only to subscribers currently inside the WhatsApp 24-hour customer service window — regular messages, no template approval required. Anytime sends to all selected subscribers regardless of window, but because some of them are outside it, only an approved WhatsApp template can be used. See the 24-hour customer service window.
3

Select Template (Anytime only)

Pick an approved template from Select Template. This step only appears for Anytime — inside a 24 Hours broadcast you’re free to send any message type (text, service/session messages, etc.), so no template is required. Don’t have one yet? Click Create right next to the dropdown, or create a WhatsApp message template first — either way, you need an approved template before you can send an Anytime broadcast.
Configure Action Button panel with Broadcast Type set to Anytime, and the Select Template dropdown and Create button both highlighted
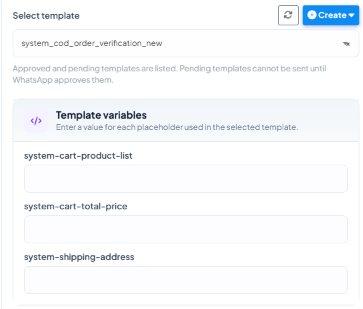
If the template you pick has variables — placeholder text, or a header image/video/document — ChatSyncs asks for those values right below the dropdown:
Select Template showing system_cod_order_verification_new chosen, with a Template variables section listing fields for each placeholder used in the template
4

Include or exclude labels

Include Label IDs sends only to subscribers with that label (e.g. Customers, Leads, VIP Customers). Exclude Label IDs skips subscribers with that label (e.g. Unsubscribed, Do Not Disturb). Don’t have a label yet? Create a label in Subscriber Manager.
5

Country of the Subscriber (optional)

Only send to subscribers in a specific country, e.g. India.
6

Use Recently Added Subscribers (optional)

Enable this to target only recently added subscribers — useful for welcome campaigns, onboarding sequences, or new-lead engagement.
7

Assign Label After Broadcast (optional)

Auto-assign a label to every subscriber once the broadcast sends successfully — useful for segmenting an audience, filtering future broadcasts, triggering automations, and tracking campaign performance.Example: a Summer Sale broadcast with Assigned Label set to Summer_Sale tags every recipient — Rahul, Priya, Amit, and everyone else — with Summer_Sale the moment they receive it, so you can target exactly that audience again later (e.g. a follow-up discount reminder only to people who already saw the sale).
8

Sending time (optional)

By default the campaign sends as soon as you finish building and save it. Toggle Send later on to pick a future date and time instead — useful for holiday campaigns, product launches, or timing the send to your audience’s business hours.
Configure Action Button panel showing Custom Field, Custom field contains value, Assign label after broadcast, and a Sending time section with a Send later toggle, above Targeted subscribers and Daily WhatsApp Business Account conversation limit

The Sending time toggle, right above the live Targeted subscribers count and Daily WABA conversation limit.

Filter by Custom Field

Custom Field and Custom Field Contains Value let you send a broadcast only to subscribers who have a specific answer saved in a specific field. Think of it in two parts:
  • Custom Field is the category — like asking “which box am I checking?” e.g. Name, City, Plan Type.
  • Custom Field Contains Value is the answer you’re looking for inside that box — e.g. if the field is Name, the value could be Rahul. If the field is City, the value could be Bangalore.
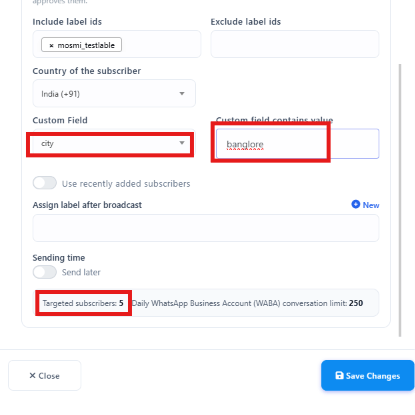
So if you set Custom Field = City and Custom Field Contains Value = Bangalore, only subscribers whose City is saved as Bangalore will receive the broadcast — everyone else is skipped.
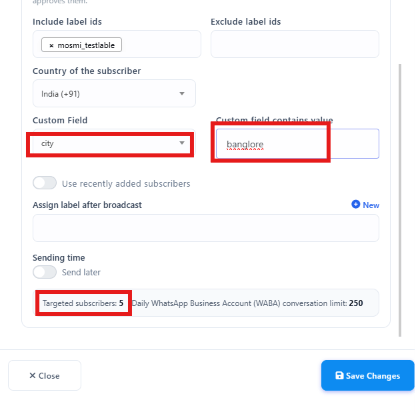
Broadcast settings panel with Custom Field set to city and Custom field contains value set to banglore, showing Targeted subscribers: 5

A real example — Custom Field set to 'city', Custom field contains value set to 'banglore', with the live Targeted subscribers count (5) shown below.

Notice Targeted subscribers: 5 right below the filters — ChatSyncs counts the matches live, so you can see exactly how many people will get the message before you send anything.
Don’t have a custom field yet, like City or Plan Type? Create a custom field in Subscriber Manager.

Personalize the message for each subscriber

A broadcast doesn’t have to read the same for everyone. The same custom fields you filter on can also go inside the message, so every subscriber sees their own saved value — their name, their city, their plan. In an Anytime broadcast the message is your template, so the personalization goes into the template:
1

Make sure the custom field has data

Every subscriber you target needs a value saved in that field, or that part of the message sends blank. See how a custom field gets filled in — a CSV or Google Sheet import column, a Keyword Replies flow, or a form answer.
2

Insert the field into your template

In the template’s Message Body, click Custom Fields and pick the field — it’s written as #field_name#, e.g. #city#. The Name button inserts the subscriber’s name. See Custom Fields, Variables, Name, and AI Rewrite for every placeholder type, then submit the template for Meta’s approval.
3

Pick that template for the broadcast

Once approved, choose it under Select Template in the campaign configuration above. ChatSyncs fills in each subscriber’s own value as it sends.
Example: Rahul’s template body reads:
Personalized messages also feel less like mass spam, so they tend to get fewer blocks and reports — which protects your quality rating.
A custom field holds a value that stays the same for that subscriber every time. For a value that changes with every send — a price, an order number — use a Template Variable instead. See Template Variables vs Custom Variables.

Check your daily sending limit

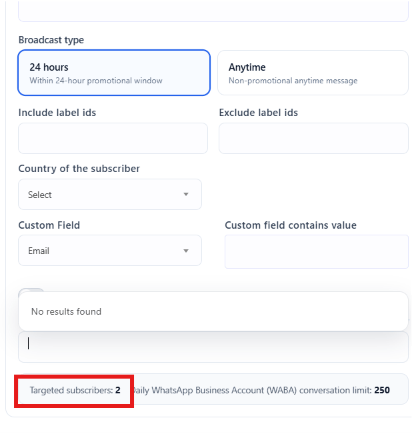
Broadcast settings panel showing Targeted subscribers count and Daily WhatsApp Business Account conversation limit

Audience filters with the live Targeted subscribers count and the Daily WABA conversation limit shown at the bottom.

Right next to the Targeted subscribers count, a Daily WhatsApp Business Account (WABA) conversation limit shows the maximum subscribers you’re allowed to message per day. If your targeted count is higher than this limit, only that many will actually be reached today — keep an eye on both numbers before sending a 24 Hours broadcast.
When a customer replies to a 24-hour broadcast, a new 24-hour window automatically opens — letting you keep messaging them without an approved template. Including interactive buttons or a clear call-to-action in the broadcast encourages replies, which refreshes the window and reduces how often you need paid template messages.

Build the broadcast message

Once every setting above is filled in, click Save Changes at the bottom of the Action Button panel. The broadcast canvas opens right after:
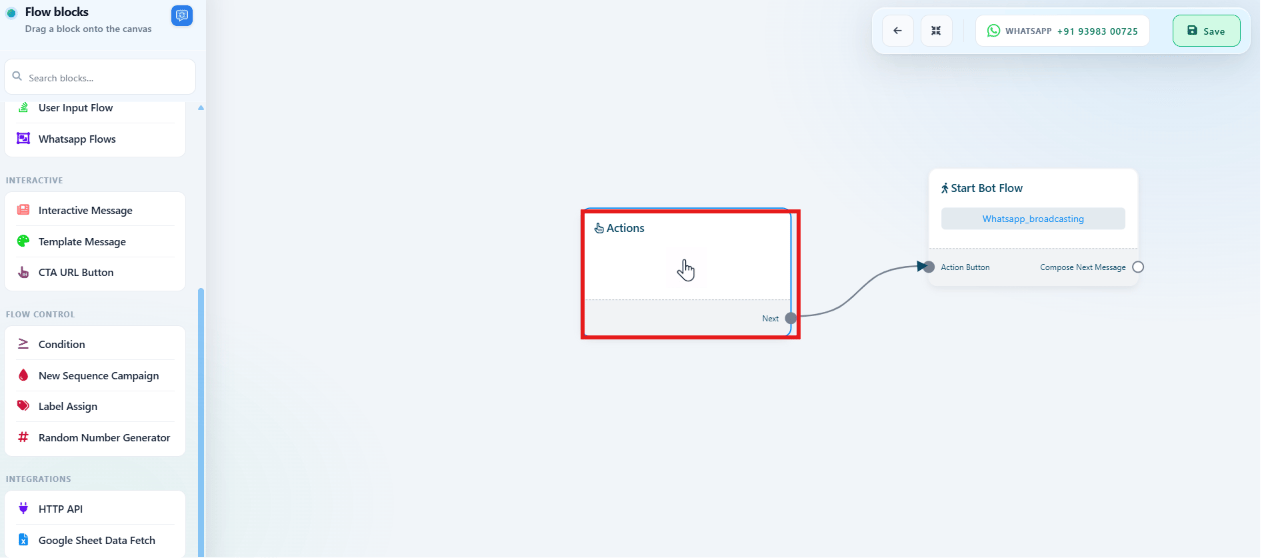
Broadcast flow canvas showing an Actions Broadcasting block connected to a Start Bot Flow block

The broadcast canvas: an Actions (Broadcasting) block connected to Start Bot Flow, ready for message blocks to be added.
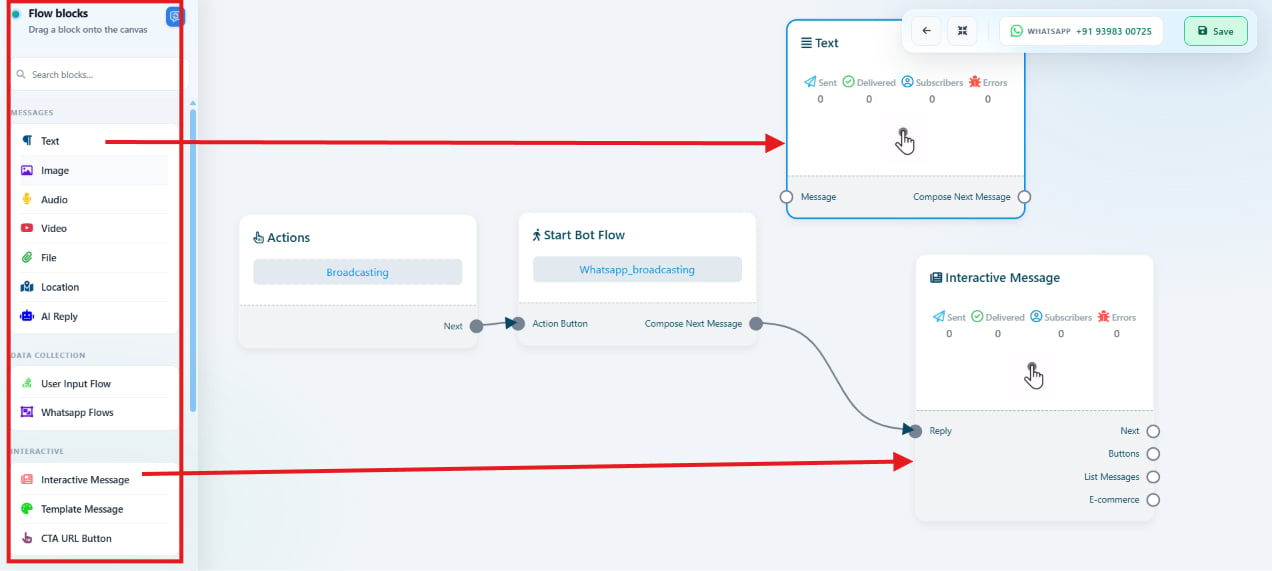
The canvas works just like the Keyword Replies builder. A Start Bot Flow block is already connected to the Actions: Broadcasting block; drag on more blocks to design what subscribers receive. You can add the same component types available in Keyword Replies: Text, Images, Videos, Documents, Audio Files, Interactive Buttons, Quick Replies, CTA/URL Buttons, Lists, Forms, Conditions, Actions, and AI Responses. Drag blocks from the Flow blocks panel and connect them to design the journey, for example:
Flow blocks panel and a broadcast canvas with Text and Interactive Message blocks chained after the Broadcasting action

The Flow blocks panel (Messages, Data Collection, Interactive components) connected into a broadcast flow with Text and Interactive Message blocks.

Monitor campaign statistics

Once a campaign is sent, the WhatsApp Broadcasting list shows its Campaign Name, Status (Completed, Pending, Processing, etc.), Scheduled At time, and four metrics:
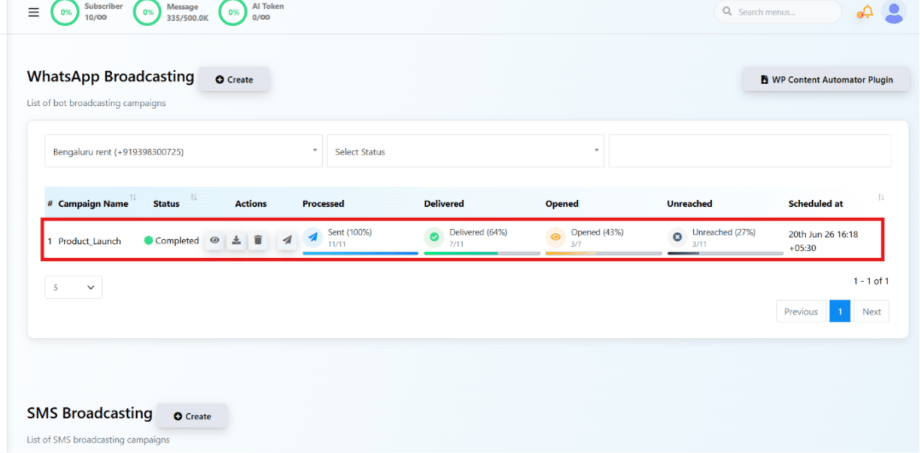
WhatsApp Broadcasting list row for Product_Launch showing Processed, Delivered, Opened, and Unreached percentages

A completed campaign's row in the WhatsApp Broadcasting list, showing Processed, Delivered, Opened, and Unreached statistics.

Unreached messages are usually caused by invalid phone numbers, the user not being on WhatsApp, blocked accounts, or other delivery failures.

Campaign actions

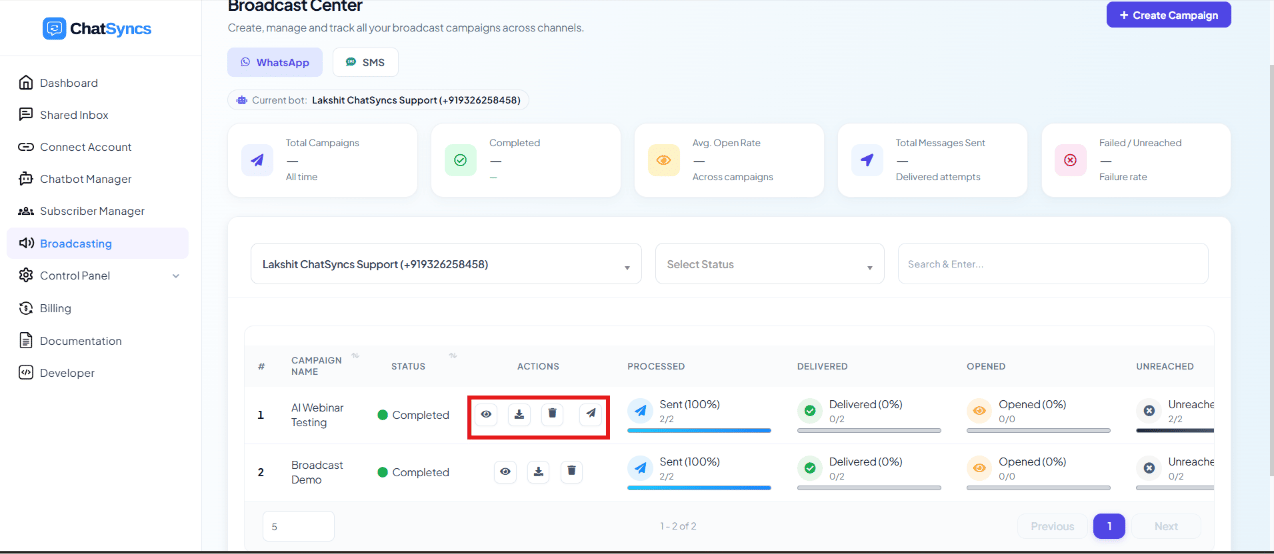
Broadcast Center campaign row with its action icons highlighted: view report, download report, delete, and resend

A campaign row's action icons — view report, download report, delete, and resend failed messages.

Each campaign row has action buttons:
  • View Report — detailed broadcast statistics and recipient information.
  • Download Report — exports the report as a CSV for analysis and record keeping.
  • Resend Failed Messages — retries delivery for messages that failed, e.g. after correcting invalid phone numbers.
  • Delete Campaign — removes the campaign from the list.
Example: Product_Launch completed with Processed 11/11, Delivered 7/11, Opened 3/7, Unreached 3/11. After fixing the numbers behind the 3 unreached sends, Resend Failed Messages retries delivery to just those subscribers. Clicking View Report opens the campaign’s full detail — the audience filters it was sent with (Template, Included/Excluded Labels, Country, Custom Field, Assign Label After Broadcast, Added Before/After), plus its Status, Targeted count, Message Count, and the same Processed/Delivered/Opened/Unreached breakdown shown on the list.
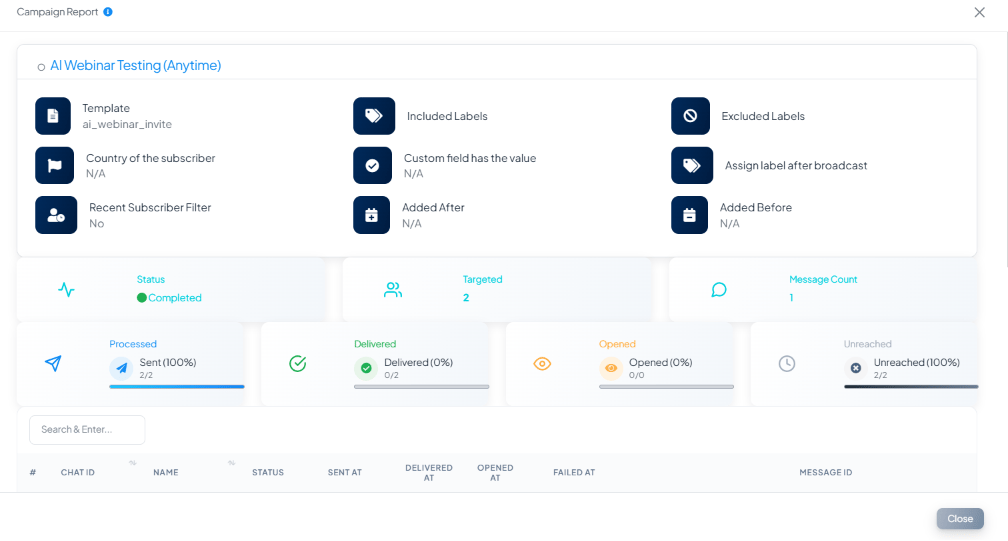
Campaign Report modal showing the filters a campaign was sent with, plus Status, Targeted, Message Count, and delivery statistics

The Campaign Report modal — audience filters used, and Status/Targeted/Message Count/Processed/Delivered/Opened/Unreached stats.
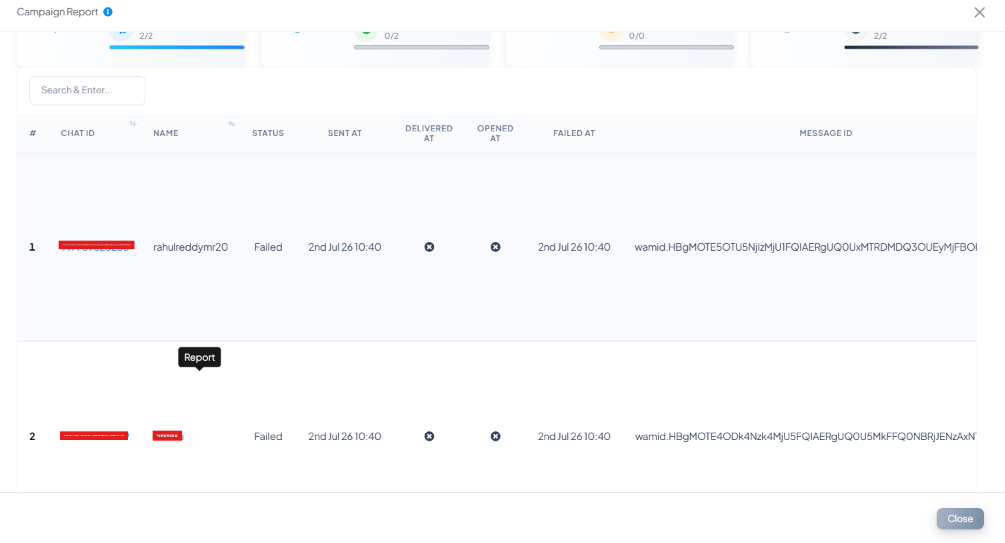
Scrolling down shows every individual recipient — Chat ID, Name, Status, Sent At, Delivered At, Opened At, Failed At, and Message ID — so you can see exactly who received the message and who didn’t.
Campaign Report recipient table with columns for Chat ID, Name, Status, Sent At, Delivered At, Opened At, Failed At, and Message ID

The Campaign Report's recipient table, listing each subscriber's delivery status and message ID.

WhatsApp charges for template messages based on the template’s category (Marketing, Utility, or Authentication) and the recipient’s country — an Anytime broadcast always uses a template, so it’s always a paid send, not something covered by a free monthly quota. Example: you start an Anytime broadcast to 1,000 customers with no payment method on file — the broadcast can stop partway through instead of finishing. Add a card before you send, so this doesn’t happen: How to Add Payment Method for WhatsApp API Billing.

Tips for successful broadcasts

  • Start small on your first send. Target 100–200 subscribers first rather than your whole list, then check your quality rating a few hours later before scaling up to the rest.
  • Don’t broadcast to cold lists. Contacts who never opted in or haven’t interacted with your business are far more likely to block or report you — that damages your quality rating and can shrink your daily messaging limit.
  • Time it to your audience, not yours. Send during business hours in the recipient’s timezone — messages that land at odd hours get more blocks.
  • Monitor results after every send. Check Processed / Delivered / Opened / Unreached on the campaign row. If blocks or Unreached are unusually high, pause and review your targeting before sending the next one.
  • Know your daily limit before you send. Your WhatsApp Business Account’s daily conversation limit caps how many subscribers can actually be reached — see Understanding WhatsApp Quality Rating for how quality rating affects that limit over time.
Example: A store’s first-ever broadcast goes to 150 subscribers labeled Newsletter_Optin (people who explicitly opted in) rather than all 5,000 imported contacts. Delivered comes back at 96% with zero blocks — a strong signal it’s safe to broadcast to the full list next time.

Frequently asked

Go to Broadcasting → Create Campaign, configure a campaign name, broadcast type, and audience filters, then build the message on the canvas (just like a Keyword Replies flow) and save. The campaign sends to every subscriber matching your filters.
Yes — in the campaign configuration panel, toggle Sending time → Send later on and pick a future date and time. Leave it off and the campaign sends as soon as you finish building and save it.
24 Hours only reaches subscribers currently inside the WhatsApp 24-hour customer service window and can send regular messages with no template approval needed. Anytime reaches everyone you select regardless of window, but because some recipients are outside it, it requires an approved WhatsApp template — build one in Message Templates if you don’t have one yet.
Check the Unreached statistic on the campaign — common causes are invalid phone numbers, the subscriber not being on WhatsApp, blocked accounts, or other delivery failures. Fix the underlying issue (e.g. correct the number) and use Resend Failed Messages to retry.
Yes — use Include Label IDs for segments like VIP Customers, Exclude Label IDs to skip segments like Unsubscribed, Country of the Subscriber to filter by location, or Custom Field + Custom Field Contains Value to filter on a chatbot custom field such as Plan Type.
Yes — insert custom fields (e.g. #city#) or the subscriber’s name into the template’s Message Body, then pick that template for the broadcast. Each subscriber receives their own saved value; if a field is empty for someone, that part sends blank. See Personalize the message for each subscriber.
Custom Field is which category you’re checking, e.g. City. Custom Field Contains Value is the specific answer you want inside that category, e.g. Bangalore. Together, Custom Field = City and Value = Bangalore sends the broadcast only to subscribers whose City is saved as Bangalore.
Click View Report on that campaign’s row in the Broadcast Center list — it shows the audience filters it was sent with, overall Processed/Delivered/Opened/Unreached stats, and a recipient-by-recipient breakdown with each subscriber’s delivery status and message ID.
No — send your first broadcast to a small, opted-in segment (100–200 subscribers) and check your quality rating a few hours later. Broadcasting to a large, cold, or unengaged list risks blocks and reports that hurt your ability to send in the future.
During business hours in your audience’s timezone, not yours — messages that land late at night or very early get more blocks and lower engagement.
  • Anytime broadcasts require an approved template — Meta blocks unapproved templates and plain text sent outside the 24-hour window. See how to create a template if you don’t have one yet.
  • The Daily WABA conversation limit caps how many subscribers can actually be reached, even if your audience filters match more than that — check the live Targeted subscribers count against the daily limit before sending a 24-Hours broadcast.
  • Unreached subscribers aren’t automatically retried — use Resend Failed Messages after fixing the underlying issue (e.g. an invalid number).