

Prerequisites
- A WhatsApp number already connected to ChatSyncs.
- An external server or workflow tool reachable from the internet, with your own AI agent already built on it — an n8n workflow with an OpenAI Chat Model and Simple Memory node, in this build. Building and training that AI agent is entirely outside ChatSyncs; this guide only covers the WhatsApp connection.
- Your ChatSyncs API token and Phone Number ID — see Finding IDs — needed to call the Developer API from your own server.
- Read Bot Settings first for the full Webhook tab reference; this guide only covers the Incoming Webhook toggle specifically.
Implementation Guide
Step 1 — Enable the Incoming Webhook
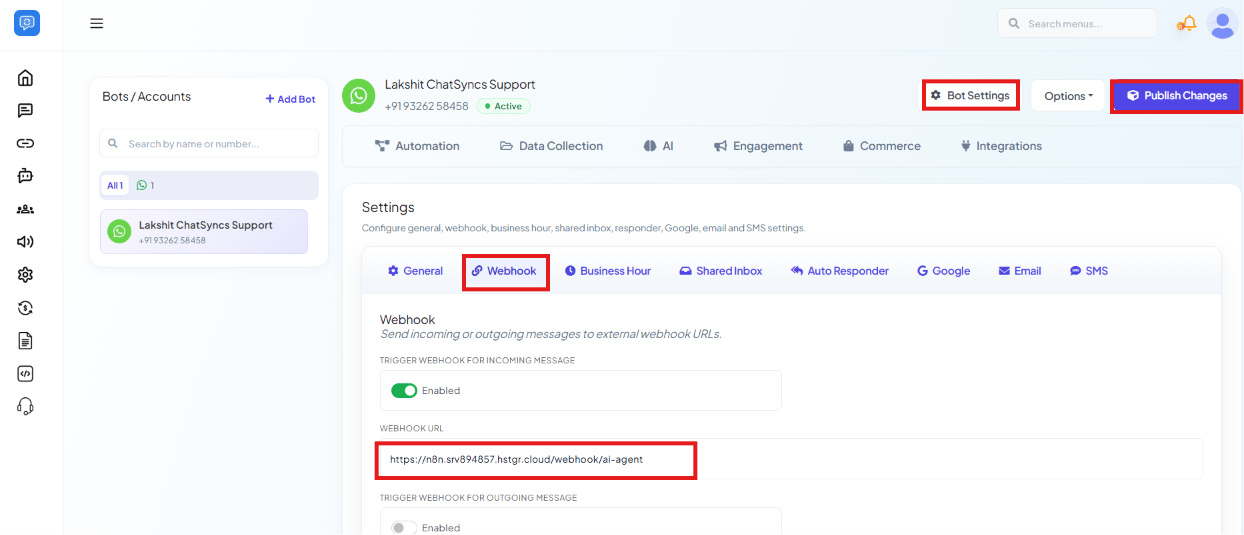
Objective: Have ChatSyncs forward every customer message to your AI agent’s server the moment it arrives. Explanation: The Incoming Webhook is a toggle on the bot’s Webhook settings tab — once enabled, every message a customer sends is POSTed to the URL you enter, in addition to whatever ChatSyncs’ own bot flow would otherwise do with it. Actions to perform:- Open Bot Settings → Webhook.
- Turn on Trigger Webhook for Incoming Message.
- Enter your AI agent’s webhook URL (its n8n Webhook node’s URL, in this build).
- Click Publish Changes.
Step 2 — Your AI agent generates a reply
Objective: Let your existing AI agent decide what to say, using its own tools and memory. Explanation: This step runs entirely outside ChatSyncs, on your own infrastructure. In this build: an n8n Webhook node (“incoming Messages”) receives the POST from Step 1, a Set node (“data”) shapes the payload, an AI Agent node (backed by an OpenAI Chat Model and a Simple Memory node, with room for Tools) reads the message and produces a reply, an output Split node breaks that reply into its message-type parts, and a Switch node then routes each part down one of three branches — interactive buttons, plain text, or an image with interactive buttons.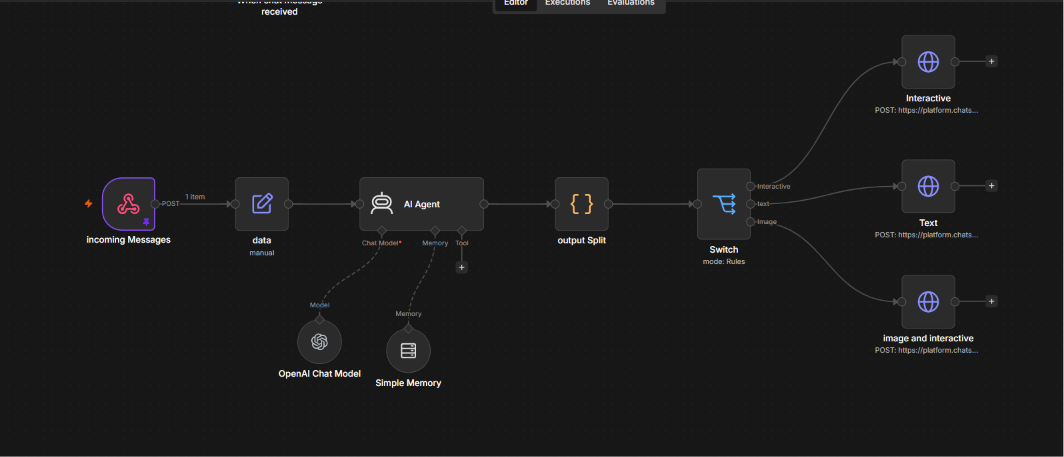
- incoming Messages (Webhook) node: receives the incoming-message payload from Step 1.
- data (Set) node: pulls the fields the AI Agent needs out of that payload.
- AI Agent node: generates the reply, with whatever chat model, memory, and tools your setup already uses.
- output Split node: splits the AI’s structured output into its component parts (text, buttons, image).
- Switch node: routes each part to the matching branch — interactive buttons, plain text, or image-plus-buttons — based on the message type the AI Agent returned.
Step 3 — Send the reply back through the ChatSyncs API
Objective: Deliver the AI’s reply to the customer on WhatsApp. Explanation: ChatSyncs’ Send Text Message and Send Interactive Buttons API endpoints let any external server push a message straight to a customer’s WhatsApp chat. In this build, each of the Switch node’s three branches ends by POSTing straight to the ChatSyncs platform API — one for interactive buttons, one for plain text, and one for an image sent together with interactive buttons. Actions to perform (on your own server):- Text branch:
POST /whatsapp/sendwithapiToken,phone_number_id, the customer’sphone_number, andmessageset to the AI’s reply text. - Interactive branch:
POST /whatsapp/send/interactive-buttonswith the sameapiToken,phone_number_id, andphone_number, plusmessagefor the body text andbuttonsas a JSON array of up to 3 options. - Image + interactive branch: the same interactive-buttons call, with an added image URL so the buttons are delivered alongside a picture instead of body text alone.
Copy & test this workflow
The exact n8n workflow used throughout Step 2 and Step 3 above — the incoming webhook, the AI Agent with its Chat Model and Memory, the output split, and all three send branches (interactive, text, image + interactive) — is available below as a real exported workflow JSON:View the full n8n workflow JSON
View the full n8n workflow JSON
Select all and copy the block below, then paste it (Ctrl+V / Cmd+V) directly onto
your n8n canvas — n8n imports pasted workflow JSON automatically, without needing to save or
upload a file first.
Features Used
Expected Result
A customer messages the WhatsApp number as usual. ChatSyncs forwards the message out to the company’s own AI agent, that AI agent decides what to say using its own tools and memory, and the reply lands back in the same WhatsApp conversation — as plain text or Reply Buttons — with the customer never aware the answer came from outside ChatSyncs.Frequently asked
Why not just use ChatSyncs' built-in AI Agent instead?
Why not just use ChatSyncs' built-in AI Agent instead?
ChatSyncs’ own AI Agent answers from documents trained into a
Knowledge Base campaign — a great fit if you’re starting fresh. This pattern is for the
opposite situation: an AI agent that already exists, already has its own tools and memory,
and shouldn’t be rebuilt or retrained a second time just to reach WhatsApp.
Does ChatSyncs ever see my AI's training data or tools?
Does ChatSyncs ever see my AI's training data or tools?
No. ChatSyncs only sees the incoming message it forwards out, and the finished reply it’s
asked to send back. Everything in between — the model, the memory, the tools, the routing
logic — stays on your own server.
Is this the same thing as Webhook Workflow?
Is this the same thing as Webhook Workflow?
No — they run in the opposite direction. Webhook Workflow
is for an external event (like an order being placed) triggering ChatSyncs to send a
message. The Incoming Webhook used here is the reverse: a customer message on WhatsApp
triggering a POST out to your server.
Do I need my own server to build this?
Do I need my own server to build this?
Yes — the Incoming Webhook needs a real, internet-reachable endpoint to POST to, and the
Send Text Message / Send Interactive Buttons calls need something to make them. n8n is one
option; any server or workflow tool that can receive a POST and make one back works the
same way.
What happens if my AI agent's server is down or slow?
What happens if my AI agent's server is down or slow?
The Incoming Webhook doesn’t wait for a response — it’s fire-and-forget, so a slow or down
server just means the customer never gets a reply, not that the bot itself breaks. Add your
own timeout and fallback handling (e.g. a default “we’ll get back to you” message) on your
server if this matters for your use case.
Does this only work with n8n?
Does this only work with n8n?
No — n8n is just what this build used. Any server capable of receiving the Incoming
Webhook’s POST and calling ChatSyncs’ Send Text Message / Send Interactive Buttons endpoints
can run this same pattern, in any language or workflow tool.
What if I want the AI to send a message the customer didn't ask for, outside the 24-hour window?
What if I want the AI to send a message the customer didn't ask for, outside the 24-hour window?
Session messages (both endpoints used here) only work within 24 hours of the customer’s
last message. Sending outside that window requires an approved Message Template instead —
see Send Text Message for that limit.
Related Documentation
- Bot Settings — the Incoming/Outgoing Webhook tab used in Step 1.
- Send Text Message — the plain-text send endpoint used in Step 3.
- Send Interactive Buttons — the buttons send endpoint used in Step 3.
- AI Agents and Intent Detection — ChatSyncs’ own built-in AI Agent, for contrast.
- Webhook Workflow — the opposite-direction pattern: an external event triggering ChatSyncs to send.
- Finding IDs — where to get the
apiTokenandphone_number_idused in Step 3.
Back to Business Problem
Start over from the beginning of this use case.