

When to add a subscriber manually
Use Create Subscriber when you need one contact in ChatSyncs right now and importing a whole file is overkill. Example: Priya calls your shop asking about pricing before she’s ever sent your WhatsApp number a message. You want her in ChatSyncs immediately — labeled as a Lead, with a quote template ready to send — instead of waiting for her to message the bot first. Other common cases: a walk-in customer, a lead from a phone call or in-person event, or someone you want to enroll in a Sequence in advance. For more than a handful of contacts, How Do I Import Subscribers Using a CSV File? or How Do I Import Subscribers from Google Sheets? is faster and less error-prone.Comparison: which import method fits?
Create a subscriber
1
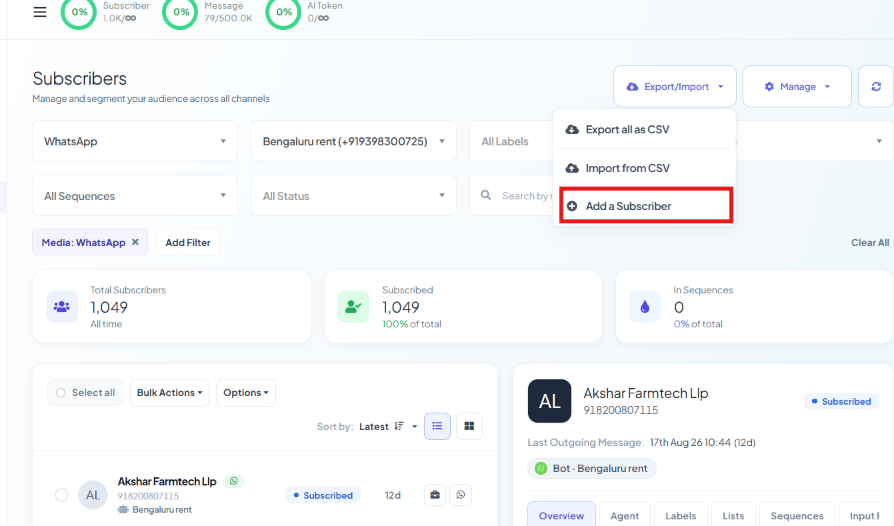
Open Export/Import → Add a Subscriber
From the Subscriber Manager list, open Export/Import, then Add a Subscriber.
2
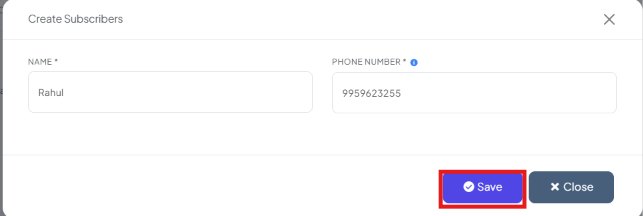
Enter the subscriber's Name
Type their name into the Name field, e.g.
Priya Sharma.3
Enter the subscriber's Phone Number
Type the number in the exact format below — see the Warning.
4
Save
Click Save — the subscriber appears in the list immediately.
What to do right after creating one
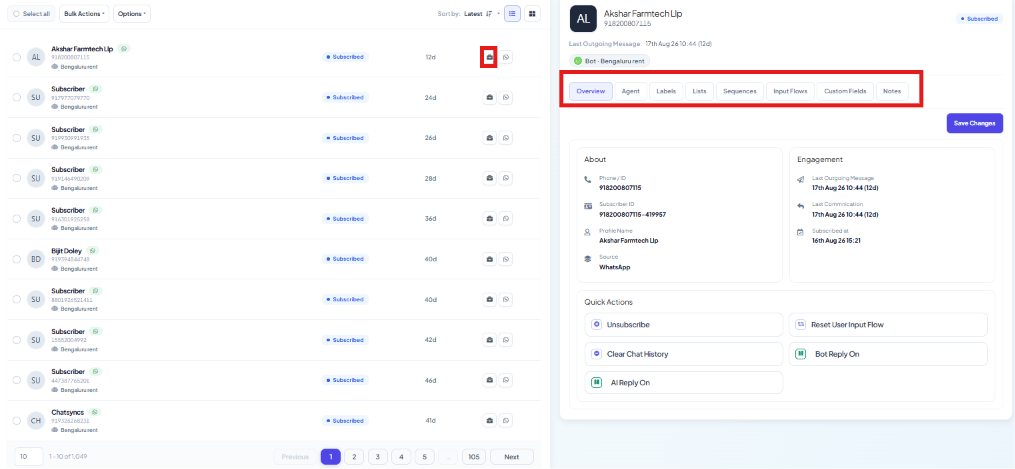
A manually-created subscriber starts with just a name and phone number — nothing else. Common next steps:- Add a label — select them in the list and use Options → Assign Label (e.g.
Lead,Walk-in) so they show up in filtered lists and broadcasts. See Create a label if the label doesn’t exist yet. - Fill in a custom field — open their profile from the list and add data like city, email, or company under the Custom Fields tab, one field at a time.
- Enroll them in a Sequence — use Options → Assign Sequence to start one right away (see How to Build Automatic Follow-Up Chatbots on WhatsApp in ChatSyncs) without waiting for them to trigger it themselves.
- Send them a message — since they haven’t messaged you first, you’re outside the 24-hour customer service window, so your first message to them must be an approved Message Template.
The Create Subscriber modal only takes a Name and Phone Number — there’s no custom field
input at creation time. To fill in a custom field for a manually-created subscriber, either add
it from their profile afterward, or bring them in through
How Do I Import Subscribers Using a CSV File? or How Do I Import Subscribers from Google Sheets?
instead, where extra columns become custom fields automatically at the moment of import.
Frequently asked
What phone number format does Create Subscriber expect?
What phone number format does Create Subscriber expect?
Country code directly followed by the number, with no
+, spaces, or other punctuation —
e.g. 919876543210 for an Indian number. See the Warning above.When should I use this instead of a CSV or Google Sheet import?
When should I use this instead of a CSV or Google Sheet import?
For one or two contacts at a time — a walk-in, a phone lead, someone you want in the system
before they’ve messaged the bot. For more than a handful, bulk import is faster and less
error-prone.
Can I add hundreds of contacts manually, one at a time?
Can I add hundreds of contacts manually, one at a time?
You could, but you shouldn’t — it’s slow and easy to mistype a number. Use
How Do I Import Subscribers Using a CSV File? or
How Do I Import Subscribers from Google Sheets? instead for
anything beyond a handful of contacts.
Can I edit a manually-created subscriber later?
Can I edit a manually-created subscriber later?
Yes — labels, custom fields, and other details can be updated from their profile at any
time, the same as any other subscriber.
Can I fill in a custom field while creating a subscriber manually?
Can I fill in a custom field while creating a subscriber manually?
No — the Create Subscriber modal only takes Name and Phone Number. Add custom field data
afterward from the subscriber’s profile, or import them via CSV/Google Sheet instead, where
extra columns are picked up as custom fields automatically.
What happens if I enter the phone number in the wrong format?
What happens if I enter the phone number in the wrong format?
ChatSyncs matches subscribers by the exact number format it expects. An inconsistent format
(missing country code, added
+, extra spaces) risks creating a duplicate subscriber
instead of finding the existing one.Can I message a manually-created subscriber right away?
Can I message a manually-created subscriber right away?
Only with an approved Message Template. Since they haven’t messaged you first, there’s no
open 24-hour service window yet — a free-form text reply won’t deliver until they reply to a
template and open one. See
Creating a WhatsApp Message Template.
I created a subscriber with a number that already exists — what happens?
I created a subscriber with a number that already exists — what happens?
ChatSyncs matches by the exact phone number format. If it matches an existing subscriber,
that record is what gets found and used going forward — but only if the format is identical
(same country code, no
+, no spaces). A mismatched format creates a separate duplicate
instead.Related Documentation
- Subscriber Manager — the subscriber list and full Options menu.
- How Do I Import Subscribers Using a CSV File? — for bulk-importing more than a handful of contacts.
- How Do I Import Subscribers from Google Sheets? — importing straight from a connected Google Sheet or Google Contacts.
- How Do I Manage Custom Fields and Labels? — adding structured data to a subscriber after creation.