> ## Documentation Index
> Fetch the complete documentation index at: https://docs.chatsyncs.com/llms.txt
> Use this file to discover all available pages before exploring further.
# Outbound Actions
> Outbound Actions sends data from ChatSyncs to another application whenever a specific action happens — a subscriber submits a WhatsApp Flow, completes an Input Flow, clicks a Postback button, or shares their location. Instead of that data living only inside ChatSyncs, it's automatically forwarded to Google Sheets, a CRM, your own server, Zapier, Make.com, Airtable, or any other endpoint that can receive an HTTP request.
 ## Example: send Input Flow submissions to Google Sheets
Say you built a **Customer Registration Form** using an [Input Flow](/learn/whatsapp-input-flow)
or [WhatsApp Flow](/learn/whatsapp-flows) with fields for Full Name, Phone Number, Business
Type, Service Interested, and Demo Date. When a subscriber submits it, an Outbound Action can
push that submission straight into a Google Sheet — no manual copying, no server of your own
required. The rest of this page walks through that exact setup, since it's the most common use
case.
```
User submits WhatsApp Flow or Input Flow
↓
ChatSyncs Triggered
↓
Outbound Action
↓
Google Apps Script
↓
Google Sheet
↓
Columns Created Automatically
↓
Data Stored Automatically
```
## Set up Google Sheets as the destination
Create a new, empty Google Sheet. You don't need to add any columns — they're created
automatically later.
## Example: send Input Flow submissions to Google Sheets
Say you built a **Customer Registration Form** using an [Input Flow](/learn/whatsapp-input-flow)
or [WhatsApp Flow](/learn/whatsapp-flows) with fields for Full Name, Phone Number, Business
Type, Service Interested, and Demo Date. When a subscriber submits it, an Outbound Action can
push that submission straight into a Google Sheet — no manual copying, no server of your own
required. The rest of this page walks through that exact setup, since it's the most common use
case.
```
User submits WhatsApp Flow or Input Flow
↓
ChatSyncs Triggered
↓
Outbound Action
↓
Google Apps Script
↓
Google Sheet
↓
Columns Created Automatically
↓
Data Stored Automatically
```
## Set up Google Sheets as the destination
Create a new, empty Google Sheet. You don't need to add any columns — they're created
automatically later.
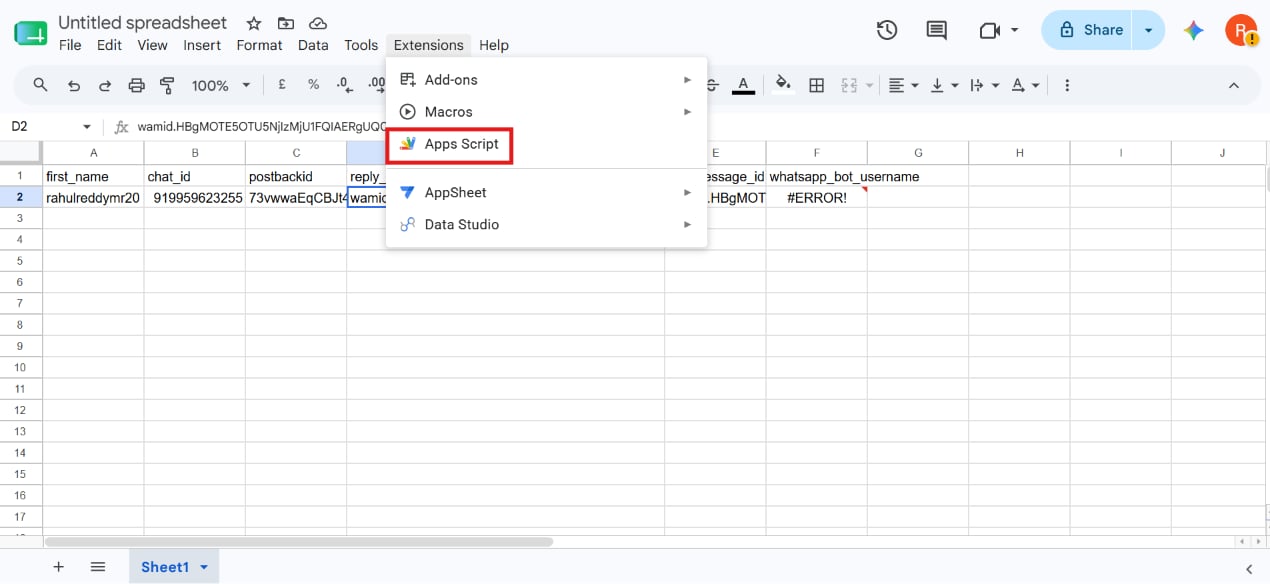 Inside the sheet, go to **Extensions → Apps Script**.
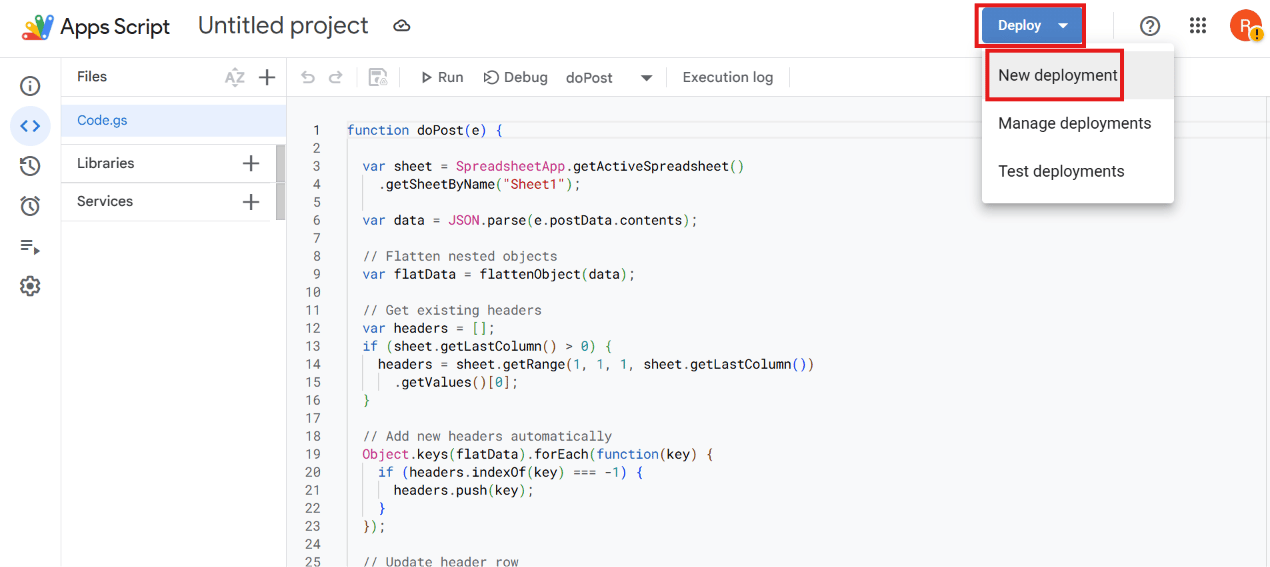 Delete any existing code and paste a `doPost(e)` function that reads the incoming webhook
payload and appends it as a row — creating header columns automatically the first time
each field name is seen:
```javascript theme={null}
function doPost(e) {
var sheet = SpreadsheetApp.getActiveSpreadsheet().getActiveSheet();
var data = JSON.parse(e.postData.contents);
var headers = Object.keys(data);
if (sheet.getLastRow() == 0) {
sheet.appendRow(headers);
}
var values = headers.map(function(key) {
return data[key];
});
sheet.appendRow(values);
return ContentService
.createTextOutput("Success")
.setMimeType(ContentService.MimeType.TEXT);
}
```
Click **Deploy → New deployment**, set **Select type** to **Web app**, **Execute as** to
**Me (your Google account)**, and **Who has access** to **Anyone** (or **Anyone with the
link**) — not **Only myself**, or ChatSyncs won't be able to reach it. Click **Deploy** and
authorize the requested Google permissions.
Delete any existing code and paste a `doPost(e)` function that reads the incoming webhook
payload and appends it as a row — creating header columns automatically the first time
each field name is seen:
```javascript theme={null}
function doPost(e) {
var sheet = SpreadsheetApp.getActiveSpreadsheet().getActiveSheet();
var data = JSON.parse(e.postData.contents);
var headers = Object.keys(data);
if (sheet.getLastRow() == 0) {
sheet.appendRow(headers);
}
var values = headers.map(function(key) {
return data[key];
});
sheet.appendRow(values);
return ContentService
.createTextOutput("Success")
.setMimeType(ContentService.MimeType.TEXT);
}
```
Click **Deploy → New deployment**, set **Select type** to **Web app**, **Execute as** to
**Me (your Google account)**, and **Who has access** to **Anyone** (or **Anyone with the
link**) — not **Only myself**, or ChatSyncs won't be able to reach it. Click **Deploy** and
authorize the requested Google permissions.
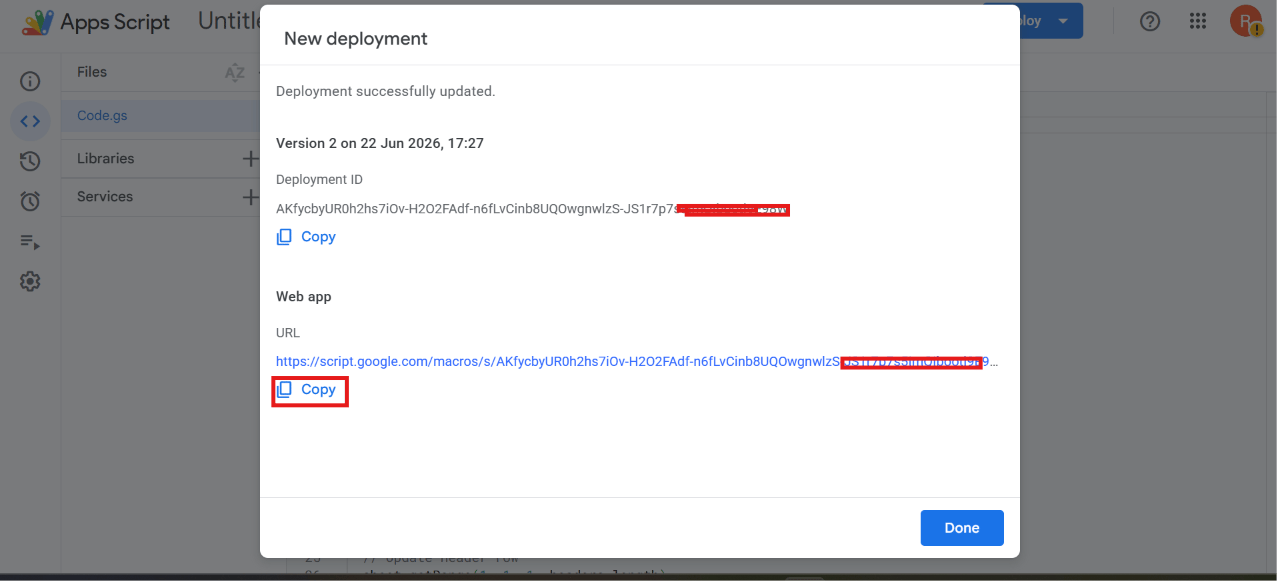 Google gives you a URL like
`https://script.google.com/macros/s/XXXXXXXXXXXX/exec`. Copy it — this is your webhook URL.
## Create the Outbound Action in ChatSyncs
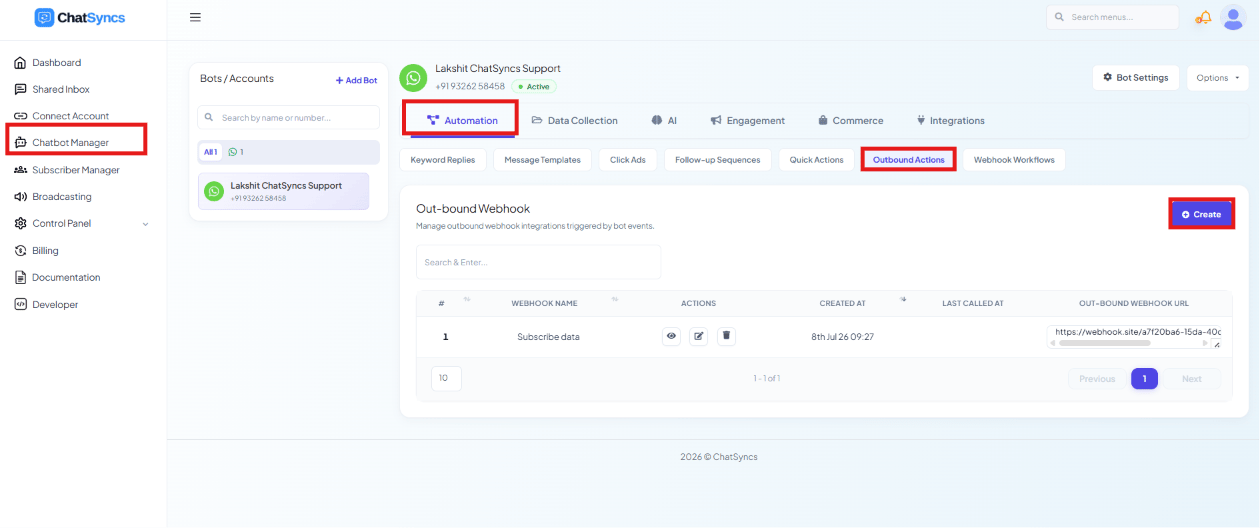
Go to **Chatbot Manager → Automation → Outbound Actions → Create**, then fill in one form covering
the webhook, its triggers, and the data it sends:
Google gives you a URL like
`https://script.google.com/macros/s/XXXXXXXXXXXX/exec`. Copy it — this is your webhook URL.
## Create the Outbound Action in ChatSyncs
Go to **Chatbot Manager → Automation → Outbound Actions → Create**, then fill in one form covering
the webhook, its triggers, and the data it sends:
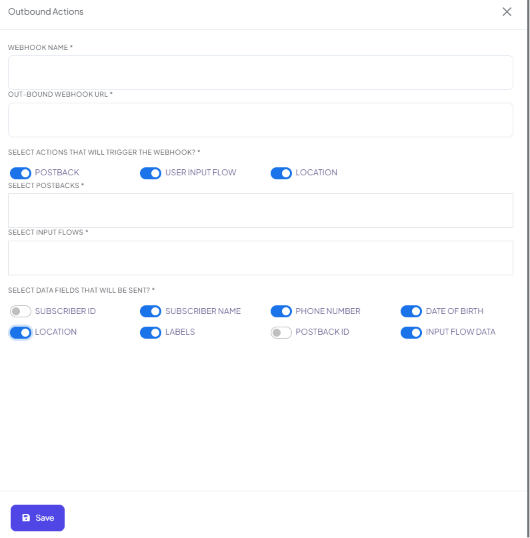 * **Webhook Name** — e.g. `Customer Registration Data`.
* **Out-bound Webhook URL** — paste the Web App URL you copied above.
### Select the trigger(s)
Unlike separate configurations per event, **Postback**, **User Input Flow**, and **Location**
are all toggles on this same form — turn on whichever one(s) should trigger this webhook.
Whenever an enabled action happens, ChatSyncs sends the data to that particular webhook URL:
* **Postback** — fires when a subscriber clicks a postback button. Pick which postback(s) in
**Select Postbacks**.
* **User Input Flow** — fires when a subscriber submits an Input Flow. Pick which flow(s) in
**Select Input Flows** (e.g. `Appointment Booking`, `Customer Registration Form`).
* **Location** — fires when a subscriber shares their live location.
You can enable more than one trigger on the same Outbound Action — each fires independently and
sends to the same configured webhook URL.
### Select fields to send
Enable whichever fields you need: **Subscriber ID, Subscriber Name, Phone Number, Date of
Birth, Location, Labels, Postback ID, Input Flow Data**.
**Turn on Input Flow Data.** Without it, the subscriber's actual form answers won't be sent —
only metadata like the subscriber ID or name.
Click **Save** — the webhook is now active.
## How automatic columns work
Whenever a webhook payload arrives, the Apps Script reads its JSON keys and adds any column
that doesn't already exist — you never edit the sheet by hand. For example, a payload from a
Postback trigger like:
```json theme={null}
{
"first_name": "Rahul",
"chat_id": "919959623255",
"postbackid": "73vwwaEqCBJt...",
"reply_message_id": "wamid.HBgMOTE5..."
}
```
* **Webhook Name** — e.g. `Customer Registration Data`.
* **Out-bound Webhook URL** — paste the Web App URL you copied above.
### Select the trigger(s)
Unlike separate configurations per event, **Postback**, **User Input Flow**, and **Location**
are all toggles on this same form — turn on whichever one(s) should trigger this webhook.
Whenever an enabled action happens, ChatSyncs sends the data to that particular webhook URL:
* **Postback** — fires when a subscriber clicks a postback button. Pick which postback(s) in
**Select Postbacks**.
* **User Input Flow** — fires when a subscriber submits an Input Flow. Pick which flow(s) in
**Select Input Flows** (e.g. `Appointment Booking`, `Customer Registration Form`).
* **Location** — fires when a subscriber shares their live location.
You can enable more than one trigger on the same Outbound Action — each fires independently and
sends to the same configured webhook URL.
### Select fields to send
Enable whichever fields you need: **Subscriber ID, Subscriber Name, Phone Number, Date of
Birth, Location, Labels, Postback ID, Input Flow Data**.
**Turn on Input Flow Data.** Without it, the subscriber's actual form answers won't be sent —
only metadata like the subscriber ID or name.
Click **Save** — the webhook is now active.
## How automatic columns work
Whenever a webhook payload arrives, the Apps Script reads its JSON keys and adds any column
that doesn't already exist — you never edit the sheet by hand. For example, a payload from a
Postback trigger like:
```json theme={null}
{
"first_name": "Rahul",
"chat_id": "919959623255",
"postbackid": "73vwwaEqCBJt...",
"reply_message_id": "wamid.HBgMOTE5..."
}
```
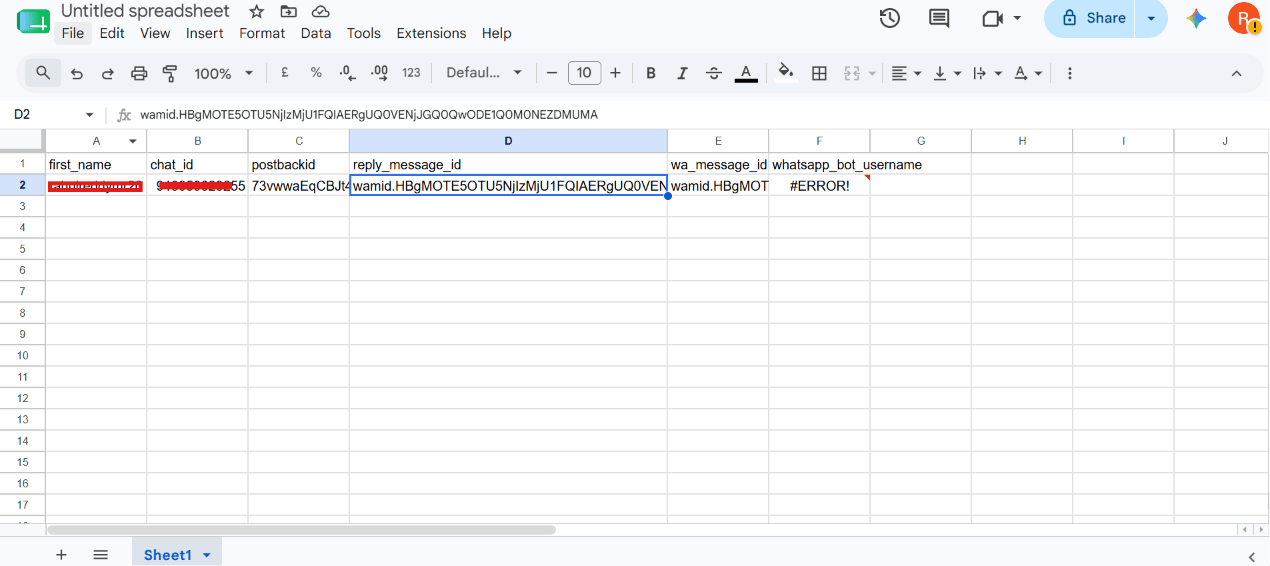 produces the sheet shown above, with `first_name`, `chat_id`, `postbackid`, and
`reply_message_id` as columns, populated automatically — no manual setup per field.
If you add a new field later (e.g. `budget`), the next submission that includes it
automatically gets its own column — no need to edit the sheet first.
## Real business examples
| Use case | Fields collected | Destination |
| -------------------- | ----------------------------------------------- | ------------- |
| Lead Collection | Name, Phone, Business Type | Google Sheets |
| Appointment Booking | Name, Date, Time | Google Sheets |
| Property Enquiry | Name, Phone, Property Type, Budget, Location | Google Sheets |
| AI Automation Agency | Name, Company, Service Required, Monthly Budget | Google Sheets |
This is the simplest and most common way to connect a ChatSyncs WhatsApp Flow or Input Flow
directly to Google Sheets without running your own server — the same approach works for any
endpoint that accepts an HTTP POST, including a CRM, Zapier, Make.com, or Airtable.
## Manage Outbound Actions
produces the sheet shown above, with `first_name`, `chat_id`, `postbackid`, and
`reply_message_id` as columns, populated automatically — no manual setup per field.
If you add a new field later (e.g. `budget`), the next submission that includes it
automatically gets its own column — no need to edit the sheet first.
## Real business examples
| Use case | Fields collected | Destination |
| -------------------- | ----------------------------------------------- | ------------- |
| Lead Collection | Name, Phone, Business Type | Google Sheets |
| Appointment Booking | Name, Date, Time | Google Sheets |
| Property Enquiry | Name, Phone, Property Type, Budget, Location | Google Sheets |
| AI Automation Agency | Name, Company, Service Required, Monthly Budget | Google Sheets |
This is the simplest and most common way to connect a ChatSyncs WhatsApp Flow or Input Flow
directly to Google Sheets without running your own server — the same approach works for any
endpoint that accepts an HTTP POST, including a CRM, Zapier, Make.com, or Airtable.
## Manage Outbound Actions
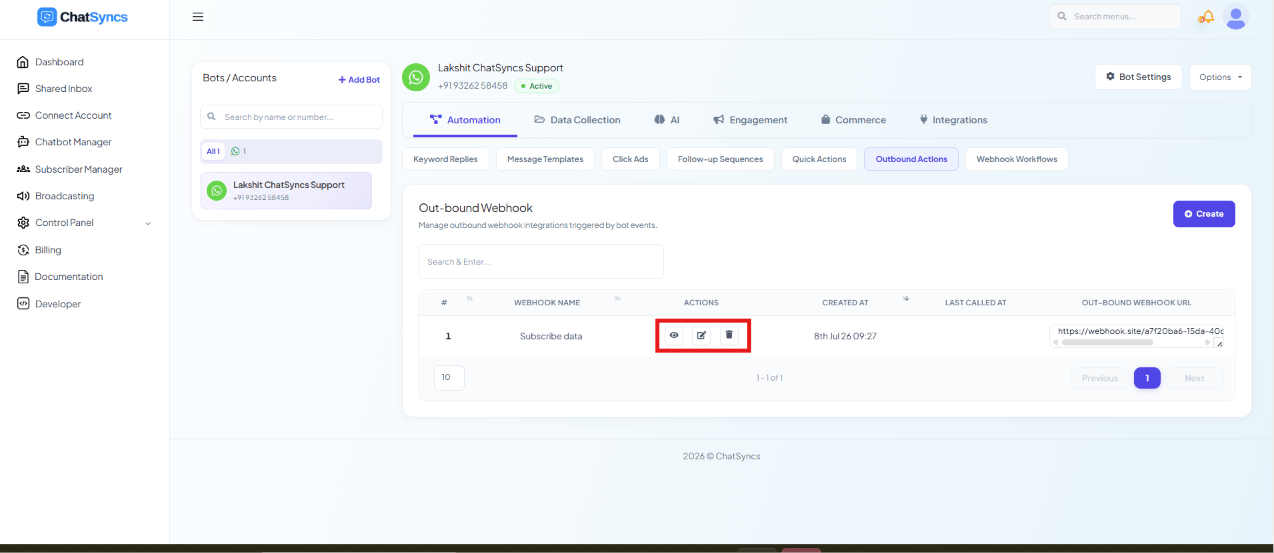 Saved webhooks appear in the **Outbound Actions** list with three actions:
* **View Report** — see webhook logs and activity, and check whether data was sent
successfully.
* **Edit** — update the webhook URL, triggers, or selected data fields at any time.
* **Delete** — permanently remove the webhook; ChatSyncs stops sending it data immediately.
Use **View Report** to confirm your Google Sheet, CRM, or server is actually receiving the
data — don't assume it's working just because the webhook saved successfully.
## Frequently asked
Deploy a Google Apps Script `doPost` web app on the target sheet, copy its URL, then create
an **Outbound Action** in Chatbot Manager → Automation with that URL, turn on **User Input
Flow** (or **Postback** / **Location**), and make sure **Input Flow Data** is turned on.
Yes — **Postback**, **User Input Flow**, and **Location** are all toggles on the same
Outbound Action form, not separate configurations. Enable as many as you need; each fires
independently and sends to the same webhook URL.
Check three things: the Apps Script deployment's **Who has access** is set to **Anyone**
(not "Only myself"), the **Out-bound Webhook URL** in ChatSyncs exactly matches the deployed
Web App URL, and the right trigger/fields are enabled. Use **View Report** on the webhook to
see whether ChatSyncs is sending anything at all.
The **Input Flow Data** field toggle is probably off. Without it, the webhook still fires
and sends subscriber metadata, but not the actual question answers.
No — the Apps Script reads the JSON keys in each payload and adds any missing column
automatically, including for new fields you start sending later.
Yes — an Outbound Action sends a plain HTTP request, so any endpoint that can receive one
works: a CRM, your own server, Zapier, Make.com, or Airtable.
* **"Only myself" access blocks ChatSyncs entirely** — the Apps Script deployment's **Who has
access** must be **Anyone** or **Anyone with the link**.
* **Input Flow Data must be explicitly enabled** — it's the one field that carries the actual
form answers; everything else is just subscriber metadata.
* **The webhook URL must match the live deployment** — redeploying a new version in Apps
Script can change the URL, which then needs updating in ChatSyncs too.
Saved webhooks appear in the **Outbound Actions** list with three actions:
* **View Report** — see webhook logs and activity, and check whether data was sent
successfully.
* **Edit** — update the webhook URL, triggers, or selected data fields at any time.
* **Delete** — permanently remove the webhook; ChatSyncs stops sending it data immediately.
Use **View Report** to confirm your Google Sheet, CRM, or server is actually receiving the
data — don't assume it's working just because the webhook saved successfully.
## Frequently asked
Deploy a Google Apps Script `doPost` web app on the target sheet, copy its URL, then create
an **Outbound Action** in Chatbot Manager → Automation with that URL, turn on **User Input
Flow** (or **Postback** / **Location**), and make sure **Input Flow Data** is turned on.
Yes — **Postback**, **User Input Flow**, and **Location** are all toggles on the same
Outbound Action form, not separate configurations. Enable as many as you need; each fires
independently and sends to the same webhook URL.
Check three things: the Apps Script deployment's **Who has access** is set to **Anyone**
(not "Only myself"), the **Out-bound Webhook URL** in ChatSyncs exactly matches the deployed
Web App URL, and the right trigger/fields are enabled. Use **View Report** on the webhook to
see whether ChatSyncs is sending anything at all.
The **Input Flow Data** field toggle is probably off. Without it, the webhook still fires
and sends subscriber metadata, but not the actual question answers.
No — the Apps Script reads the JSON keys in each payload and adds any missing column
automatically, including for new fields you start sending later.
Yes — an Outbound Action sends a plain HTTP request, so any endpoint that can receive one
works: a CRM, your own server, Zapier, Make.com, or Airtable.
* **"Only myself" access blocks ChatSyncs entirely** — the Apps Script deployment's **Who has
access** must be **Anyone** or **Anyone with the link**.
* **Input Flow Data must be explicitly enabled** — it's the one field that carries the actual
form answers; everything else is just subscriber metadata.
* **The webhook URL must match the live deployment** — redeploying a new version in Apps
Script can change the URL, which then needs updating in ChatSyncs too.