> ## Documentation Index
> Fetch the complete documentation index at: https://docs.chatsyncs.com/llms.txt
> Use this file to discover all available pages before exploring further.
# How to Manage Custom Fields and Labels
> How to create and manage Labels (tags for segmenting subscribers you can filter by, broadcast to, or automate from) and Custom Fields (extra structured data stored per subscriber, like email, department, or an order ID) from ChatSyncs Subscriber Manager's Manage dropdown — including the three ways a custom field gets filled in and the three ways that data flows back out to sheets, webhooks, and messages.
## Labels vs. Custom Fields
Both live under the **Manage** dropdown on the [Subscriber Manager](/learn/whatsapp-subscriber-manager)
list, and both add structure beyond a subscriber's built-in phone number, subscriber ID, and
name — but they solve two different problems. Knowing which one you actually need saves a lot of
backtracking later:
| | Stores | Use it to |
| ---------------- | ----------------------------------------- | ----------------------------------------------------------------------------------------------------------- |
| **Label** | Nothing by itself — it's a tag you attach | Group subscribers into a segment you can filter by, target with a broadcast, or trigger an automation from |
| **Custom Field** | One extra piece of data, per subscriber | Remember something specific about *that person* — their email, department, an order ID, an appointment date |
A simple rule of thumb: if the answer is the same word for a whole group of people (`VIP`,
`Lead`, `batch1`), it's a **Label**. If the answer is different for every single subscriber
(`priya@company.com`, `Order #4521`), it's a **Custom Field**.
## The Manage dropdown
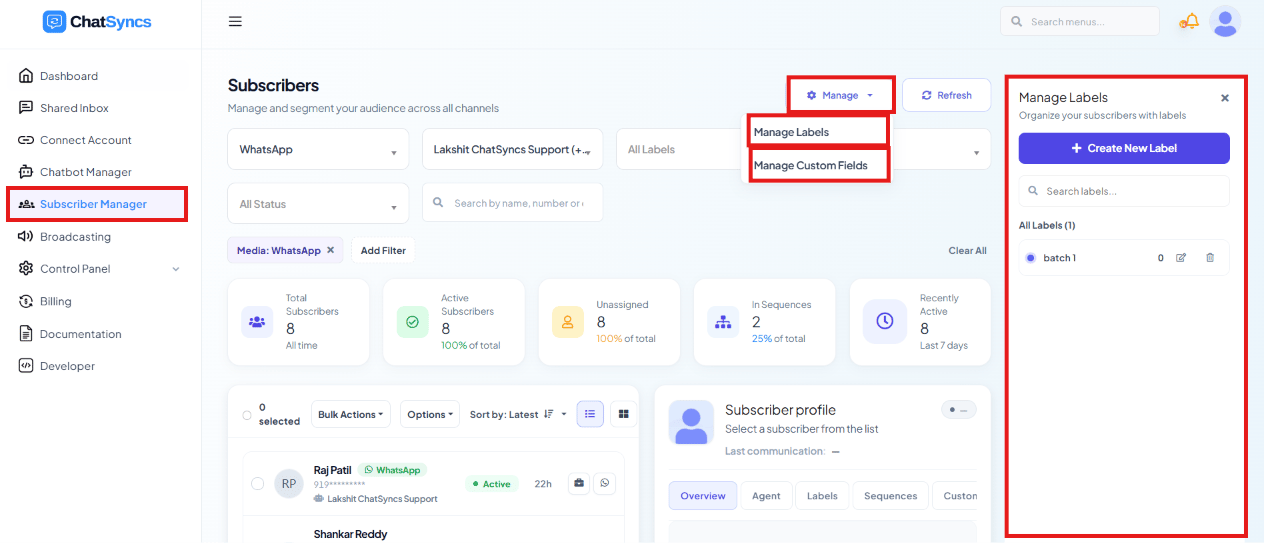 From the subscriber list, the **Manage** dropdown opens **Manage Labels** and **Manage Custom
Fields** as a panel on the right — this is where both are defined, before either can ever be
assigned to a subscriber.
## Create a label
**Labels** group subscribers into segments (e.g. `batch1`, `Lead`, `VIP Customer`) that you can
filter by, target in broadcasts, or trigger automations from.
From the subscriber list, the **Manage** dropdown opens **Manage Labels** and **Manage Custom
Fields** as a panel on the right — this is where both are defined, before either can ever be
assigned to a subscriber.
## Create a label
**Labels** group subscribers into segments (e.g. `batch1`, `Lead`, `VIP Customer`) that you can
filter by, target in broadcasts, or trigger automations from.
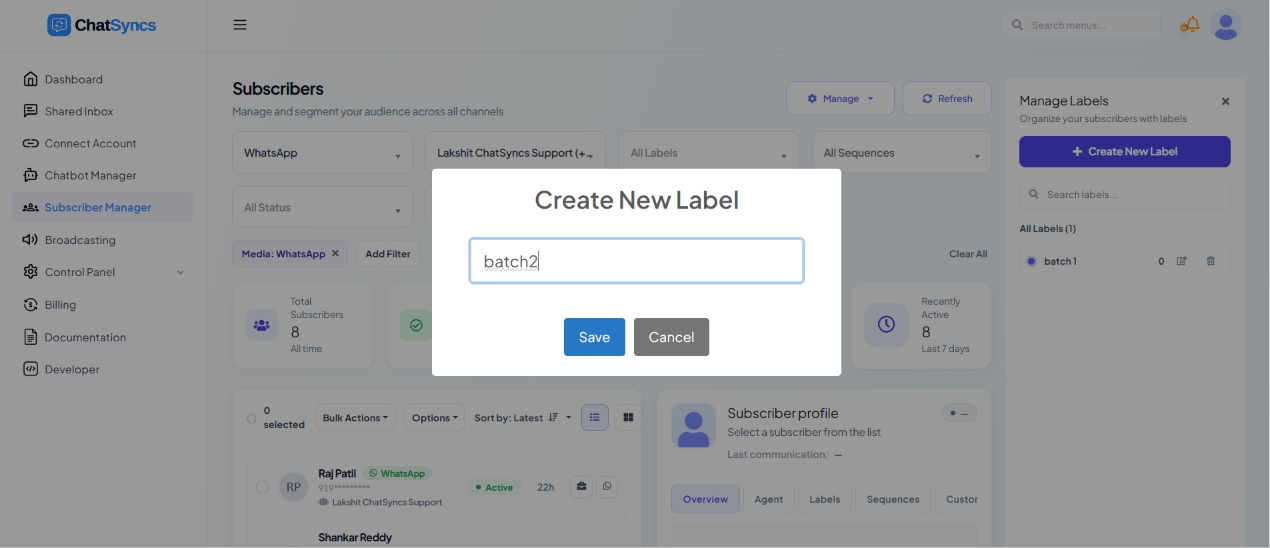 From the subscriber list, open **Manage**, then **Manage Labels**.
Click **+ Create New Label** in the panel.
Enter a **Label Name**, e.g. `batch2`.
Click **Save** — the label is now available to assign to subscribers.
**Expected result:** The new label appears in the **All Labels** list and in every label picker
across ChatSyncs — ready to filter subscribers by, or attach to a broadcast's audience.
Creating a label only defines it — it doesn't attach it to anyone yet. Assign it to subscribers
from the [Subscriber Manager overview's bulk actions](/learn/whatsapp-subscriber-manager#assign-or-remove-a-label),
or automatically from a [Keyword Replies](/learn/whatsapp-keyword-replies) flow's Automation
Actions.
Naming labels with a consistent prefix (`batch1`, `batch2`, `batch3`) or a clear category
(`Lead`, `Customer`, `VIP`) makes them far easier to pick correctly later, once you have a dozen
of them.
## Custom Fields
From the subscriber list, open **Manage**, then **Manage Labels**.
Click **+ Create New Label** in the panel.
Enter a **Label Name**, e.g. `batch2`.
Click **Save** — the label is now available to assign to subscribers.
**Expected result:** The new label appears in the **All Labels** list and in every label picker
across ChatSyncs — ready to filter subscribers by, or attach to a broadcast's audience.
Creating a label only defines it — it doesn't attach it to anyone yet. Assign it to subscribers
from the [Subscriber Manager overview's bulk actions](/learn/whatsapp-subscriber-manager#assign-or-remove-a-label),
or automatically from a [Keyword Replies](/learn/whatsapp-keyword-replies) flow's Automation
Actions.
Naming labels with a consistent prefix (`batch1`, `batch2`, `batch3`) or a clear category
(`Lead`, `Customer`, `VIP`) makes them far easier to pick correctly later, once you have a dozen
of them.
## Custom Fields
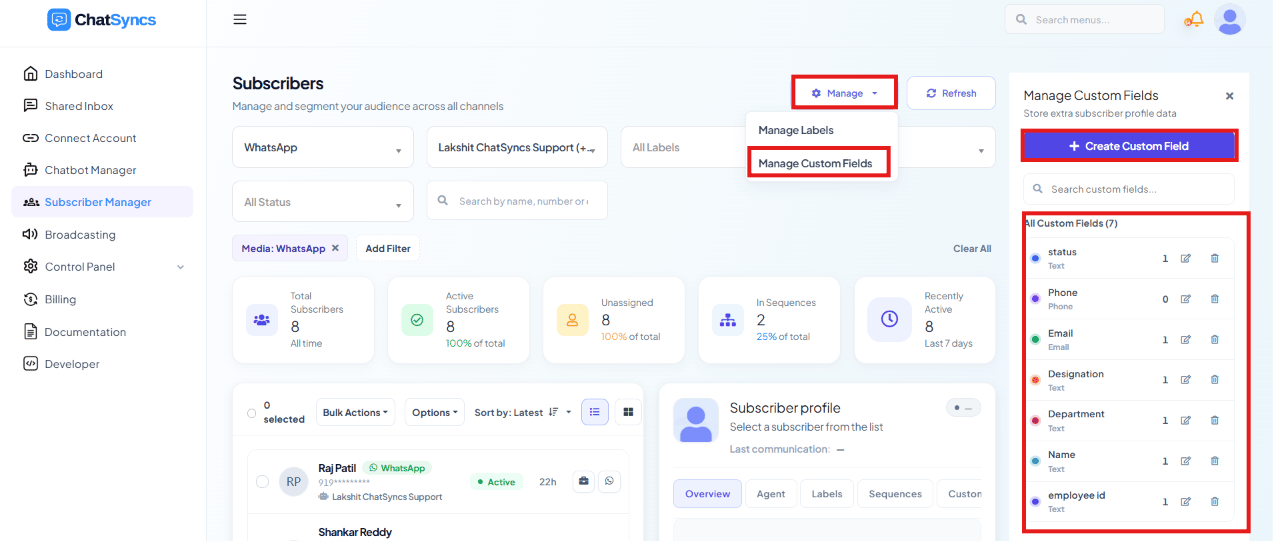 A **Custom Field** stores one extra piece of structured data per subscriber, beyond the
built-in Phone Number, Subscriber ID, and Name — e.g. `email`, `designation`, `department`, or
`employee id`. Create one from **Manage → Manage Custom Fields**, picking a type that matches
the data:
From the subscriber list, open **Manage**, then **Manage Custom Fields**.
Click **+ Create Custom Field** in the panel.
Pick a type that matches the data you'll store — see the table below.
The field is now available on every subscriber's profile, and as a mapping target during import.
| Type | Stores | Typical use |
| ---------- | ---------------- | --------------------------------------- |
| **Text** | Any free text | Company name, city, notes |
| **Number** | A numeric value | Order ID, quantity, budget |
| **Date** | A calendar date | Appointment date, date of birth |
| **Email** | An email address | Contact email for follow-ups |
| **Phone** | A phone number | An alternate or referral contact number |
### How a custom field gets filled in
Creating a custom field only defines the storage slot — it starts empty for every subscriber
until it's populated one of three ways, all covered elsewhere on this site:
* **Manually or via import** — any extra column beyond phone number and name in an
[imported CSV or Google Sheet](/learn/subscriber-manager-import-csv) becomes a custom field
automatically, matched by column header.
* **From a conversation** — a [Keyword Replies](/learn/whatsapp-keyword-replies#data-&-integrations) flow's
**Save to Custom Field** action stores whatever the subscriber types (e.g. their email) the
moment they answer.
* **From a form submission** — an [Input Flow](/learn/whatsapp-input-flow) or
[WhatsApp Flow](/learn/whatsapp-flows) question can save its answer straight to a custom
field.
### How that data flows back out
Once populated, a custom field's value flows back out the same way it flows in:
* **To Google Sheets** — Keyword Replies'
[Sync Data to Google Sheets](/learn/whatsapp-keyword-replies#data-&-integrations) maps each custom
field to a spreadsheet column on every submission.
* **To a webhook** — Keyword Replies' **Forward Data to Webhook**, or a dedicated
[Outbound Action](/learn/whatsapp-outbound-actions) with **Input Flow Data** enabled, sends
the same custom field values as JSON to a CRM, Zapier, Make.com, or your own server.
* **Back into messages** — a custom field's value can be inserted into a
[Message Template](/learn/whatsapp-message-templates) or Keyword Replies text as a `#fieldname#`
variable, e.g. `Hi #name#, your appointment is on #preferred_appointment_date#`.
## Frequently asked
A **label** is a shared tag for grouping subscribers into a segment (`VIP`, `batch1`) — it
holds no data of its own. A **custom field** stores a different value per subscriber
(an email address, an order ID). See the comparison table above.
Create a **Label** under **Manage → Manage Labels**, then select subscribers in the
Subscriber Manager list and use **Options → Assign Label** (or **Remove Label** to undo it).
You can then filter the subscriber list by that label, or target it in a broadcast.
Three ways: an extra column in a CSV/Google Sheet import, a **Save to Custom Field** action
in a Keyword Replies flow, or a form answer from an Input Flow / WhatsApp Flow. See
"How a custom field gets filled in" above.
Yes — reference it as a `#fieldname#` variable in a Message Template or Keyword Replies
text block, e.g. `Hi #name#, your order #order_id# has shipped.`
**Number** — it keeps the value sortable and usable in calculations, unlike **Text**, which
stores it as an unstructured string.
## Related Documentation
* [Subscriber Manager](/learn/whatsapp-subscriber-manager) — the subscriber list, Options menu,
and bulk label/sequence actions.
* [Import Using CSV](/learn/subscriber-manager-import-csv) — how extra columns become custom
fields automatically.
* [Keyword Replies](/learn/whatsapp-keyword-replies#data-&-integrations) — Save to Custom Field
and Sync Data to Google Sheets actions.
* [Message Templates](/learn/whatsapp-message-templates) — inserting a custom field's value into
an outgoing message.
* [Outbound Actions](/learn/whatsapp-outbound-actions) — forwarding custom field data to a CRM
or webhook.
## Learn From a Use Case
* [Clinic Appointment Booking Automation](/learn/clinic-appointment-booking-business-problem) —
Custom Fields store each answer submitted through the appointment form.
A **Custom Field** stores one extra piece of structured data per subscriber, beyond the
built-in Phone Number, Subscriber ID, and Name — e.g. `email`, `designation`, `department`, or
`employee id`. Create one from **Manage → Manage Custom Fields**, picking a type that matches
the data:
From the subscriber list, open **Manage**, then **Manage Custom Fields**.
Click **+ Create Custom Field** in the panel.
Pick a type that matches the data you'll store — see the table below.
The field is now available on every subscriber's profile, and as a mapping target during import.
| Type | Stores | Typical use |
| ---------- | ---------------- | --------------------------------------- |
| **Text** | Any free text | Company name, city, notes |
| **Number** | A numeric value | Order ID, quantity, budget |
| **Date** | A calendar date | Appointment date, date of birth |
| **Email** | An email address | Contact email for follow-ups |
| **Phone** | A phone number | An alternate or referral contact number |
### How a custom field gets filled in
Creating a custom field only defines the storage slot — it starts empty for every subscriber
until it's populated one of three ways, all covered elsewhere on this site:
* **Manually or via import** — any extra column beyond phone number and name in an
[imported CSV or Google Sheet](/learn/subscriber-manager-import-csv) becomes a custom field
automatically, matched by column header.
* **From a conversation** — a [Keyword Replies](/learn/whatsapp-keyword-replies#data-&-integrations) flow's
**Save to Custom Field** action stores whatever the subscriber types (e.g. their email) the
moment they answer.
* **From a form submission** — an [Input Flow](/learn/whatsapp-input-flow) or
[WhatsApp Flow](/learn/whatsapp-flows) question can save its answer straight to a custom
field.
### How that data flows back out
Once populated, a custom field's value flows back out the same way it flows in:
* **To Google Sheets** — Keyword Replies'
[Sync Data to Google Sheets](/learn/whatsapp-keyword-replies#data-&-integrations) maps each custom
field to a spreadsheet column on every submission.
* **To a webhook** — Keyword Replies' **Forward Data to Webhook**, or a dedicated
[Outbound Action](/learn/whatsapp-outbound-actions) with **Input Flow Data** enabled, sends
the same custom field values as JSON to a CRM, Zapier, Make.com, or your own server.
* **Back into messages** — a custom field's value can be inserted into a
[Message Template](/learn/whatsapp-message-templates) or Keyword Replies text as a `#fieldname#`
variable, e.g. `Hi #name#, your appointment is on #preferred_appointment_date#`.
## Frequently asked
A **label** is a shared tag for grouping subscribers into a segment (`VIP`, `batch1`) — it
holds no data of its own. A **custom field** stores a different value per subscriber
(an email address, an order ID). See the comparison table above.
Create a **Label** under **Manage → Manage Labels**, then select subscribers in the
Subscriber Manager list and use **Options → Assign Label** (or **Remove Label** to undo it).
You can then filter the subscriber list by that label, or target it in a broadcast.
Three ways: an extra column in a CSV/Google Sheet import, a **Save to Custom Field** action
in a Keyword Replies flow, or a form answer from an Input Flow / WhatsApp Flow. See
"How a custom field gets filled in" above.
Yes — reference it as a `#fieldname#` variable in a Message Template or Keyword Replies
text block, e.g. `Hi #name#, your order #order_id# has shipped.`
**Number** — it keeps the value sortable and usable in calculations, unlike **Text**, which
stores it as an unstructured string.
## Related Documentation
* [Subscriber Manager](/learn/whatsapp-subscriber-manager) — the subscriber list, Options menu,
and bulk label/sequence actions.
* [Import Using CSV](/learn/subscriber-manager-import-csv) — how extra columns become custom
fields automatically.
* [Keyword Replies](/learn/whatsapp-keyword-replies#data-&-integrations) — Save to Custom Field
and Sync Data to Google Sheets actions.
* [Message Templates](/learn/whatsapp-message-templates) — inserting a custom field's value into
an outgoing message.
* [Outbound Actions](/learn/whatsapp-outbound-actions) — forwarding custom field data to a CRM
or webhook.
## Learn From a Use Case
* [Clinic Appointment Booking Automation](/learn/clinic-appointment-booking-business-problem) —
Custom Fields store each answer submitted through the appointment form.