> ## Documentation Index
> Fetch the complete documentation index at: https://docs.chatsyncs.com/llms.txt
> Use this file to discover all available pages before exploring further.
# User Manager
> User Manager creates and manages team members — their login, WhatsApp number, assigned Team Role (from User Permission), allowed bots, status, and live-chat assignment restriction. Use this when a customer wants to add an employee, control what that employee can access, or restrict a support agent to only their assigned chats.
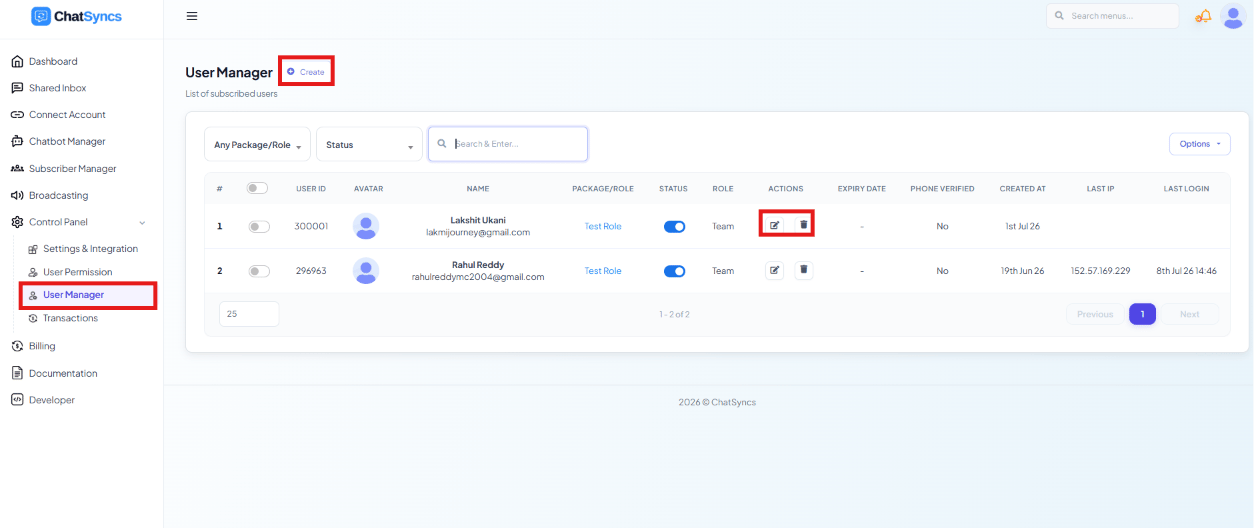 **Control Panel → User Manager** creates and manages every team member who can log into the
account — separate from the account owner's own login. Each team member is assigned a
**Team Role** (created in [User Permission](/learn/control-panel-user-permission)), which
determines exactly which modules and actions they can access once they log in. This is how an
organization lets multiple employees share one ChatSyncs account securely.
From this page you can view all team members, search or filter by **Team Role** or **Status**,
enable/disable an account, edit a user's information, delete a user, or create a new one.
## Creating a team member
**Control Panel → User Manager** creates and manages every team member who can log into the
account — separate from the account owner's own login. Each team member is assigned a
**Team Role** (created in [User Permission](/learn/control-panel-user-permission)), which
determines exactly which modules and actions they can access once they log in. This is how an
organization lets multiple employees share one ChatSyncs account securely.
From this page you can view all team members, search or filter by **Team Role** or **Status**,
enable/disable an account, edit a user's information, delete a user, or create a new one.
## Creating a team member
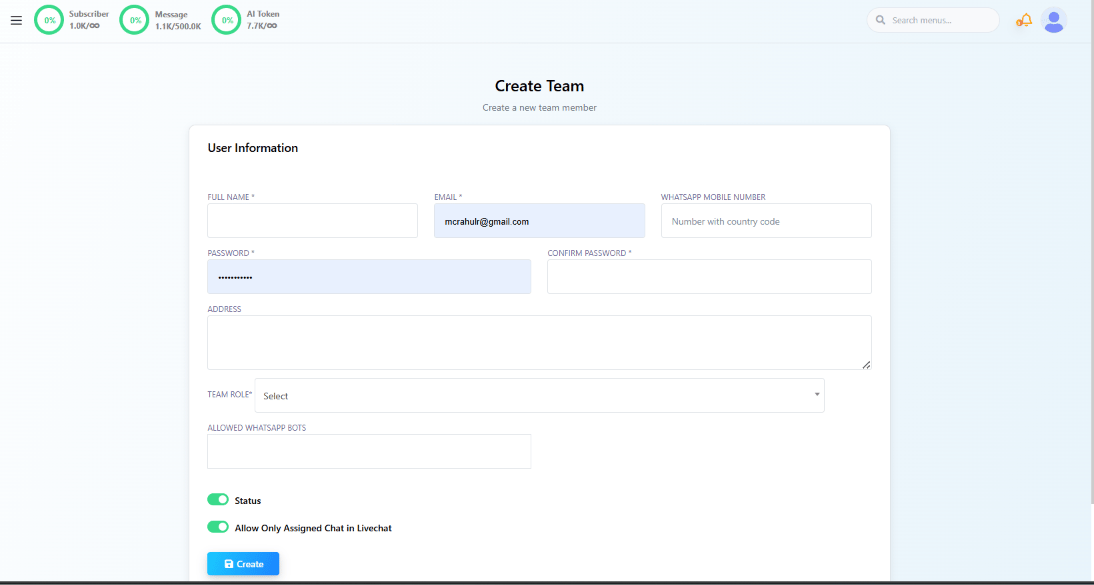 Click **Create**, then fill in the **Create New Team Member** page:
| Field | What it's for | Example |
| ----------------------------------------- | -------------------------------------------------------------------------------------- | ------------------------------------------------------ |
| **Full Name** | The employee's name | `Rahul Reddy` |
| **Email** | Used for login and communication | `rahul@example.com` |
| **WhatsApp Mobile Number** | Employee's WhatsApp number with country code (optional) | `+91 9876543210` |
| **Password** / **Confirm Password** | The employee's login credentials | — |
| **Address** | Optional | — |
| **Team Role** | The permission package from **User Permission** that decides what this user can access | `Admin`, `Sales Team`, `Customer Support`, `Marketing` |
| **Allowed WhatsApp Bots** | Which bot(s) this user is allowed to manage, if more than one bot exists | — |
| **Status** | **Enabled** = can log in, **Disabled** = cannot log in | — |
| **Allow Only Assigned Chat in Live Chat** | See below | — |
Click **Create** — the account is created immediately and the employee can log in right away
with the email and password you set.
### Allow Only Assigned Chat in Live Chat
* **Enabled** — the team member can only view and reply to conversations specifically assigned
to them.
* **Disabled** — the team member can view all conversations (subject to their Team Role's Live
Chat permission).
**Example:** three support agents — Priya, Kiran, and David — all have Live Chat access. A
customer named John starts a conversation, and the administrator assigns it to Priya. With
**Allow Only Assigned Chat** enabled, Priya can see and reply to John's messages, but Kiran and
David cannot — preventing two agents from answering the same customer at once.
## How User Permission and User Manager work together
**User Permission** creates the *roles* (what a set of permissions allows). **User Manager**
creates the *users* and assigns one of those roles to each.
Define one in User Permission — e.g. Admin, Customer Support, Marketing.
Choose which modules and actions that role can use.
Go to Control Panel → User Manager.
Fill in their info as above.
Pick the role you defined in step 1.
Give the employee their email and password.
The user only sees the modules their assigned role allows.
## Real-world example
An online clothing store has three employees. First, three Team Roles are created in
**User Permission**:
| Role | Access |
| ---------------- | -------------------------------- |
| Admin | Full access |
| Customer Support | Live Chat and Subscribers |
| Marketing | Broadcast and WhatsApp Templates |
Then three team members are created here, each assigned one of those roles:
| Employee | Team Role | Login Email |
| -------- | ---------------- | --------------------------------------------- |
| Rahul | Admin | [rahul@example.com](mailto:rahul@example.com) |
| Priya | Customer Support | [priya@example.com](mailto:priya@example.com) |
| Arjun | Marketing | [arjun@example.com](mailto:arjun@example.com) |
**What each person sees after logging in:**
* **Rahul (Admin)** — Dashboard, Chatbot Manager, User Manager, User Permission, Live Chat,
Broadcast, API Settings, and every other module. Full control of the system.
* **Priya (Customer Support)** — only Live Chat and Subscribers. No access to Chatbot Manager,
Broadcast, API Settings, User Manager, or User Permission — just the tools she needs to help
customers.
* **Arjun (Marketing)** — only Broadcast and WhatsApp Templates. No access to Live Chat, Bot
Manager, API Settings, or User Management — focused purely on marketing.
## Best practices
* **Create the permission role before adding the team member** — assigning a role happens at
creation time, so define the role in User Permission first.
* **Give every employee their own login** — don't share one login across multiple people; it
breaks login-activity auditing and live-chat assignment.
* **Enable Allow Only Assigned Chat for support teams** — otherwise multiple agents can end up
replying to the same customer.
* **Disable an account instead of deleting it** when an employee leaves, so their historical
activity (past logins, chat replies) is preserved.
## Frequently asked
**Control Panel → User Manager** lists every team member, along with their role, status,
and last login.
Change their **Team Role** in **User Manager** to a different
[User Permission](/learn/control-panel-user-permission) package, rather than editing access
feature-by-feature for that one person.
Find them in **User Manager** and use the row's delete action, or set their **Status** to
disabled if you want to revoke access without deleting their record and history.
Enable **Allow Only Assigned Chat in Live Chat** on their team member accounts, then assign
each conversation to a specific agent — only that agent will see and be able to reply to it.
Yes — set **Allowed WhatsApp Bots** when creating or editing the team member to restrict
them to one or more specific bots, if the account has more than one.
Click **Create**, then fill in the **Create New Team Member** page:
| Field | What it's for | Example |
| ----------------------------------------- | -------------------------------------------------------------------------------------- | ------------------------------------------------------ |
| **Full Name** | The employee's name | `Rahul Reddy` |
| **Email** | Used for login and communication | `rahul@example.com` |
| **WhatsApp Mobile Number** | Employee's WhatsApp number with country code (optional) | `+91 9876543210` |
| **Password** / **Confirm Password** | The employee's login credentials | — |
| **Address** | Optional | — |
| **Team Role** | The permission package from **User Permission** that decides what this user can access | `Admin`, `Sales Team`, `Customer Support`, `Marketing` |
| **Allowed WhatsApp Bots** | Which bot(s) this user is allowed to manage, if more than one bot exists | — |
| **Status** | **Enabled** = can log in, **Disabled** = cannot log in | — |
| **Allow Only Assigned Chat in Live Chat** | See below | — |
Click **Create** — the account is created immediately and the employee can log in right away
with the email and password you set.
### Allow Only Assigned Chat in Live Chat
* **Enabled** — the team member can only view and reply to conversations specifically assigned
to them.
* **Disabled** — the team member can view all conversations (subject to their Team Role's Live
Chat permission).
**Example:** three support agents — Priya, Kiran, and David — all have Live Chat access. A
customer named John starts a conversation, and the administrator assigns it to Priya. With
**Allow Only Assigned Chat** enabled, Priya can see and reply to John's messages, but Kiran and
David cannot — preventing two agents from answering the same customer at once.
## How User Permission and User Manager work together
**User Permission** creates the *roles* (what a set of permissions allows). **User Manager**
creates the *users* and assigns one of those roles to each.
Define one in User Permission — e.g. Admin, Customer Support, Marketing.
Choose which modules and actions that role can use.
Go to Control Panel → User Manager.
Fill in their info as above.
Pick the role you defined in step 1.
Give the employee their email and password.
The user only sees the modules their assigned role allows.
## Real-world example
An online clothing store has three employees. First, three Team Roles are created in
**User Permission**:
| Role | Access |
| ---------------- | -------------------------------- |
| Admin | Full access |
| Customer Support | Live Chat and Subscribers |
| Marketing | Broadcast and WhatsApp Templates |
Then three team members are created here, each assigned one of those roles:
| Employee | Team Role | Login Email |
| -------- | ---------------- | --------------------------------------------- |
| Rahul | Admin | [rahul@example.com](mailto:rahul@example.com) |
| Priya | Customer Support | [priya@example.com](mailto:priya@example.com) |
| Arjun | Marketing | [arjun@example.com](mailto:arjun@example.com) |
**What each person sees after logging in:**
* **Rahul (Admin)** — Dashboard, Chatbot Manager, User Manager, User Permission, Live Chat,
Broadcast, API Settings, and every other module. Full control of the system.
* **Priya (Customer Support)** — only Live Chat and Subscribers. No access to Chatbot Manager,
Broadcast, API Settings, User Manager, or User Permission — just the tools she needs to help
customers.
* **Arjun (Marketing)** — only Broadcast and WhatsApp Templates. No access to Live Chat, Bot
Manager, API Settings, or User Management — focused purely on marketing.
## Best practices
* **Create the permission role before adding the team member** — assigning a role happens at
creation time, so define the role in User Permission first.
* **Give every employee their own login** — don't share one login across multiple people; it
breaks login-activity auditing and live-chat assignment.
* **Enable Allow Only Assigned Chat for support teams** — otherwise multiple agents can end up
replying to the same customer.
* **Disable an account instead of deleting it** when an employee leaves, so their historical
activity (past logins, chat replies) is preserved.
## Frequently asked
**Control Panel → User Manager** lists every team member, along with their role, status,
and last login.
Change their **Team Role** in **User Manager** to a different
[User Permission](/learn/control-panel-user-permission) package, rather than editing access
feature-by-feature for that one person.
Find them in **User Manager** and use the row's delete action, or set their **Status** to
disabled if you want to revoke access without deleting their record and history.
Enable **Allow Only Assigned Chat in Live Chat** on their team member accounts, then assign
each conversation to a specific agent — only that agent will see and be able to reply to it.
Yes — set **Allowed WhatsApp Bots** when creating or editing the team member to restrict
them to one or more specific bots, if the account has more than one.