> ## Documentation Index
> Fetch the complete documentation index at: https://docs.chatsyncs.com/llms.txt
> Use this file to discover all available pages before exploring further.
# Webhook Automation Settings in ChatSyncs
> How to add a delay, conditional send rules, and post-webhook actions (assigning conversations, labels, and sequences) to a ChatSyncs Webhook Workflow.
Beyond just sending a message, a [Webhook Workflow](/learn/chatsyncs-webhook-workflow/introduction) can
control **when** the message goes out, **whether** it should send at all, and **what happens
next** once it does — all from the same workflow's settings.
## Send the message with a delay
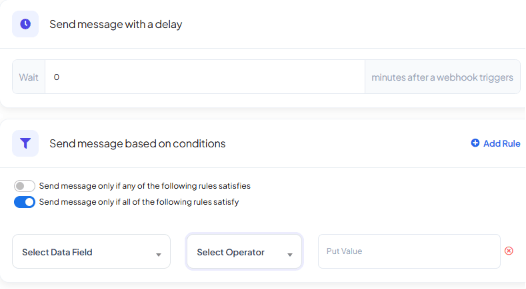 Set **Wait** to a number of minutes after the webhook triggers before the message actually
sends. `0` sends immediately.
**Example:** A customer books a meeting for 3:00 PM. Instead of confirming the instant the
booking lands, set a 30-minute delay so the message reads more like a considered reminder than
an instant auto-reply.
## Send the message only under certain conditions
Instead of a message for *every* call, conditions let you decide whether a particular one
should actually trigger a send.
Set **Wait** to a number of minutes after the webhook triggers before the message actually
sends. `0` sends immediately.
**Example:** A customer books a meeting for 3:00 PM. Instead of confirming the instant the
booking lands, set a 30-minute delay so the message reads more like a considered reminder than
an instant auto-reply.
## Send the message only under certain conditions
Instead of a message for *every* call, conditions let you decide whether a particular one
should actually trigger a send.
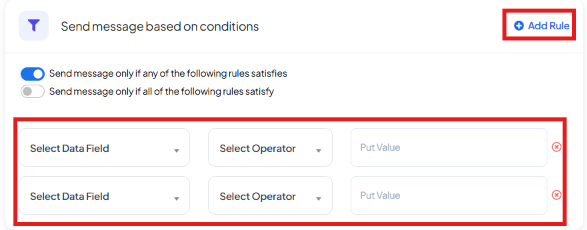 Click **Add Rule** to add a condition — each one has three parts:
* **Select Data Field** — which webhook field to check (only fields your app actually sends will
be useful here).
* **Select Operator** — how to compare the field to your value:
| Operator | What it checks |
| ------------------ | ----------------------------------------------------- |
| `Equals` | The field is exactly this value |
| `Not Equals` | The field is anything *other than* this value |
| `Contains` | The value appears somewhere inside the field |
| `Does Not Contain` | The value does *not* appear anywhere inside the field |
| `Starts With` | The field begins with this value |
| `Ends With` | The field ends with this value |
| `Greater Than` | The field's number is bigger than this value |
| `Less Than` | The field's number is smaller than this value |
| `Is Empty` | The field has no value at all |
| `Is Not Empty` | The field has some value, whatever it is |
* **Put Value** — the value to compare against.
Add as many rules as you need, then choose how they combine:
* **Any** (OR logic) — the message sends if **at least one** rule matches.
* **All** (AND logic) — **every** rule must match before the message sends.
**Example:** Only send a booking confirmation if the booking type is `consultation` — internal
team meetings booked through the same calendar shouldn't trigger a customer message.
Verify the webhook payload actually contains every field a rule checks. A rule referencing a
field your app never sends will simply never match — test with real sample data before
publishing.
## Actions after a successful call
Once a message sends successfully, the workflow can also update the subscriber automatically:
Click **Add Rule** to add a condition — each one has three parts:
* **Select Data Field** — which webhook field to check (only fields your app actually sends will
be useful here).
* **Select Operator** — how to compare the field to your value:
| Operator | What it checks |
| ------------------ | ----------------------------------------------------- |
| `Equals` | The field is exactly this value |
| `Not Equals` | The field is anything *other than* this value |
| `Contains` | The value appears somewhere inside the field |
| `Does Not Contain` | The value does *not* appear anywhere inside the field |
| `Starts With` | The field begins with this value |
| `Ends With` | The field ends with this value |
| `Greater Than` | The field's number is bigger than this value |
| `Less Than` | The field's number is smaller than this value |
| `Is Empty` | The field has no value at all |
| `Is Not Empty` | The field has some value, whatever it is |
* **Put Value** — the value to compare against.
Add as many rules as you need, then choose how they combine:
* **Any** (OR logic) — the message sends if **at least one** rule matches.
* **All** (AND logic) — **every** rule must match before the message sends.
**Example:** Only send a booking confirmation if the booking type is `consultation` — internal
team meetings booked through the same calendar shouldn't trigger a customer message.
Verify the webhook payload actually contains every field a rule checks. A rule referencing a
field your app never sends will simply never match — test with real sample data before
publishing.
## Actions after a successful call
Once a message sends successfully, the workflow can also update the subscriber automatically:
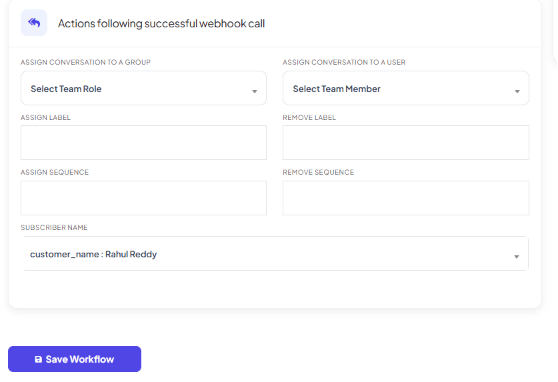 * **Assign Conversation to a Group** — route the conversation to a team (e.g. Sales, Support).
* **Assign Conversation to a User** — assign it to one specific team member.
* **Assign Label / Remove Label** — tag or untag the subscriber for segmentation and filtering.
* **Assign Sequence / Remove Sequence** — start or stop an automated sequence for them, see
[How to Build Automatic Follow-Up Chatbots on WhatsApp](/learn/chatsyncs-automation/build-automatic-follow-up-chatbots-on-whatsapp-in-chatsyncs).
* **Subscriber Name** — map a webhook field to set the subscriber's display name in ChatSyncs.
* **Assign Conversation to a Group** — route the conversation to a team (e.g. Sales, Support).
* **Assign Conversation to a User** — assign it to one specific team member.
* **Assign Label / Remove Label** — tag or untag the subscriber for segmentation and filtering.
* **Assign Sequence / Remove Sequence** — start or stop an automated sequence for them, see
[How to Build Automatic Follow-Up Chatbots on WhatsApp](/learn/chatsyncs-automation/build-automatic-follow-up-chatbots-on-whatsapp-in-chatsyncs).
* **Subscriber Name** — map a webhook field to set the subscriber's display name in ChatSyncs.
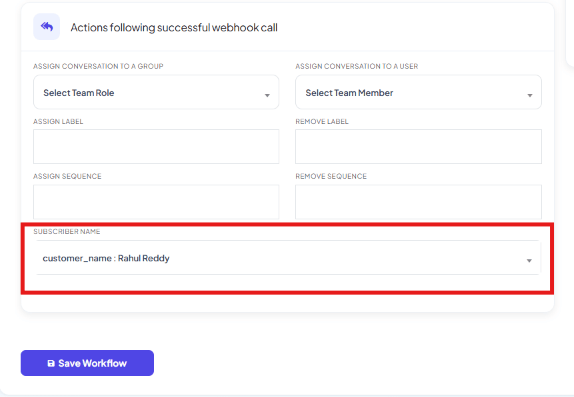 Map **Subscriber Name** to the field holding the customer's name — not the phone field, which is
only used to identify the subscriber. Leave it empty if your app doesn't send a name; the
subscriber just stays identified by phone number.
**Example:** A new lead fills out a form → the webhook sends a WhatsApp welcome message → the
conversation is automatically assigned to the Sales team with a `New Lead` label — all from one
successful call, no manual follow-up.
Click **Save Workflow** once everything is configured.
## Frequently asked
Yes — use **Send message based on conditions** to only send when a field matches a rule.
Yes — set **Wait** under **Send message with a delay** to the number of minutes to hold
before sending. `0` sends immediately.
**Any** sends if at least one rule matches (OR logic). **All** requires every rule to match
before it sends (AND logic).
Yes — under **Actions Following Successful Webhook Call**, use **Assign Conversation to a
Group** (a team) or **Assign Conversation to a User** (one teammate).
Map **Subscriber Name** to the field holding the customer's name — not the phone field, which is
only used to identify the subscriber. Leave it empty if your app doesn't send a name; the
subscriber just stays identified by phone number.
**Example:** A new lead fills out a form → the webhook sends a WhatsApp welcome message → the
conversation is automatically assigned to the Sales team with a `New Lead` label — all from one
successful call, no manual follow-up.
Click **Save Workflow** once everything is configured.
## Frequently asked
Yes — use **Send message based on conditions** to only send when a field matches a rule.
Yes — set **Wait** under **Send message with a delay** to the number of minutes to hold
before sending. `0` sends immediately.
**Any** sends if at least one rule matches (OR logic). **All** requires every rule to match
before it sends (AND logic).
Yes — under **Actions Following Successful Webhook Call**, use **Assign Conversation to a
Group** (a team) or **Assign Conversation to a User** (one teammate).