> ## Documentation Index
> Fetch the complete documentation index at: https://docs.chatsyncs.com/llms.txt
> Use this file to discover all available pages before exploring further.
# Create a Webhook Workflow in ChatSyncs
> Step-by-step: create a Webhook Workflow in ChatSyncs, get its callback URL, capture a test response, and map the JSON data to your template's variables.
Setting up a [Webhook Workflow](/learn/chatsyncs-webhook-workflow/introduction) has four parts: create the
workflow, get its callback URL, capture a real test payload, then map that payload's fields to
your template's variables.
Before you start, have an **approved Message Template** with variables ready — see [Creating a
WhatsApp Message Template](/learn/chatsyncs-message-templates/creating-a-whatsapp-message-template-in-chatsyncs). The webhook data fills those variables;
you can't map anything without them.
Go to **Chatbot Manager → Automation → Webhook Workflows** and click **Create**. Fill in the
workflow details:
* **Workflow Name** — a recognizable name, e.g. `Cal.com Booking Confirmation`.
* **Select Number** — the WhatsApp number to send messages from.
* **Select Template** — the approved message template to use.
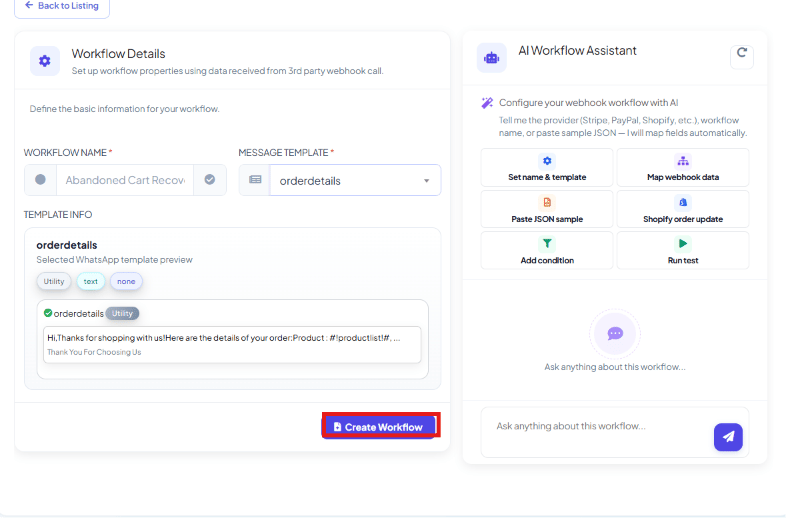 The **AI Workflow Assistant** panel next to the form can do most of this for you — tell it
the provider or workflow name, or paste a sample JSON payload, and it offers shortcuts like
**Set name & template**, **Map webhook data**, and **Paste JSON sample**.
After saving, ChatSyncs generates a unique **Webhook Callback URL**, e.g.
`https://platform.chatsyncs.com/webhook/whatsapp-workflow/xxxxxxx`. Copy it and paste it into
your third-party app's webhook or notification settings — for example, in Cal.com that's
**Settings → Webhooks → Event Triggers**.
The **AI Workflow Assistant** panel next to the form can do most of this for you — tell it
the provider or workflow name, or paste a sample JSON payload, and it offers shortcuts like
**Set name & template**, **Map webhook data**, and **Paste JSON sample**.
After saving, ChatSyncs generates a unique **Webhook Callback URL**, e.g.
`https://platform.chatsyncs.com/webhook/whatsapp-workflow/xxxxxxx`. Copy it and paste it into
your third-party app's webhook or notification settings — for example, in Cal.com that's
**Settings → Webhooks → Event Triggers**.
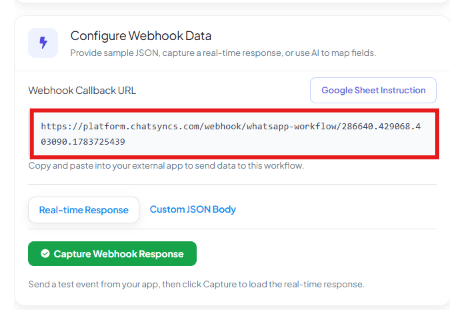 Each workflow has its own URL, so a test call to it only ever affects this one workflow. No
live form yet? Use the **Custom JSON Body** tab to paste a sample payload instead of
capturing a real one.
Click **Capture Webhook Response** — this tells ChatSyncs to start listening for the next
call to this workflow's URL.
Each workflow has its own URL, so a test call to it only ever affects this one workflow. No
live form yet? Use the **Custom JSON Body** tab to paste a sample payload instead of
capturing a real one.
Click **Capture Webhook Response** — this tells ChatSyncs to start listening for the next
call to this workflow's URL.
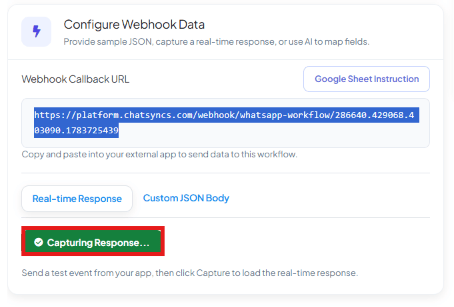 With ChatSyncs still capturing, trigger a real event in your third-party app (e.g. make a
test booking), or send a POST request straight to the callback URL from a tool like Postman:
With ChatSyncs still capturing, trigger a real event in your third-party app (e.g. make a
test booking), or send a POST request straight to the callback URL from a tool like Postman:
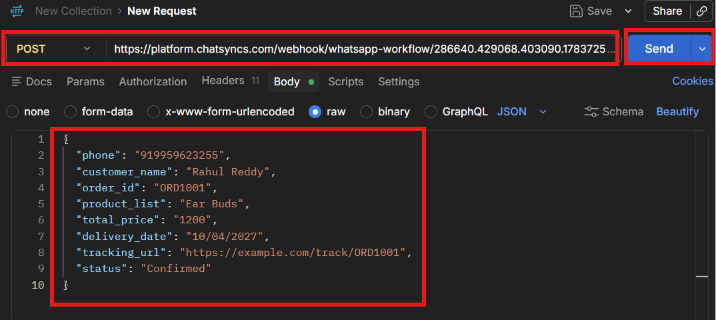 **Capture before you send, not after.** Clicking Capture *after* the test event fires can
leave the field list empty or show data from an older, unrelated capture.
Once ChatSyncs receives the test payload, the **Webhook Response Mapping** section lists
every field it found:
**Capture before you send, not after.** Clicking Capture *after* the test event fires can
leave the field list empty or show data from an older, unrelated capture.
Once ChatSyncs receives the test payload, the **Webhook Response Mapping** section lists
every field it found:
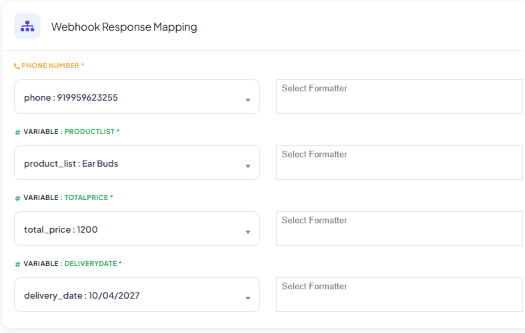 * **Phone Number** — select the JSON path that holds the recipient's phone number. This is
required — without it ChatSyncs has no destination for the message.
* **Variables** — for each template variable (e.g. `USERNAME`, `BOOKINGDATE`,
`MEETINGLINK`), select the matching JSON path from the webhook response, e.g.
`payload > attendees > 0 > name` → the customer's name.
* **Data Formatters** — optionally transform a field before sending (e.g. reformat a date).
Click **Save** once every variable is mapped.
**ChatSyncs maps the field name, not the sample value.** A dropdown showing
`customer_name : Rahul Reddy` means *"use whatever comes in under the `customer_name` key"*
— not literally "Rahul Reddy" every time. A later submission with a different name fills the
template automatically, as long as the field name stays the same.
After saving, the workflow appears on the dashboard. Its **Verified** column shows whether a
successful test webhook has been received. Once verified, the workflow is live and sends
messages automatically every time the webhook fires.
Want a worked example end to end? See
[How to Send Automated WhatsApp Messages on WP Form Submission](/learn/chatsyncs-integrations/send-automated-whatsapp-messages-on-wp-form-submission-in-chatsyncs)
for wiring a WordPress form plugin to a workflow like this one.
## Frequently asked
Click **Capture Webhook Response** *before* triggering the test event, not after — ChatSyncs
only reads fields from a call made while it's actively capturing.
Yes — use the **Custom JSON Body** tab to paste a sample payload, or send a POST request to
the callback URL yourself from Postman or curl.
No — ChatSyncs maps by **field name** (the JSON key), not the sample value shown during
setup. Only a renamed or removed field breaks the mapping.
The workflow can't send anything — Phone Number tells ChatSyncs who to message, so it's
required before the workflow can go live.
* **The Phone Number mapping is mandatory** — without it, ChatSyncs has no recipient for the
message.
* **Only an approved template can be selected** — a workflow can't send a template that hasn't
come back **Approved** from Sync Template.
* **A renamed field breaks its mapping silently** — if a third-party app changes a field name
later, re-capture a response and remap it.
* **Phone Number** — select the JSON path that holds the recipient's phone number. This is
required — without it ChatSyncs has no destination for the message.
* **Variables** — for each template variable (e.g. `USERNAME`, `BOOKINGDATE`,
`MEETINGLINK`), select the matching JSON path from the webhook response, e.g.
`payload > attendees > 0 > name` → the customer's name.
* **Data Formatters** — optionally transform a field before sending (e.g. reformat a date).
Click **Save** once every variable is mapped.
**ChatSyncs maps the field name, not the sample value.** A dropdown showing
`customer_name : Rahul Reddy` means *"use whatever comes in under the `customer_name` key"*
— not literally "Rahul Reddy" every time. A later submission with a different name fills the
template automatically, as long as the field name stays the same.
After saving, the workflow appears on the dashboard. Its **Verified** column shows whether a
successful test webhook has been received. Once verified, the workflow is live and sends
messages automatically every time the webhook fires.
Want a worked example end to end? See
[How to Send Automated WhatsApp Messages on WP Form Submission](/learn/chatsyncs-integrations/send-automated-whatsapp-messages-on-wp-form-submission-in-chatsyncs)
for wiring a WordPress form plugin to a workflow like this one.
## Frequently asked
Click **Capture Webhook Response** *before* triggering the test event, not after — ChatSyncs
only reads fields from a call made while it's actively capturing.
Yes — use the **Custom JSON Body** tab to paste a sample payload, or send a POST request to
the callback URL yourself from Postman or curl.
No — ChatSyncs maps by **field name** (the JSON key), not the sample value shown during
setup. Only a renamed or removed field breaks the mapping.
The workflow can't send anything — Phone Number tells ChatSyncs who to message, so it's
required before the workflow can go live.
* **The Phone Number mapping is mandatory** — without it, ChatSyncs has no recipient for the
message.
* **Only an approved template can be selected** — a workflow can't send a template that hasn't
come back **Approved** from Sync Template.
* **A renamed field breaks its mapping silently** — if a third-party app changes a field name
later, re-capture a response and remap it.