> ## Documentation Index
> Fetch the complete documentation index at: https://docs.chatsyncs.com/llms.txt
> Use this file to discover all available pages before exploring further.

# How to Connect Your Number to ChatSyncs

> The easiest way to connect a phone number to ChatSyncs — Embedded Signup turns any number into a WhatsApp Business number automatically, with no technical setup needed.

**First, pick your path:**

* If you want to keep using WhatsApp on your phone (the Business App) **and** ChatSyncs at the
  same time, see [How to Connect Your WhatsApp Business App
  to ChatSyncs](/learn/chatsyncs-overview/connect-your-whatsapp-business-app-to-chatsyncs) instead.
* If your number is already active on the WhatsApp app and you want to move it onto ChatSyncs
  instead of keeping both, see [How to Migrate from WhatsApp App to a ChatSyncs Business
  Account](/learn/chatsyncs-setup-and-configuration/migrate-from-whatsapp-app-to-a-chatsyncs-business-account) instead.
* If you want a brand-new number used **only** on ChatSyncs, not on your phone, keep reading —
  this page covers that path.

## Before you start

* A Facebook account with access to the business.
* A phone number not already active on WhatsApp or WhatsApp Business (if it was, delete that number from WhatsApp permanently and wait a few hours first).
* A **Meta Business Portfolio** — the account container that holds your business's WhatsApp setup. Embedded signup can create one for you on the spot if you don't have one yet (just a name, your first/last name, and a website).

## Connect a brand-new number (Cloud API)

<Frame caption="Video walkthrough: connecting a virtual number via the Cloud API.">
  <iframe className="w-full aspect-video rounded-xl" src="https://www.youtube.com/embed/ryvwdb7--8U" title="Connect WhatsApp Cloud API in ChatSyncs | Complete Setup Tutorial" allow="accelerometer; autoplay; clipboard-write; encrypted-media; gyroscope; picture-in-picture" allowFullScreen />
</Frame>

<Steps>
  <Step title="Open Connect WhatsApp">
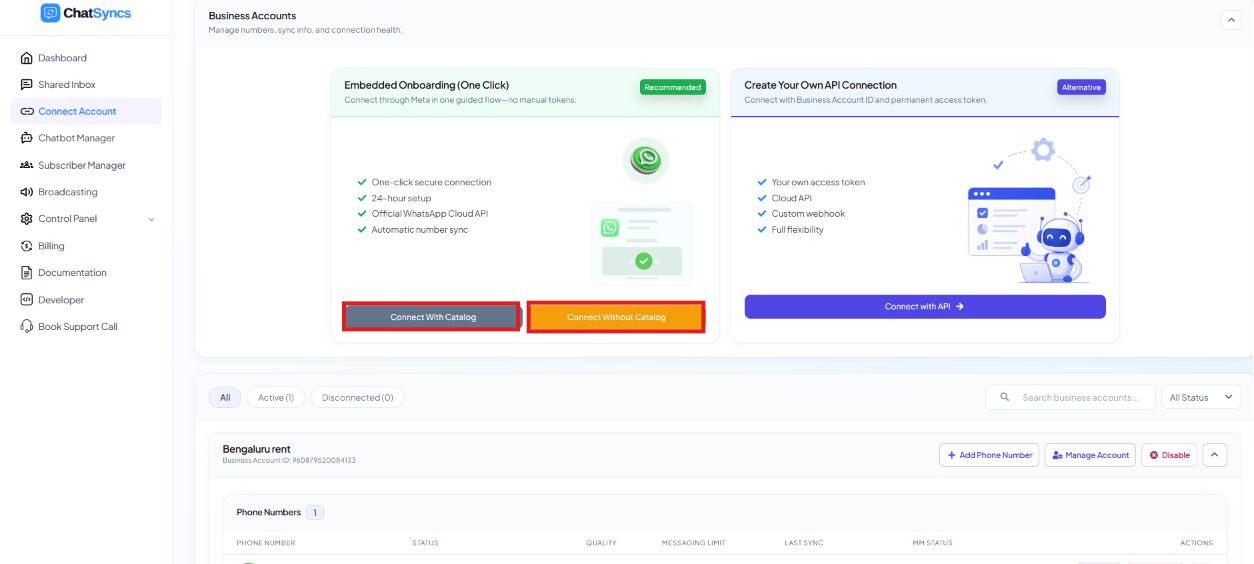
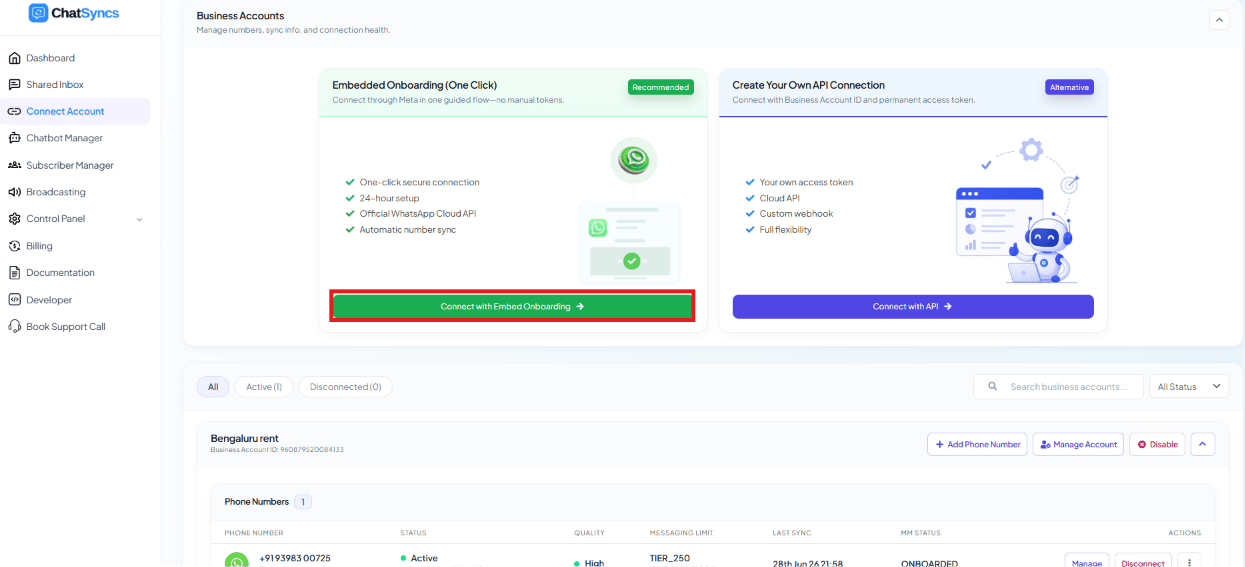
    Go to **Connect Account**, under **Business Accounts** click **Connect WhatsApp**, then pick the green **Embedded Onboarding (One Click)** card and click **Connect with Embed Onboarding** (the blue **Create Your Own API Connection** card is the manual path — see [How to Connect Your WhatsApp Account Manually (Alternative Method)](/learn/chatsyncs-setup-and-configuration/connect-your-whatsapp-account-manually-alternative-method-in-chatsyncs)).

    <Frame caption="Business Accounts — Embedded Onboarding (recommended) vs. Create Your Own API Connection.">
      <img src="https://mintcdn.com/chatsyncs/HNsP4MLygnS_qtAH/images/learn/connect-your-number/step-00-business-accounts-onboarding-options.png?fit=max&auto=format&n=HNsP4MLygnS_qtAH&q=85&s=1ebcd3ef3e26a13595ce9bf8ab43b71b" alt="Business Accounts page with Embedded Onboarding (One Click) card and Create Your Own API Connection card side by side" width="1245" height="567" data-path="images/learn/connect-your-number/step-00-business-accounts-onboarding-options.png" />
    </Frame>
  </Step>

  <Step title="Choose catalog permissions">
    If you've already set up a product catalog and want to share its permissions, click **Connect With Catalog** — otherwise click **Connect Without Catalog**. Either opens Meta's popup.

    <Frame caption="Connect With Catalog vs. Connect Without Catalog.">
      <img src="https://mintcdn.com/chatsyncs/HNsP4MLygnS_qtAH/images/learn/connect-your-number/step-00b-catalog-choice-buttons.png?fit=max&auto=format&n=HNsP4MLygnS_qtAH&q=85&s=663a75a71f55d4fcf3551977f80db033" alt="Connect With Catalog and Connect Without Catalog buttons under the Embedded Onboarding card" width="1254" height="564" data-path="images/learn/connect-your-number/step-00b-catalog-choice-buttons.png" />
    </Frame>
  </Step>

  <Step title="Log in with Facebook">
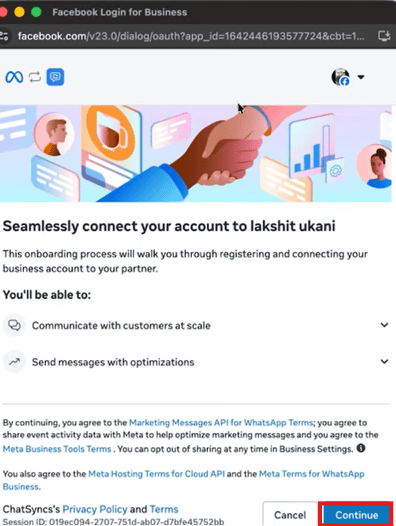
    Meta's popup opens. Log in if you aren't already, then click **Continue**.

    <Frame caption="Meta's embedded signup consent screen — click Continue to proceed.">
      <img src="https://mintcdn.com/chatsyncs/HNsP4MLygnS_qtAH/images/learn/connect-your-number/step-01-facebook-login-consent.png?fit=max&auto=format&n=HNsP4MLygnS_qtAH&q=85&s=c3aa13ec5fe17615bddd41d40afe141a" alt="Facebook Login for Business popup: Seamlessly connect your account to ChatSyncs, with a Continue button" width="396" height="526" data-path="images/learn/connect-your-number/step-01-facebook-login-consent.png" />
    </Frame>
  </Step>

  <Step title="Select or create a Business Portfolio">
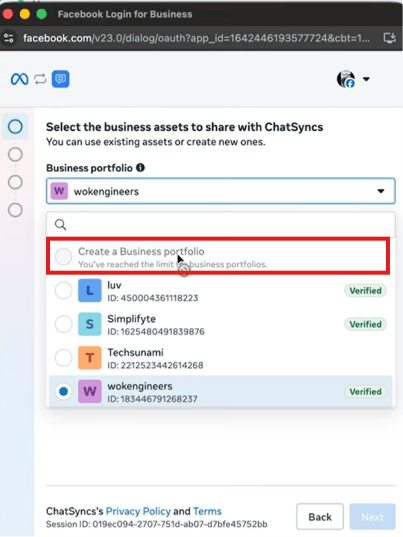
    Pick an existing portfolio from the dropdown, or click **Create a Business Portfolio** if you don't have one — it only asks for a portfolio name, your first/last name, and a website.

    <Frame caption="Select the business portfolio to share with ChatSyncs.">
      <img src="https://mintcdn.com/chatsyncs/HNsP4MLygnS_qtAH/images/learn/connect-your-number/step-02-select-business-portfolio.png?fit=max&auto=format&n=HNsP4MLygnS_qtAH&q=85&s=c4a47bf1186cb936b4638ebf776e9b31" alt="Select the business assets to share with ChatSyncs, with Create a Business portfolio option highlighted" width="403" height="537" data-path="images/learn/connect-your-number/step-02-select-business-portfolio.png" />
    </Frame>
  </Step>

  <Step title="Pick 'Create a WhatsApp Business account'">
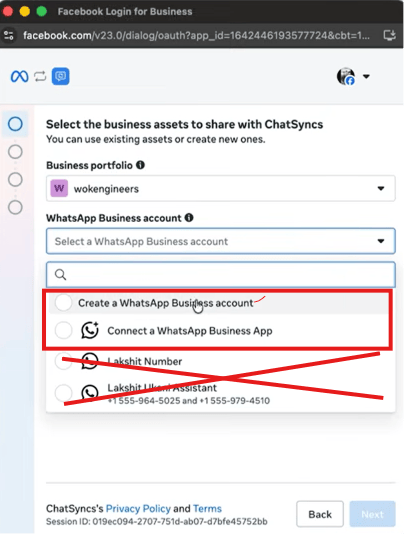
    With the portfolio selected, open the **WhatsApp Business account** dropdown — you'll see two options:

    * **Create a WhatsApp Business account** (first option) → a brand-new number, usable only on ChatSyncs, not on your phone. **Pick this one.**
    * **Connect a WhatsApp Business App** (second option) → this is the [How to Connect Your WhatsApp Business App to ChatSyncs](/learn/chatsyncs-overview/connect-your-whatsapp-business-app-to-chatsyncs) path instead, for keeping a number on your phone too — don't pick this here.

    Any number shown crossed out is already connected somewhere else and can't be picked.

    <Frame caption="The WhatsApp Business account dropdown — first option keeps the number ChatSyncs-only, second option is Coexistence. Crossed-out numbers are already connected elsewhere.">
      <img src="https://mintcdn.com/chatsyncs/HNsP4MLygnS_qtAH/images/learn/connect-your-number/step-04-create-vs-connect-app-options.png?fit=max&auto=format&n=HNsP4MLygnS_qtAH&q=85&s=26c4a3a178fe86761c78040568e51b2f" alt="WhatsApp Business account dropdown with Create a WhatsApp Business account and Connect a WhatsApp Business App options highlighted, and existing numbers Lakshit Number and Lakshit Ukani Assistant crossed out" width="404" height="534" data-path="images/learn/connect-your-number/step-04-create-vs-connect-app-options.png" />
    </Frame>
  </Step>

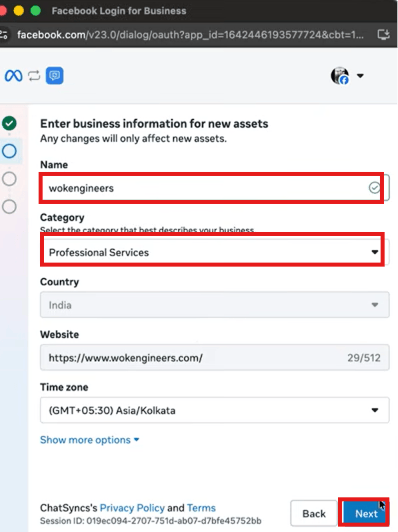
  <Step title="Enter business information">
    Click **Next**, then fill in the **Name**, **Category**, and **Website** for the new asset (Country and Time zone are carried over from your portfolio).

    <Frame caption="Business information for the new WhatsApp Business account.">
      <img src="https://mintcdn.com/chatsyncs/HNsP4MLygnS_qtAH/images/learn/connect-your-number/step-05-business-info-new-assets.png?fit=max&auto=format&n=HNsP4MLygnS_qtAH&q=85&s=d31e514df319a7335362ab30b9d366a7" alt="Enter business information for new assets form with Name, Category, Country, Website, and Time zone fields" width="398" height="532" data-path="images/learn/connect-your-number/step-05-business-info-new-assets.png" />
    </Frame>
  </Step>

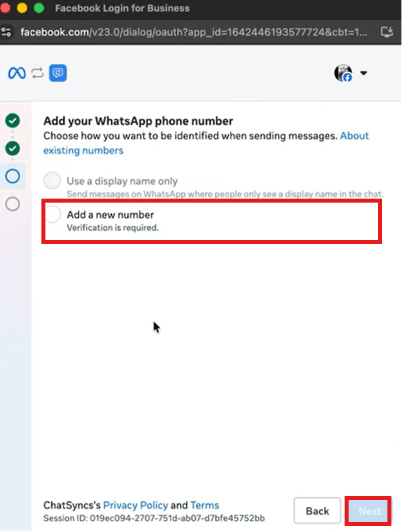
  <Step title="Add a new number">
    Choose **Add a new number** (the alternative, **Use a display name only**, uses a shared Meta test number where people only ever see your display name — not a real number).

    <Frame caption="Add a new number, rather than using a display name only.">
      <img src="https://mintcdn.com/chatsyncs/HNsP4MLygnS_qtAH/images/learn/connect-your-number/step-06-display-name-or-new-number.png?fit=max&auto=format&n=HNsP4MLygnS_qtAH&q=85&s=e6c42a50ecb8449f6f0e8712b02503e9" alt="Add your WhatsApp phone number screen with Use a display name only and Add a new number options" width="402" height="531" data-path="images/learn/connect-your-number/step-06-display-name-or-new-number.png" />
    </Frame>
  </Step>

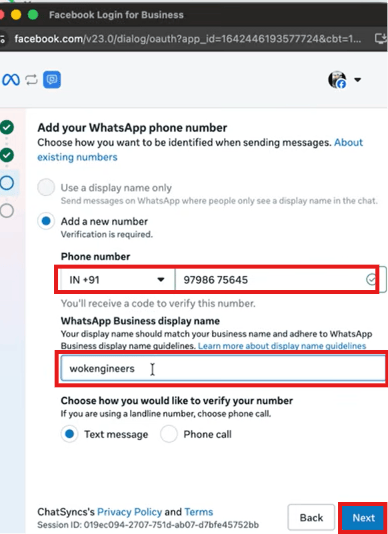
  <Step title="Enter the number, display name, and verify">
    Enter your country and **phone number**, then the **WhatsApp Business display name** — this is what customers see at the top of the chat on every message, so get it right. Choose **Text message** or **Phone call** to receive your verification code, click **Next**, then enter the code you receive.

    <Frame caption="Phone number, WhatsApp Business display name, and verification method.">
      <img src="https://mintcdn.com/chatsyncs/HNsP4MLygnS_qtAH/images/learn/connect-your-number/step-07-phone-number-and-display-name.png?fit=max&auto=format&n=HNsP4MLygnS_qtAH&q=85&s=c34fc5089fa9145e5a32f4348af7700d" alt="Phone number field, WhatsApp Business display name field, and Text message / Phone call verification options" width="388" height="534" data-path="images/learn/connect-your-number/step-07-phone-number-and-display-name.png" />
    </Frame>
  </Step>

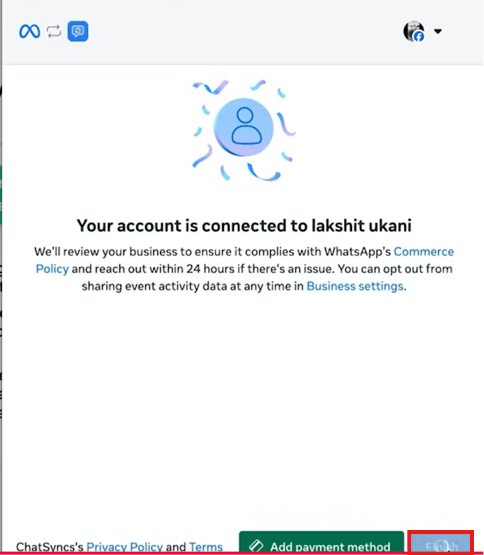
  <Step title="Done">
    Meta confirms the connection — click **Finish** to return to ChatSyncs, where the number shows up under your connected Business Accounts.

    <Frame caption="Meta's final confirmation once the account is connected.">
      <img src="https://mintcdn.com/chatsyncs/HNsP4MLygnS_qtAH/images/learn/connect-your-number/step-08-account-connected-success.png?fit=max&auto=format&n=HNsP4MLygnS_qtAH&q=85&s=62a2ec08770c169a2ccf272f24d249bf" alt="Your account is connected confirmation screen with a Finish button" width="484" height="555" data-path="images/learn/connect-your-number/step-08-account-connected-success.png" />
    </Frame>
  </Step>
</Steps>

<Note>
  Once a number is connected via Cloud API, it can no longer be used in the standard WhatsApp or WhatsApp Business app on a phone. Use a dedicated business number — or use [How to Connect Your WhatsApp Business App to ChatSyncs](/learn/chatsyncs-overview/connect-your-whatsapp-business-app-to-chatsyncs) instead if you need to keep using the app.
</Note>

## Frequently asked

<AccordionGroup>
  <Accordion title="What's the difference between the Cloud API path and Coexistence?">
    **Cloud API** connects a brand-new virtual number dedicated to ChatSyncs — once connected, that number can't be used in the regular WhatsApp app anymore. **Coexistence** links your *existing* WhatsApp Business App number instead, so you keep using the app on your phone while ChatSyncs automates on the same number. See [How to Connect Your WhatsApp Business App to ChatSyncs](/learn/chatsyncs-overview/connect-your-whatsapp-business-app-to-chatsyncs) for that path.
  </Accordion>

  <Accordion title="I got an error saying I need to unlink my number first — what do I do?">
    Your number is already linked to a different platform/partner. See [How to Disconnect Another Partner From Your WhatsApp Number](/learn/chatsyncs-setup-and-configuration/disconnect-another-partner-from-your-whatsapp-number-in-chatsyncs) for the full steps, then re-enter your number.
  </Accordion>

  <Accordion title="I don't have a Meta Business Portfolio yet — do I need to create one first?">
    No — embedded signup can create one for you inline during the flow. It only asks for a portfolio name, your first/last name, and a website. See [How to Create a Facebook Business Manager Account for ChatSyncs](/learn/chatsyncs-setup-and-configuration/create-a-facebook-business-manager-account-for-chatsyncs) if you'd rather set it up ahead of time.
  </Accordion>

  <Accordion title="What if embedded signup isn't available for my account?">
    Use [How to Connect Your WhatsApp Account Manually (Alternative Method)](/learn/chatsyncs-setup-and-configuration/connect-your-whatsapp-account-manually-alternative-method-in-chatsyncs) instead — it takes more steps but gives full visibility into every credential.
  </Accordion>
</AccordionGroup>