> ## Documentation Index
> Fetch the complete documentation index at: https://docs.chatsyncs.com/llms.txt
> Use this file to discover all available pages before exploring further.
# How to Integrate Shopify for WhatsApp Automation in ChatSyncs
> How to connect a Shopify store to ChatSyncs from Chatbot Manager → Commerce → Store Automation, so order events can trigger WhatsApp messages.
Connecting Shopify lets ChatSyncs react to what happens in your store — an order placed,
confirmed, or cancelled — and turn it into an automatic WhatsApp message to the customer.
* Order updates
* Cart reminders
* Customer support tied to a real order
* Marketing automation
## Connect your store
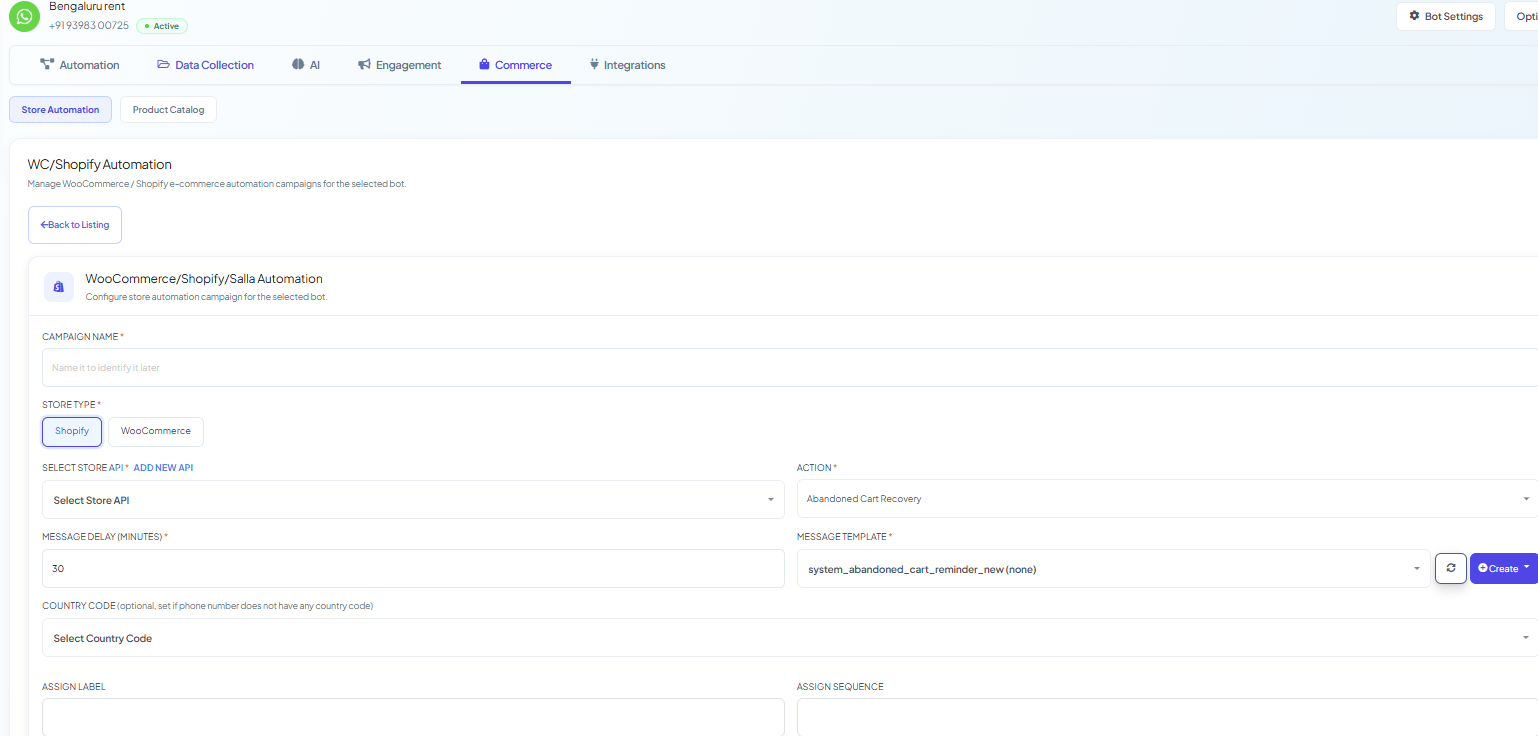 Go to **Chatbot Manager → Commerce → Store Automation**, and set **Store Type** to
**Shopify**.
Next to **Select Store API**, click **Add New API**.
Go to **Chatbot Manager → Commerce → Store Automation**, and set **Store Type** to
**Shopify**.
Next to **Select Store API**, click **Add New API**.
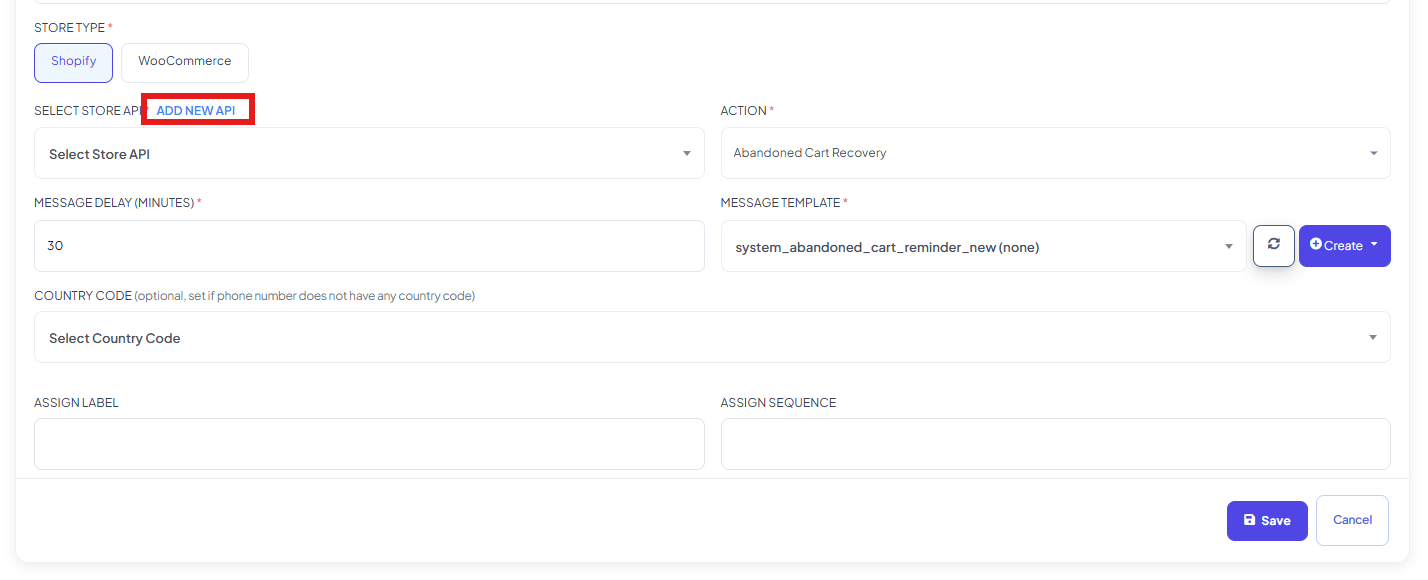 ChatSyncs opens the **E-commerce API** panel with **Shopify (Legacy)** selected. Fill in:
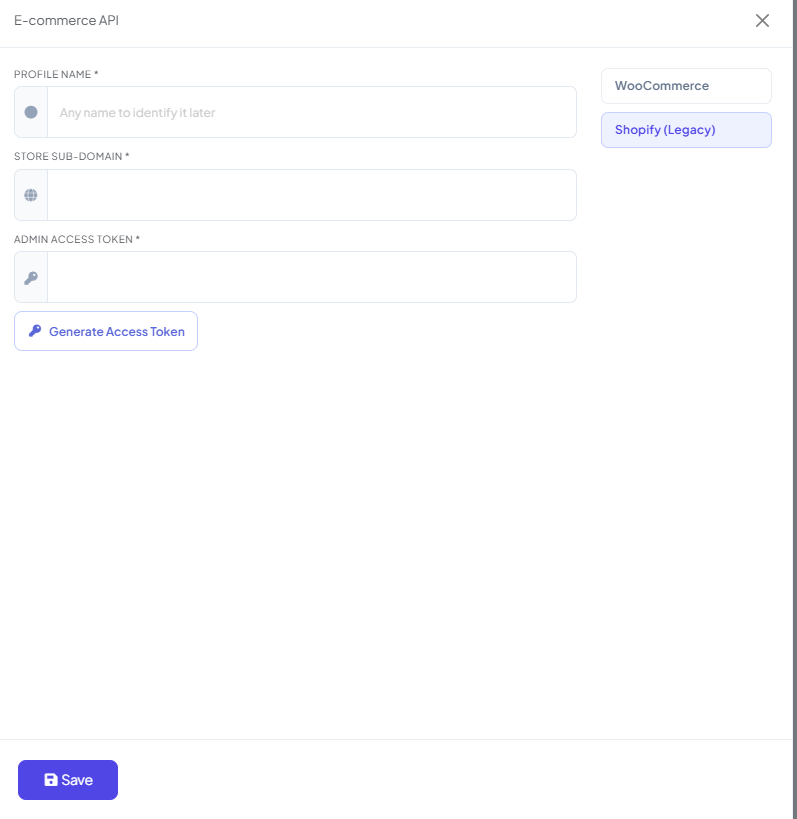 * **Profile Name** — any name to identify this store later.
* **Store Sub-Domain** — your Shopify store's subdomain.
* **Admin Access Token** — see below for how to generate it.
Click **Save**. The store now appears in **Select Store API** for use in automation
campaigns like Abandoned Cart Recovery.
## Get the Shopify Admin Access Token
Log in to your Shopify store's admin panel.
Navigate to **Settings → Apps and Sales Channels → Develop Apps**.
Click **Create an App**, enter a name, and confirm by clicking **Create App**.
Go to **Configure Admin API Scopes** and grant **read and write** permissions for:
* Order Editing
* Orders
Click **Save**.
Under **API Credentials**, click **Install App**, then **Install**.
Click **Reveal Token Once** and copy the **Admin Access Token** — you won't be able to see it
again after leaving this screen.
Paste the token into the **Admin Access Token** field back in ChatSyncs and click **Save** to
complete the connection.
Shopify only shows the Admin Access Token **once**, right after you click **Reveal Token Once**.
Copy it immediately — if you lose it, you'll need to reinstall the app to generate a new one.
## What you can automate once connected
* **Confirm Order** and **Cancel Order** — system default action buttons that fire from Shopify
order events. See [How to Set Up Quick Actions (No Match, Get Started, and More)](/learn/chatsyncs-automation/set-up-quick-actions-no-match-get-started-and-more-in-chatsyncs) for the full detail on these
two buttons.
* **Order and shipping updates via Webhook Workflow** — send a WhatsApp template automatically
whenever Shopify posts an order event, using the **Shopify order update** shortcut in the AI
Workflow Assistant. See [Webhook Workflow](/learn/chatsyncs-webhook-workflow/introduction) for the full
setup.
## Frequently asked
**Chatbot Manager → Commerce → Store Automation**, set **Store Type** to Shopify, then
**Add New API** and fill in the E-commerce API form.
Yes — those two action buttons are system defaults that only fire from a connected Shopify
or WooCommerce store's order events. If you don't use either platform, you don't need to
configure them.
Use [Webhook Workflow](/learn/chatsyncs-webhook-workflow/introduction) — its AI Workflow Assistant has a
dedicated **Shopify order update** shortcut to help map the order data to a message
template.
The Store Sub-Domain is your Shopify store's subdomain. The Admin Access Token is generated
from your Shopify Admin Panel — see [Get the Shopify Admin Access
Token](#get-the-shopify-admin-access-token) above.
* **Profile Name** — any name to identify this store later.
* **Store Sub-Domain** — your Shopify store's subdomain.
* **Admin Access Token** — see below for how to generate it.
Click **Save**. The store now appears in **Select Store API** for use in automation
campaigns like Abandoned Cart Recovery.
## Get the Shopify Admin Access Token
Log in to your Shopify store's admin panel.
Navigate to **Settings → Apps and Sales Channels → Develop Apps**.
Click **Create an App**, enter a name, and confirm by clicking **Create App**.
Go to **Configure Admin API Scopes** and grant **read and write** permissions for:
* Order Editing
* Orders
Click **Save**.
Under **API Credentials**, click **Install App**, then **Install**.
Click **Reveal Token Once** and copy the **Admin Access Token** — you won't be able to see it
again after leaving this screen.
Paste the token into the **Admin Access Token** field back in ChatSyncs and click **Save** to
complete the connection.
Shopify only shows the Admin Access Token **once**, right after you click **Reveal Token Once**.
Copy it immediately — if you lose it, you'll need to reinstall the app to generate a new one.
## What you can automate once connected
* **Confirm Order** and **Cancel Order** — system default action buttons that fire from Shopify
order events. See [How to Set Up Quick Actions (No Match, Get Started, and More)](/learn/chatsyncs-automation/set-up-quick-actions-no-match-get-started-and-more-in-chatsyncs) for the full detail on these
two buttons.
* **Order and shipping updates via Webhook Workflow** — send a WhatsApp template automatically
whenever Shopify posts an order event, using the **Shopify order update** shortcut in the AI
Workflow Assistant. See [Webhook Workflow](/learn/chatsyncs-webhook-workflow/introduction) for the full
setup.
## Frequently asked
**Chatbot Manager → Commerce → Store Automation**, set **Store Type** to Shopify, then
**Add New API** and fill in the E-commerce API form.
Yes — those two action buttons are system defaults that only fire from a connected Shopify
or WooCommerce store's order events. If you don't use either platform, you don't need to
configure them.
Use [Webhook Workflow](/learn/chatsyncs-webhook-workflow/introduction) — its AI Workflow Assistant has a
dedicated **Shopify order update** shortcut to help map the order data to a message
template.
The Store Sub-Domain is your Shopify store's subdomain. The Admin Access Token is generated
from your Shopify Admin Panel — see [Get the Shopify Admin Access
Token](#get-the-shopify-admin-access-token) above.