> ## Documentation Index
> Fetch the complete documentation index at: https://docs.chatsyncs.com/llms.txt
> Use this file to discover all available pages before exploring further.
# How Do I Connect Mautic for Auto Responder with ChatSyncs?
> Worked example of connecting a self-hosted Mautic instance as an Auto Responder Integration provider — entering its username, password, and base URL. Use when a customer runs their own Mautic install and wants WhatsApp subscribers synced into it.
[Auto Responder Integration](/learn/chatsyncs-integrations/auto-responder/introduction) lists **Mautic** as one of the
email marketing platforms you can connect. Unlike the other providers, Mautic is typically
**self-hosted** — you connect it with a username, password, and base URL instead of an API key.
Your Mautic server must have **API access enabled** and be reachable over **HTTPS** — ChatSyncs
can't sync data to an instance that isn't publicly accessible or is HTTP-only.
## Add the Mautic profile
From [Auto Responder Integration](/learn/chatsyncs-integrations/auto-responder/introduction), click **New**, select
**Mautic** from the provider list, and enter:
| Field | Value |
| ---------------- | ------------------------------------------------------------------------------ |
| **Profile Name** | Any name, e.g. "Mautic Trial". |
| **Username** | Your Mautic admin or API username. |
| **Password** | The password for that username. |
| **Base URL** | The full URL of your Mautic install, e.g. `https://your-mautic-instance.com/`. |
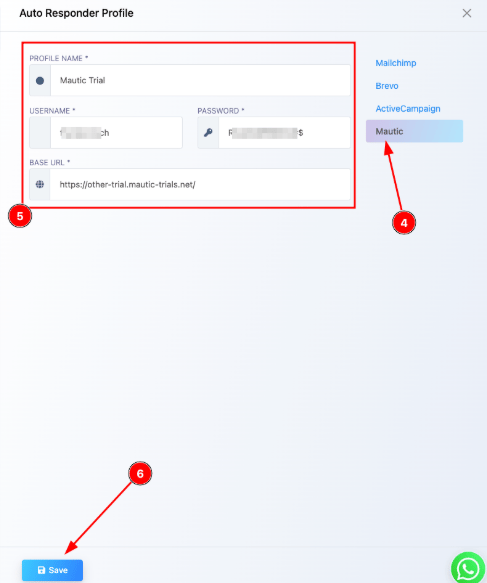 Click **Save** — ChatSyncs now sends subscriber data to Mautic, which handles the actual email
sending on its own side.
## Frequently asked
Add a new **Mautic** profile under [Auto Responder
Integration](/learn/chatsyncs-integrations/auto-responder/introduction) with your Mautic username, password, and base
URL — Mautic must be reachable over HTTPS with API access enabled.
Mautic does — ChatSyncs only sends the subscriber data across; Mautic handles the actual
email sending and campaign logic.
Double-check the username, password, and base URL, and confirm your Mautic server's API is
enabled and not blocked by a firewall.
Mautic 4.x and higher, as long as API access is active on that instance.
## Related Documentation
* [Auto Responder Integration](/learn/chatsyncs-integrations/auto-responder/introduction) — connecting any email
marketing platform and what it's used for.
Click **Save** — ChatSyncs now sends subscriber data to Mautic, which handles the actual email
sending on its own side.
## Frequently asked
Add a new **Mautic** profile under [Auto Responder
Integration](/learn/chatsyncs-integrations/auto-responder/introduction) with your Mautic username, password, and base
URL — Mautic must be reachable over HTTPS with API access enabled.
Mautic does — ChatSyncs only sends the subscriber data across; Mautic handles the actual
email sending and campaign logic.
Double-check the username, password, and base URL, and confirm your Mautic server's API is
enabled and not blocked by a firewall.
Mautic 4.x and higher, as long as API access is active on that instance.
## Related Documentation
* [Auto Responder Integration](/learn/chatsyncs-integrations/auto-responder/introduction) — connecting any email
marketing platform and what it's used for.