> ## Documentation Index
> Fetch the complete documentation index at: https://docs.chatsyncs.com/llms.txt
> Use this file to discover all available pages before exploring further.
# How Do I Connect Mailchimp for Auto Responder with ChatSyncs?
> Worked example of connecting Mailchimp as an Auto Responder Integration provider — generating an API key and adding it as a Mailchimp profile, then setting the Mailchimp List ID on a bot. Use when a customer wants WhatsApp subscribers automatically synced into a Mailchimp audience.
[Auto Responder Integration](/learn/chatsyncs-integrations/auto-responder/introduction) lists **Mailchimp** as one of the
email marketing platforms you can connect. This page is a worked example: generating a Mailchimp
API key, adding it as a profile, and pointing a bot at your Mailchimp audience.
## Step 1: Generate your Mailchimp API key
In Mailchimp, click your profile icon in the top-right corner and choose **Profile**.
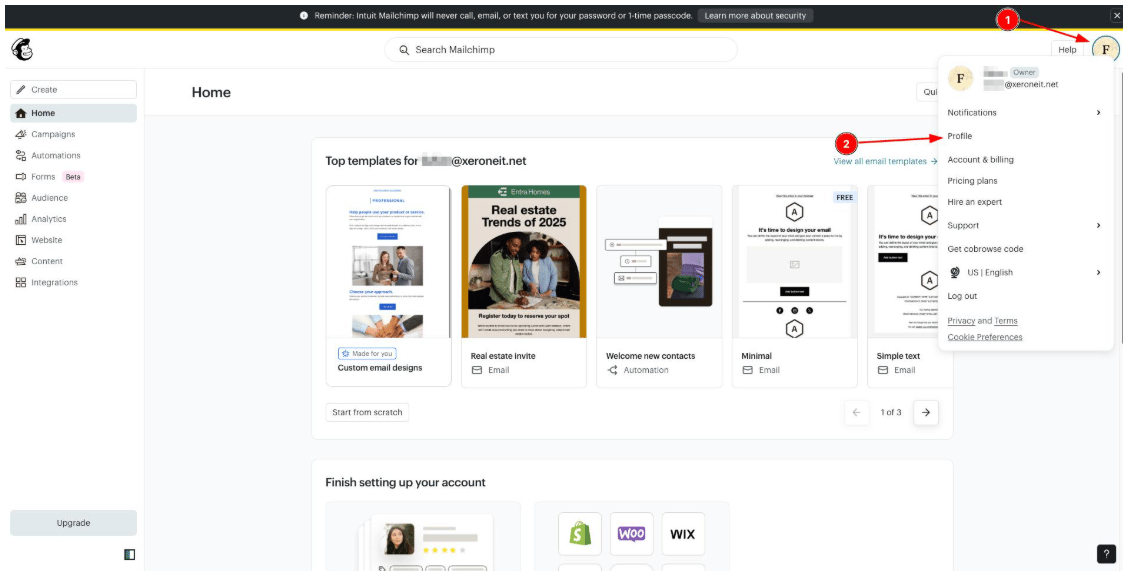 From your profile page, open **Extras → API keys** in the top navigation.
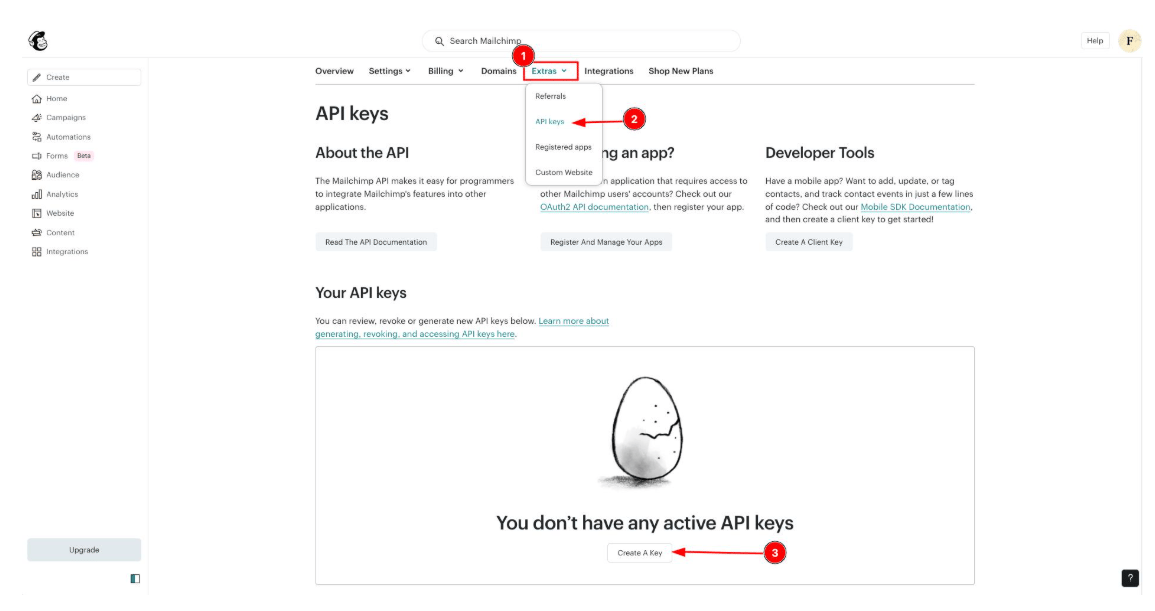 Click **Create A Key**, give it a name so you remember what it's for later (e.g. "ChatSyncs"),
and click **Generate Key**.
Click **Create A Key**, give it a name so you remember what it's for later (e.g. "ChatSyncs"),
and click **Generate Key**.
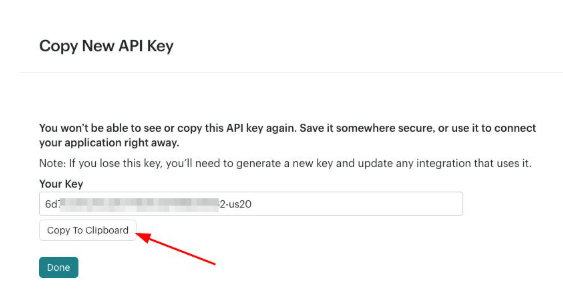 Copy the key immediately — Mailchimp only shows it to you once. If you lose it, you'll need to
generate a new one.
## Step 2: Add the Mailchimp profile in ChatSyncs
Switch to ChatSyncs. From [Auto Responder Integration](/learn/chatsyncs-integrations/auto-responder/introduction), click
**New**, select **Mailchimp** from the provider list, enter a **Profile Name**, and paste in the
API key you copied in Step 1.
Copy the key immediately — Mailchimp only shows it to you once. If you lose it, you'll need to
generate a new one.
## Step 2: Add the Mailchimp profile in ChatSyncs
Switch to ChatSyncs. From [Auto Responder Integration](/learn/chatsyncs-integrations/auto-responder/introduction), click
**New**, select **Mailchimp** from the provider list, enter a **Profile Name**, and paste in the
API key you copied in Step 1.
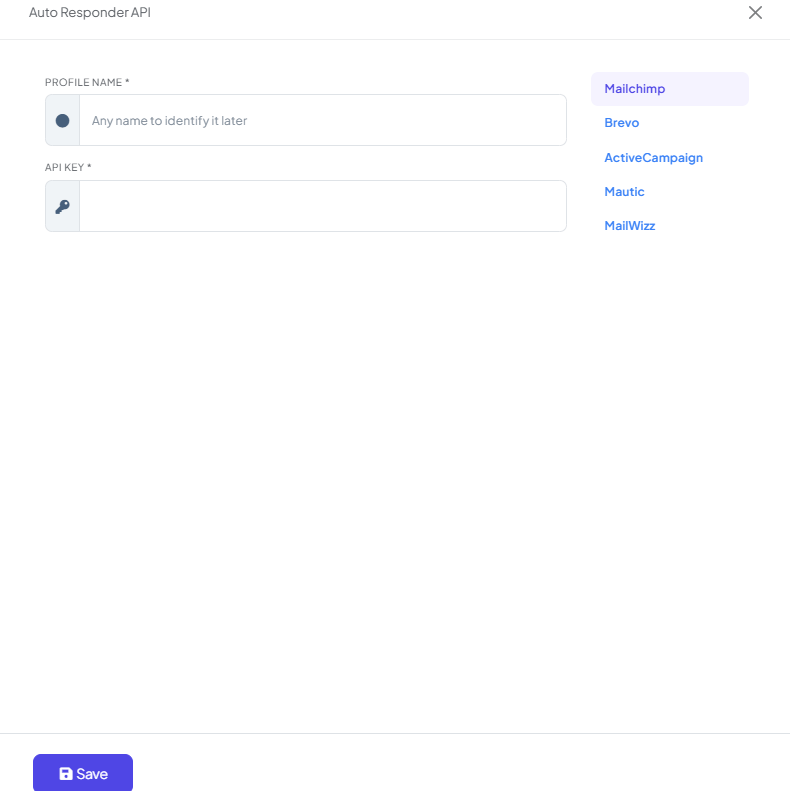 Click **Save**.
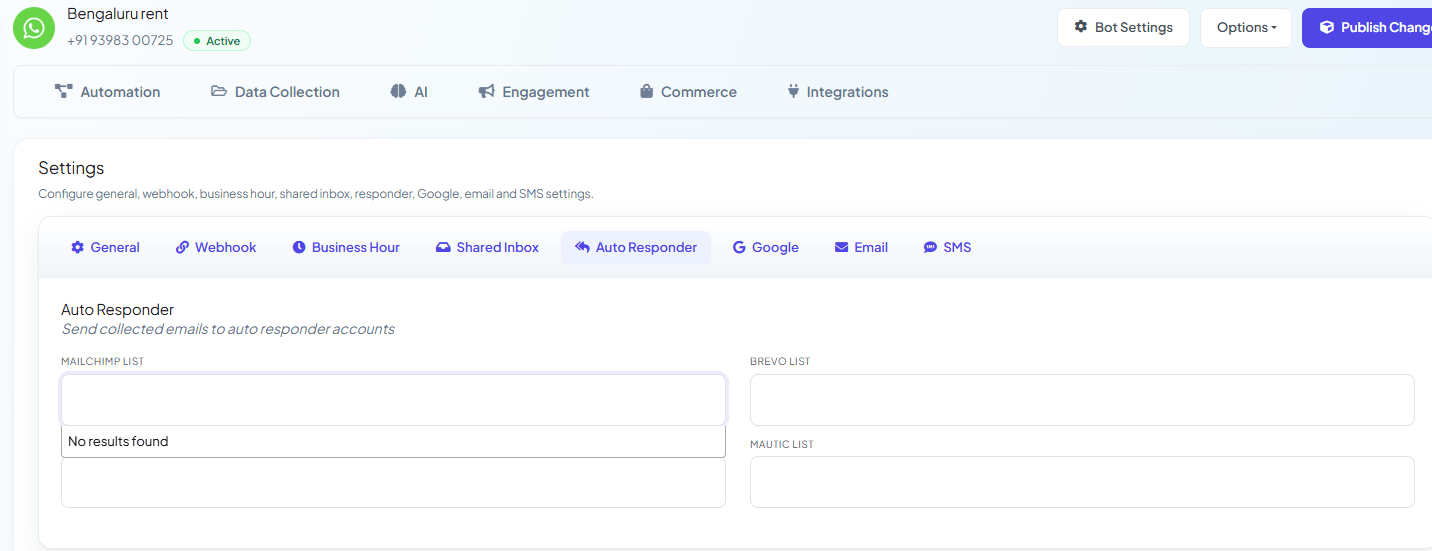
## Step 3: Point a specific bot at your Mailchimp audience
Connecting the API key only tells ChatSyncs *how* to reach your Mailchimp account — you still
need to tell each individual bot *which* audience (list) to add subscribers to. Open **Bot
Manager → \[your bot] → Configuration → Settings → Auto Responder**, and paste your Mailchimp
audience's **list ID** into the **Mailchimp List** field. The same screen has a field for each
connected platform, so you can wire up Brevo or Mautic here too.
Click **Save**.
## Step 3: Point a specific bot at your Mailchimp audience
Connecting the API key only tells ChatSyncs *how* to reach your Mailchimp account — you still
need to tell each individual bot *which* audience (list) to add subscribers to. Open **Bot
Manager → \[your bot] → Configuration → Settings → Auto Responder**, and paste your Mailchimp
audience's **list ID** into the **Mailchimp List** field. The same screen has a field for each
connected platform, so you can wire up Brevo or Mautic here too.
 ## Step 4: Collect the customer's email in a bot flow
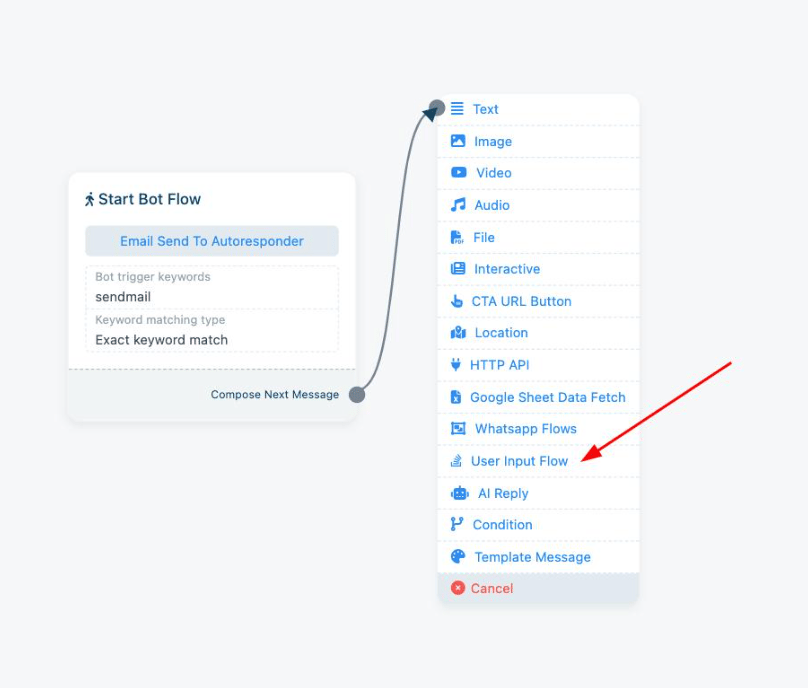
The list ID alone doesn't push anyone into Mailchimp — something in the conversation has to
actually collect an email and hand it off. The usual way is a [Keyword
Replies](/learn/chatsyncs-automation/create-a-keyword-based-whatsapp-chatbot-in-chatsyncs) flow: a trigger keyword (e.g. `sendmail`)
starts the flow, and you add a **User Input Flow** block to ask for the email.
## Step 4: Collect the customer's email in a bot flow
The list ID alone doesn't push anyone into Mailchimp — something in the conversation has to
actually collect an email and hand it off. The usual way is a [Keyword
Replies](/learn/chatsyncs-automation/create-a-keyword-based-whatsapp-chatbot-in-chatsyncs) flow: a trigger keyword (e.g. `sendmail`)
starts the flow, and you add a **User Input Flow** block to ask for the email.
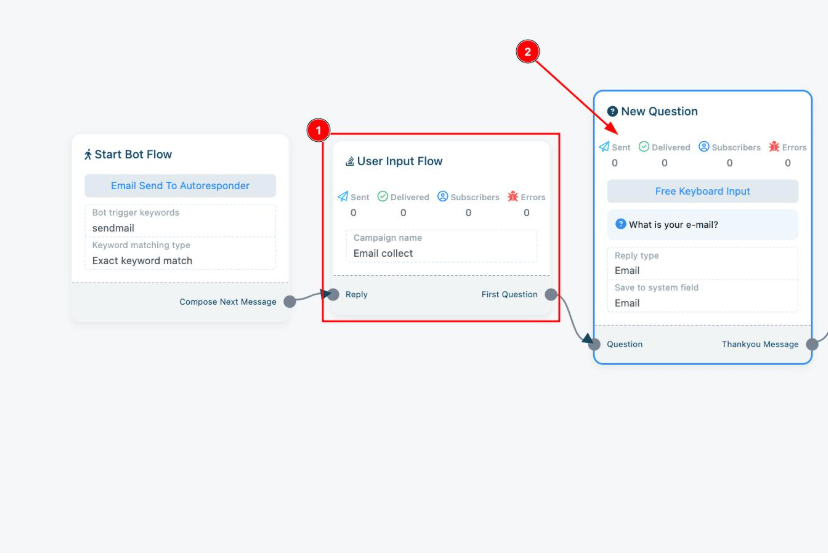
 Inside the User Input Flow, add a question using **Free Keyboard Input**, set its text to
something like "What is your e-mail?", and set **Reply type** to **Email** — this makes ChatSyncs
validate the answer actually looks like an email address before it accepts it and saves it to the
`Email` system field.
Inside the User Input Flow, add a question using **Free Keyboard Input**, set its text to
something like "What is your e-mail?", and set **Reply type** to **Email** — this makes ChatSyncs
validate the answer actually looks like an email address before it accepts it and saves it to the
`Email` system field.
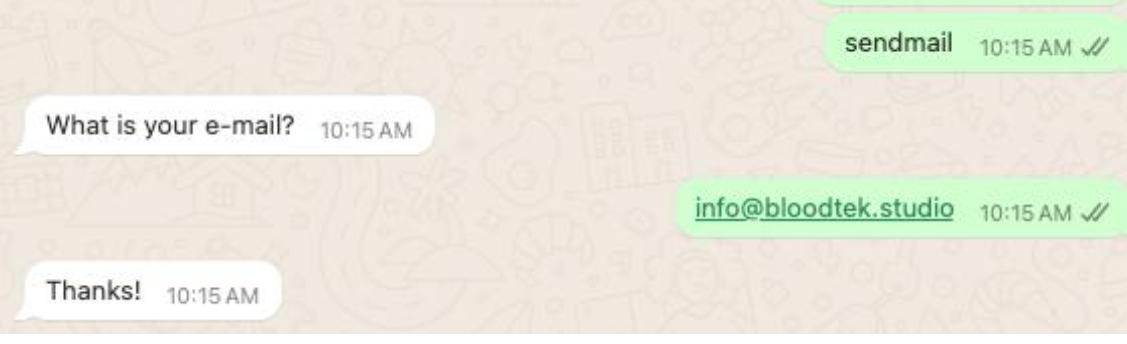
 Once the customer answers, that's the moment ChatSyncs syncs their email into the Mailchimp list
you set in Step 3 — no extra webhook or button needed. Testing it in WhatsApp looks like this:
Once the customer answers, that's the moment ChatSyncs syncs their email into the Mailchimp list
you set in Step 3 — no extra webhook or button needed. Testing it in WhatsApp looks like this:
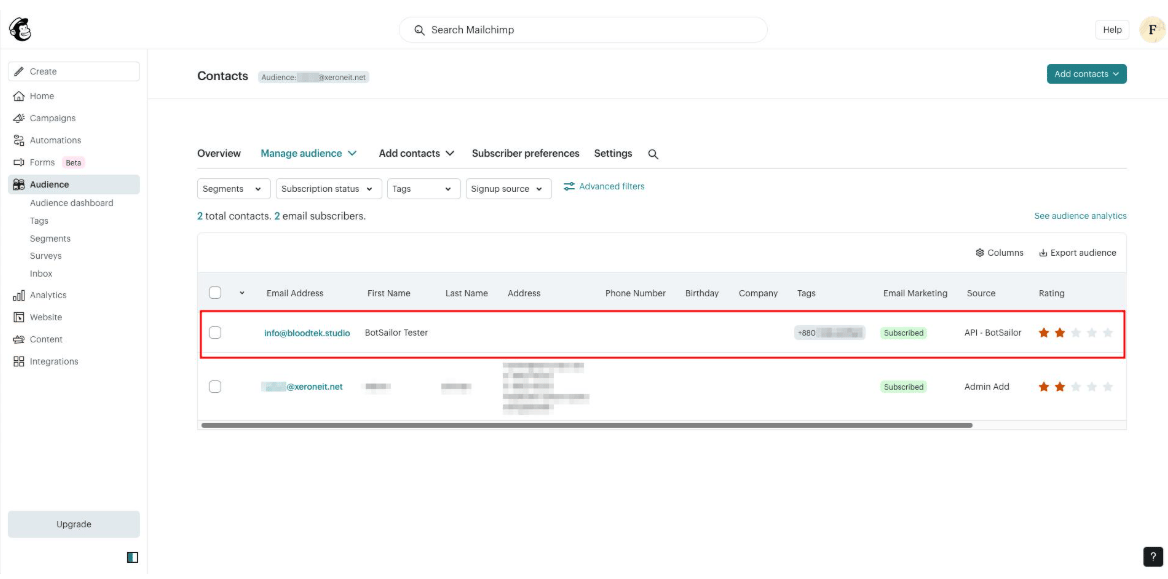
 And on the Mailchimp side, the new contact shows up in your audience within seconds, with the
source recorded as coming in through the API:
And on the Mailchimp side, the new contact shows up in your audience within seconds, with the
source recorded as coming in through the API:
 See [Auto Responder Integration](/learn/chatsyncs-integrations/auto-responder/introduction) for more on how the hand-off
to Mailchimp works, and [User Input Flow](/learn/chatsyncs-automation/user-input-flow-in-chatsyncs) for everything else the
block can do (multiple questions, other reply types, exporting responses to CSV).
## Frequently asked
Generate an API key in Mailchimp under **Extras → API keys**, then add it as a new
**Mailchimp** profile under [Auto Responder Integration](/learn/chatsyncs-integrations/auto-responder/introduction).
In **Bot Manager → \[your bot] → Configuration**, under the **Auto Responder** section — paste
the audience's list ID into the **Mailchimp List** field.
Yes — Mailchimp API access is available even on its free plan.
That doesn't sync back to ChatSyncs automatically — ChatSyncs only pushes new subscriber data
forward; handle unsubscribes on the Mailchimp side.
## Related Documentation
* [Auto Responder Integration](/learn/chatsyncs-integrations/auto-responder/introduction) — connecting any email
marketing platform and what it's used for.
* [User Input Flow](/learn/chatsyncs-automation/user-input-flow-in-chatsyncs) — collecting the customer's email with validation.
See [Auto Responder Integration](/learn/chatsyncs-integrations/auto-responder/introduction) for more on how the hand-off
to Mailchimp works, and [User Input Flow](/learn/chatsyncs-automation/user-input-flow-in-chatsyncs) for everything else the
block can do (multiple questions, other reply types, exporting responses to CSV).
## Frequently asked
Generate an API key in Mailchimp under **Extras → API keys**, then add it as a new
**Mailchimp** profile under [Auto Responder Integration](/learn/chatsyncs-integrations/auto-responder/introduction).
In **Bot Manager → \[your bot] → Configuration**, under the **Auto Responder** section — paste
the audience's list ID into the **Mailchimp List** field.
Yes — Mailchimp API access is available even on its free plan.
That doesn't sync back to ChatSyncs automatically — ChatSyncs only pushes new subscriber data
forward; handle unsubscribes on the Mailchimp side.
## Related Documentation
* [Auto Responder Integration](/learn/chatsyncs-integrations/auto-responder/introduction) — connecting any email
marketing platform and what it's used for.
* [User Input Flow](/learn/chatsyncs-automation/user-input-flow-in-chatsyncs) — collecting the customer's email with validation.