> ## Documentation Index
> Fetch the complete documentation index at: https://docs.chatsyncs.com/llms.txt
> Use this file to discover all available pages before exploring further.
# How Do I Turn On Webhook Triggers for My Bot with ChatSyncs?
> The Webhook tab in Bot Settings — four triggers (Incoming Message, Outgoing Message, Message Status Change, Conversation Status Change) sending data to your own server.
The **Webhook** tab in [Bot Settings](/learn/chatsyncs-bot-settings/introduction) connects ChatSyncs to
your own server or application. All four triggers live on this same tab — there's no separate
sub-tab to switch between.
## Full Walkthrough
[Webhook for Messages & Status Changes](/learn/chatsyncs-webhooks/webhook-for-messages-status-changes-in-chatsyncs)
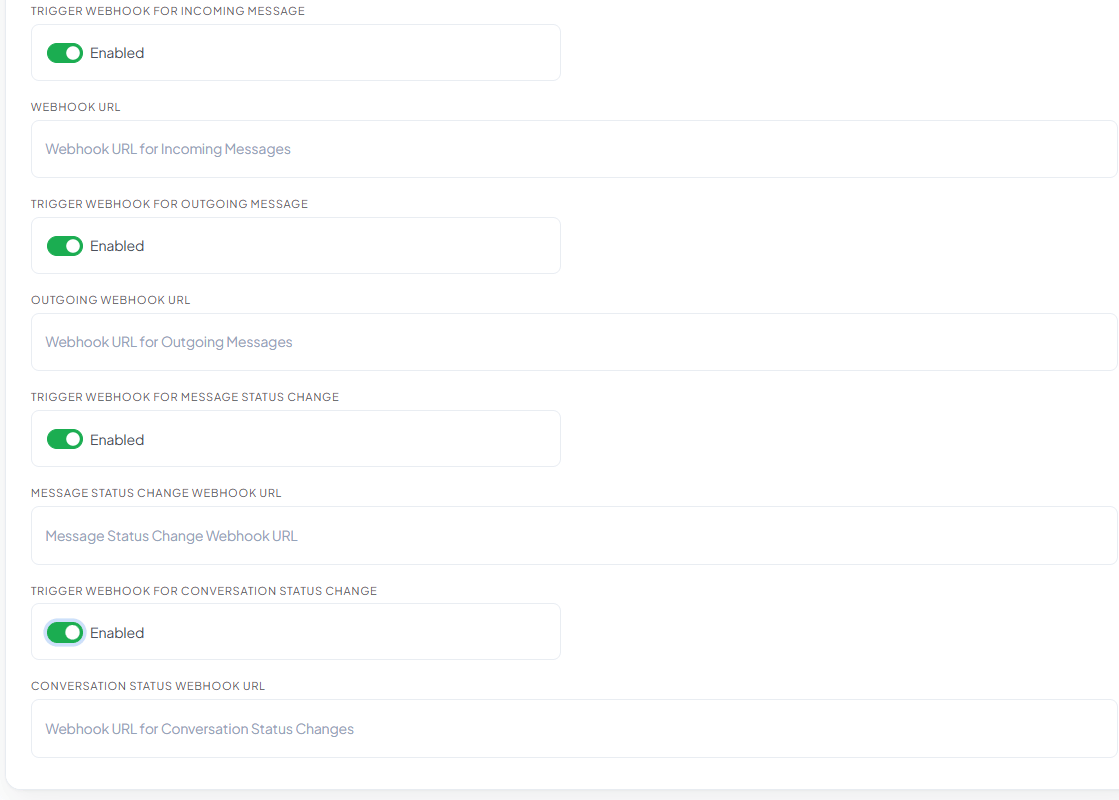
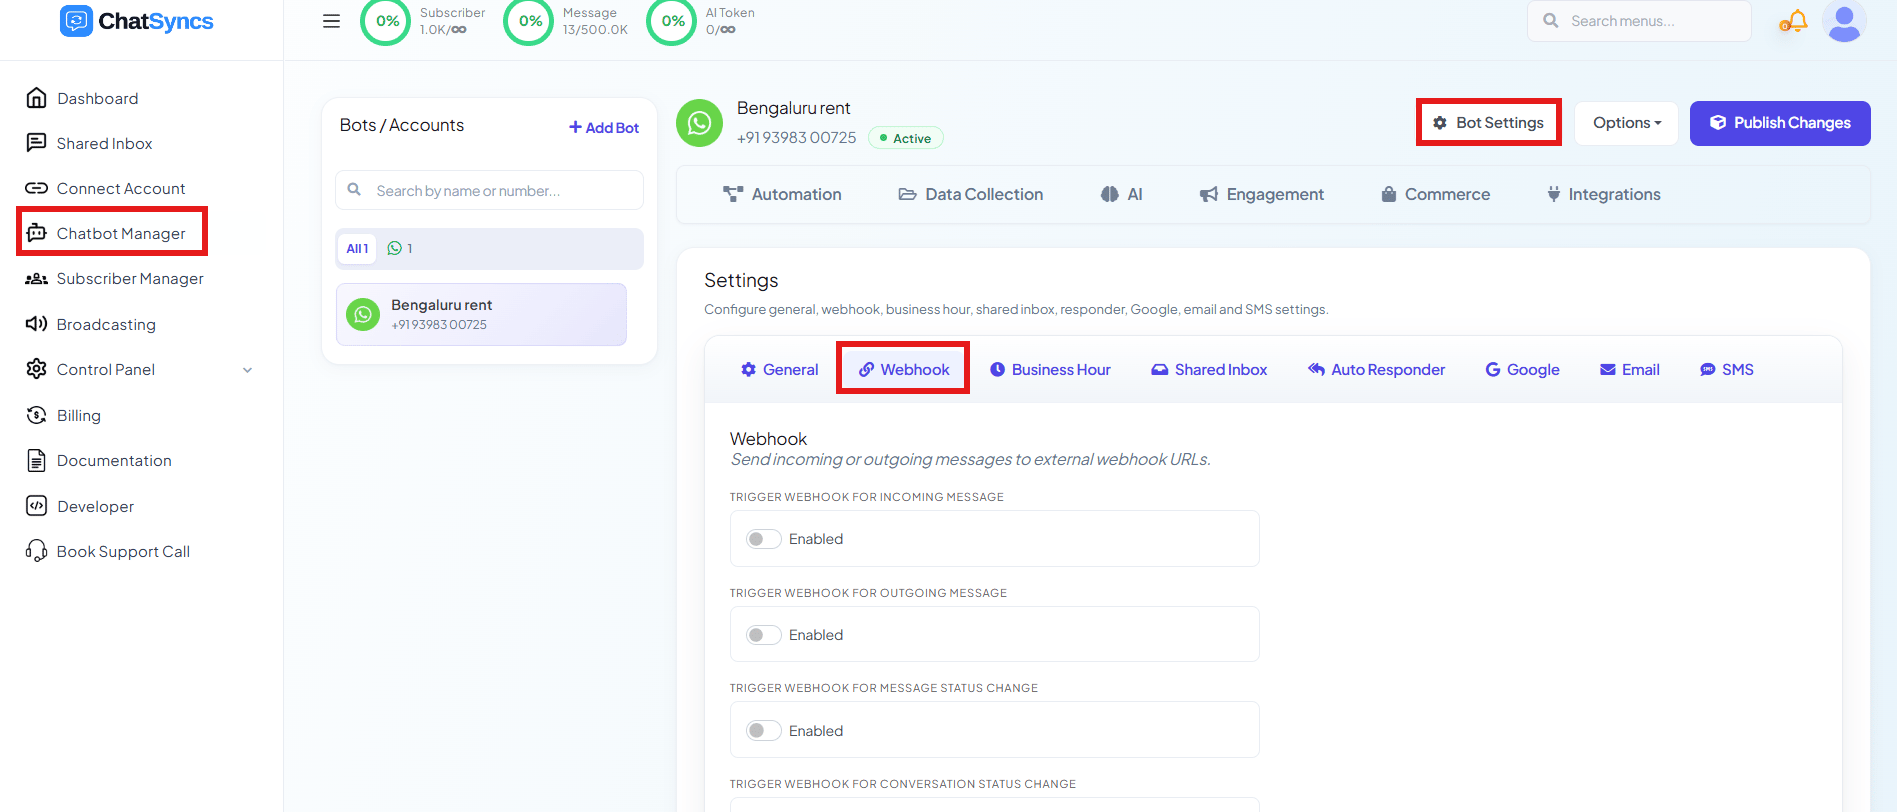 Four independent triggers, each with its own toggle and URL field:
| Trigger | Fires when |
| -------------------------------------------------- | --------------------------------------------------------------------------------------------------------------------------------------------------------------------------------- |
| **Trigger Webhook for Incoming Message** | A customer sends the bot a message. |
| **Trigger Webhook for Outgoing Message** | The bot sends a reply. |
| **Trigger Webhook for Message Status Change** | A sent message's delivery status changes (sent, delivered, read, failed). |
| **Trigger Webhook for Conversation Status Change** | The conversation's status changes (e.g. resolved, archived) — see [Mark Conversation Status](/developer-api/subscriber/mark-conversation-status) for the same states via the API. |
Four independent triggers, each with its own toggle and URL field:
| Trigger | Fires when |
| -------------------------------------------------- | --------------------------------------------------------------------------------------------------------------------------------------------------------------------------------- |
| **Trigger Webhook for Incoming Message** | A customer sends the bot a message. |
| **Trigger Webhook for Outgoing Message** | The bot sends a reply. |
| **Trigger Webhook for Message Status Change** | A sent message's delivery status changes (sent, delivered, read, failed). |
| **Trigger Webhook for Conversation Status Change** | The conversation's status changes (e.g. resolved, archived) — see [Mark Conversation Status](/developer-api/subscriber/mark-conversation-status) for the same states via the API. |
 In Bot Settings, select the **Webhook** tab.
Turn on any combination of the four toggles — they're independent.
Each enabled trigger has its own URL field — they can all point to the same endpoint, or different ones.
Click **Publish Changes** in the top-right corner — nothing goes live until you do.
In Bot Settings, select the **Webhook** tab.
Turn on any combination of the four toggles — they're independent.
Each enabled trigger has its own URL field — they can all point to the same endpoint, or different ones.
Click **Publish Changes** in the top-right corner — nothing goes live until you do.
 ## Frequently asked
Turn on **Trigger Webhook for Incoming Message** and enter your server's URL. Every incoming
message (e.g. "Where is my order?") is POSTed there with the customer's name, message, and
other details.
No — each toggle and its URL field is independent. Enable only the ones you actually need.
Yes — every trigger has its own Webhook URL field, so you can route incoming messages to one
system and status changes to another.
Confirm the URL is reachable from the public internet (not localhost or an internal-only
address), and that you clicked **Publish Changes** after entering it — nothing goes live
until you do.
## Related Documentation
* [Bot Settings](/learn/chatsyncs-bot-settings/introduction) — all eight tabs at a glance.
* [Webhook for Messages & Status Changes](/learn/chatsyncs-webhooks/webhook-for-messages-status-changes-in-chatsyncs) — the full
walkthrough of all four triggers.
* [Webhooks](/learn/chatsyncs-webhooks/introduction) — the other webhook trigger types (keyword, button
click, input flow, WhatsApp Flows).
## Frequently asked
Turn on **Trigger Webhook for Incoming Message** and enter your server's URL. Every incoming
message (e.g. "Where is my order?") is POSTed there with the customer's name, message, and
other details.
No — each toggle and its URL field is independent. Enable only the ones you actually need.
Yes — every trigger has its own Webhook URL field, so you can route incoming messages to one
system and status changes to another.
Confirm the URL is reachable from the public internet (not localhost or an internal-only
address), and that you clicked **Publish Changes** after entering it — nothing goes live
until you do.
## Related Documentation
* [Bot Settings](/learn/chatsyncs-bot-settings/introduction) — all eight tabs at a glance.
* [Webhook for Messages & Status Changes](/learn/chatsyncs-webhooks/webhook-for-messages-status-changes-in-chatsyncs) — the full
walkthrough of all four triggers.
* [Webhooks](/learn/chatsyncs-webhooks/introduction) — the other webhook trigger types (keyword, button
click, input flow, WhatsApp Flows).