> ## Documentation Index
> Fetch the complete documentation index at: https://docs.chatsyncs.com/llms.txt
> Use this file to discover all available pages before exploring further.
# How Do I Automatically Add Subscribers to My Email Marketing List with ChatSyncs?
> The Auto Responder tab in Bot Settings — adds a subscriber's email to a connected Mailchimp, Brevo, ActiveCampaign, or Mautic list the moment they share it in WhatsApp.
The **Auto Responder** tab in ChatSyncs' [Bot Settings](/learn/chatsyncs-bot-settings/introduction)
automatically adds a subscriber to an email marketing platform's list the moment they share
their email address in a WhatsApp conversation with this bot.
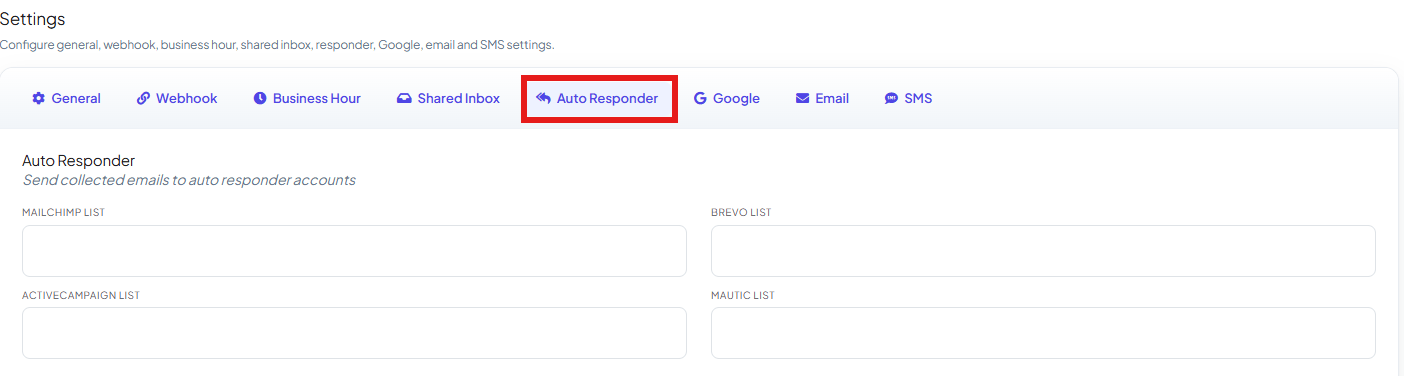 This tab uses a platform connection you set up once under [Auto Responder
Integration](/learn/chatsyncs-integrations/auto-responder/introduction) — connect Mailchimp, Brevo, ActiveCampaign, or
Mautic there first, then come back here to fill in the list for whichever platform(s) you
connected. The four fields are independent — you only need to fill in the one matching the
platform you connected.
**Example**
Customer enters:
```text theme={null}
john@gmail.com
```
Result: the email is automatically added to your selected Mailchimp list — no manual export or
copy-paste needed.
## Save your changes
This tab uses a platform connection you set up once under [Auto Responder
Integration](/learn/chatsyncs-integrations/auto-responder/introduction) — connect Mailchimp, Brevo, ActiveCampaign, or
Mautic there first, then come back here to fill in the list for whichever platform(s) you
connected. The four fields are independent — you only need to fill in the one matching the
platform you connected.
**Example**
Customer enters:
```text theme={null}
john@gmail.com
```
Result: the email is automatically added to your selected Mailchimp list — no manual export or
copy-paste needed.
## Save your changes
 Click **Publish Changes** in the top-right corner after editing any field on this tab — nothing
goes live until you do.
## Frequently asked
Yes — connect it once under [Auto Responder
Integration](/learn/chatsyncs-integrations/auto-responder/introduction), then select the specific list here.
[Auto Responder Integration](/learn/chatsyncs-integrations/auto-responder/introduction) is the one-time platform
connection (credentials, account). This **Auto Responder** tab in Bot Settings is where you
pick which list *this* bot's subscribers get added to.
The subscriber sharing their email address during a conversation with the bot — there's no
separate button to click.
No — use [How Do I Send an Automatic Email from My Bot?](/learn/chatsyncs-bot-settings/send-an-automatic-email-from-my-bot-with-chatsyncs) instead;
that sends a specific email immediately rather than adding the subscriber to a list.
## Related Documentation
* [Bot Settings](/learn/chatsyncs-bot-settings/introduction) — all eight tabs at a glance.
* [Auto Responder Integration](/learn/chatsyncs-integrations/auto-responder/introduction) — connecting the email
marketing platform itself.
Click **Publish Changes** in the top-right corner after editing any field on this tab — nothing
goes live until you do.
## Frequently asked
Yes — connect it once under [Auto Responder
Integration](/learn/chatsyncs-integrations/auto-responder/introduction), then select the specific list here.
[Auto Responder Integration](/learn/chatsyncs-integrations/auto-responder/introduction) is the one-time platform
connection (credentials, account). This **Auto Responder** tab in Bot Settings is where you
pick which list *this* bot's subscribers get added to.
The subscriber sharing their email address during a conversation with the bot — there's no
separate button to click.
No — use [How Do I Send an Automatic Email from My Bot?](/learn/chatsyncs-bot-settings/send-an-automatic-email-from-my-bot-with-chatsyncs) instead;
that sends a specific email immediately rather than adding the subscriber to a list.
## Related Documentation
* [Bot Settings](/learn/chatsyncs-bot-settings/introduction) — all eight tabs at a glance.
* [Auto Responder Integration](/learn/chatsyncs-integrations/auto-responder/introduction) — connecting the email
marketing platform itself.