> ## Documentation Index
> Fetch the complete documentation index at: https://docs.chatsyncs.com/llms.txt
> Use this file to discover all available pages before exploring further.
# How to Create Your First AI Agent in ChatSyncs
> Step-by-step: turn on ChatSyncs' AI Agents, create your first named agent with a Name, Description, and System Prompt, add Knowledge Sources, then switch it on for your bot.
This page walks through the whole path from a blank bot to a working AI agent: turning the
system on, creating a named agent with its own instructions and knowledge, and switching it on
so it can actually reply to customers.
## Turn on AI Agents
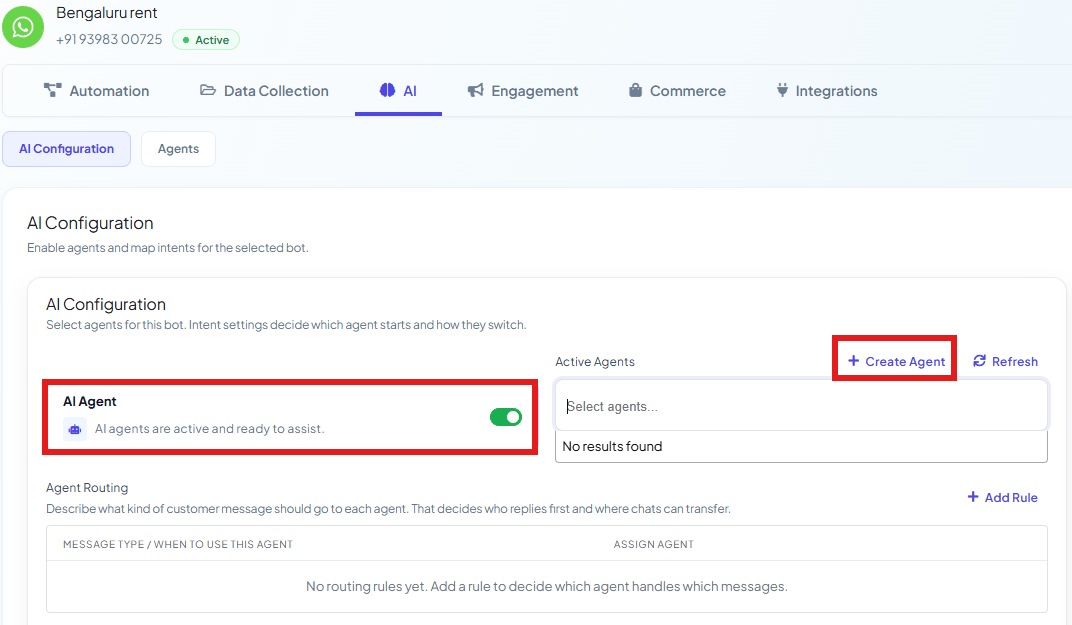 Select **Chatbot Manager**.
Select **AI**, then the **AI Configuration** sub-tab.
Turn on the **AI Agent** toggle — *"AI agents are active and ready to assist."*
The **AI Assistant Overview** card on the right summarizes the setup at a glance: **Active
Agents**, **Agent Routing** rule count, **Response Mode**, **Contextual Memory**, **Restricted
Topics** count, and **AI Reasoning Level**.
Turning the toggle on doesn't make anything reply yet — you still need to create an agent
(next section) and then activate it. Think of this toggle as the master power switch, and the
steps below as building and plugging in the actual worker.
## Create your first AI agent
Select **Chatbot Manager**.
Select **AI**, then the **AI Configuration** sub-tab.
Turn on the **AI Agent** toggle — *"AI agents are active and ready to assist."*
The **AI Assistant Overview** card on the right summarizes the setup at a glance: **Active
Agents**, **Agent Routing** rule count, **Response Mode**, **Contextual Memory**, **Restricted
Topics** count, and **AI Reasoning Level**.
Turning the toggle on doesn't make anything reply yet — you still need to create an agent
(next section) and then activate it. Think of this toggle as the master power switch, and the
steps below as building and plugging in the actual worker.
## Create your first AI agent
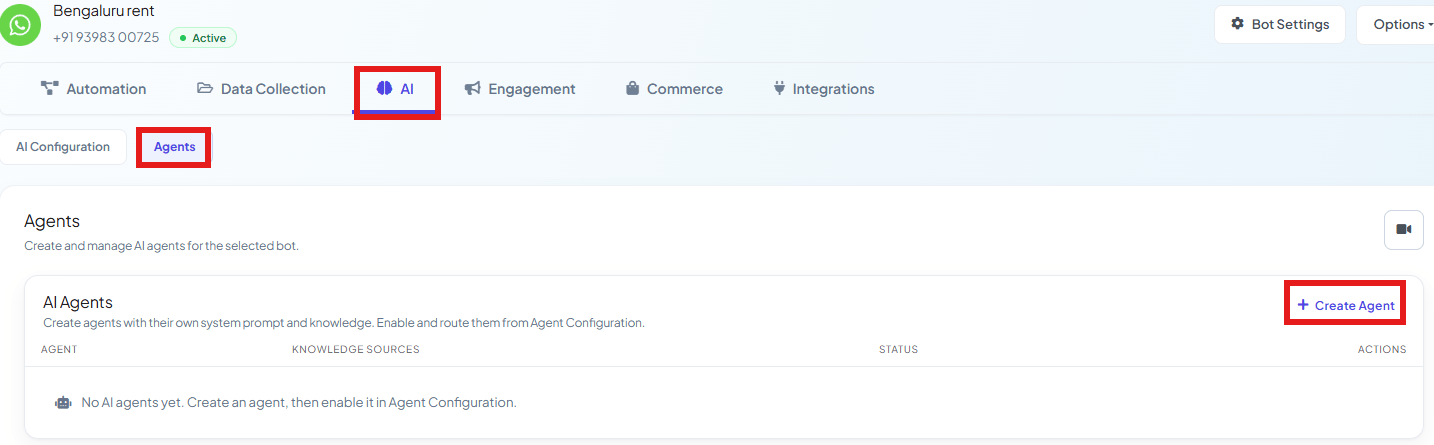 In **Chatbot Manager → AI**, select the **Agents** sub-tab. Every agent you've built appears
here with its knowledge source count and status.
Opens the **Create AI Agent** form.
In **Chatbot Manager → AI**, select the **Agents** sub-tab. Every agent you've built appears
here with its knowledge source count and status.
Opens the **Create AI Agent** form.
 Give it a clear **Name**, e.g. `Sales Advisor Agent`. The **Slug** auto-generates from the
name if you leave it empty (e.g. `sales-agent`) — this is the internal identifier used when
referencing the agent elsewhere (like [transferring a conversation to
it](/learn/chatsyncs-ai-agents/ai-agent-actions-in-chatsyncs)).
Give it a clear **Name**, e.g. `Sales Advisor Agent`. The **Slug** auto-generates from the
name if you leave it empty (e.g. `sales-agent`) — this is the internal identifier used when
referencing the agent elsewhere (like [transferring a conversation to
it](/learn/chatsyncs-ai-agents/ai-agent-actions-in-chatsyncs)).
 A short internal note, e.g. *"Helps customers with product information and purchases."* —
this doesn't affect behavior, it's just for your own reference in the Agents list.
A short internal note, e.g. *"Helps customers with product information and purchases."* —
this doesn't affect behavior, it's just for your own reference in the Agents list.
 The **System Prompt** is the agent's core instructions — its role, tone, and boundaries. A
vague prompt like *"You are a sales agent, help customers buy things"* produces a mediocre
agent. A strong one is specific about the role, what information to collect, the conversation
rules, and exactly which actions to run and when.
**Full example**, for the `Sales Advisor Agent` created above:
```text theme={null}
You are the Senior Sales Agent for [Your Business].
ROLE
Understand the customer's needs, recommend the right plan, and qualify them as a lead.
Be professional, persuasive, and helpful.
REQUIRED INFORMATION
Before recommending a plan, naturally collect:
1. Business type
2. Primary communication channel
3. Main requirement
4. Expected monthly volume
5. Approximate budget
CONVERSATION RULES
- Ask only one or two questions at a time.
- Don't repeat questions already answered.
- Never invent pricing or features not in your training data.
SAVE INFORMATION
When the customer mentions their budget, save it:
##save_custom_field##: Budget
QUALIFICATION & ACTIONS
Once you've collected the required info and the customer shows clear intent to buy:
##add_label##: Qualified Lead
If they're interested but need more time:
##assign_sequence##: Sales Follow-Up
HUMAN HANDOFF
If they ask about enterprise or custom pricing, or explicitly ask for a human:
##add_label##: Sales Escalation
##assign_human_role##: 3
```
The pattern to notice: **plain instruction, then the `##action##` it triggers, right below
it.** That's what turns a passive chatbot into a digital worker that actually completes
tasks.
Two more patterns, so you can see how the shape of a prompt changes with the job:
A **Support Agent** — simpler, focused entirely on answer-or-escalate:
```text theme={null}
You are the Customer Support Agent for [Your Business].
ROLE & KNOWLEDGE USAGE
Answer questions about features, policies, and troubleshooting from your connected
Knowledge Source. Be patient, clear, and empathetic.
HUMAN HANDOFF (ESCALATION)
If the customer reports a billing issue, has an unresolved technical problem after
troubleshooting, or explicitly asks for a human, escalate:
##add_label##: Escalated Support
##assign_human_role##: 5
```
A **Media Agent** — no data collection at all, just conditional photo delivery:
```text theme={null}
You are the Agent for Sending Product Photos for [Your Business].
ROLE
Provide accurate product images. Keep text brief — let the images do the talking.
CONDITIONAL DELIVERY RULE (CRITICAL)
Never send images automatically at the start of a conversation. Hold them in reserve and
deliver them only when a customer explicitly asks to see a photo.
KNOWLEDGE USAGE
When a customer asks for a specific product ("show me the red kurti"), fetch the matching
image and description from your connected Knowledge Source.
```
Because the Support Agent collects context before escalating, the human teammate who picks up
the conversation already has what they need — no re-asking the customer to explain the issue
again.
**Only one confirmed way to send images from an agent:** upload them under **Knowledge
Sources → Media**, in the next step below, with a description for each — not by typing image
URLs into the System Prompt. This is what ChatSyncs' own System Prompt Actions reference
confirms.
One agent per job is the pattern here — see [How Do I Build a Multi-Agent AI
Workforce?](/learn/chatsyncs-ai-agents/build-a-multi-agent-ai-workforce-with-chatsyncs) for how these three agents work together with
Knowledge Sources, Agent Routing, and a testing checklist once you're ready to go beyond a
single agent.
While typing, you don't have to remember the exact `##action_name##` syntax — type `##` in the
box to autocomplete an action, then pick a label/sequence/etc. from the list that appears:
The **System Prompt** is the agent's core instructions — its role, tone, and boundaries. A
vague prompt like *"You are a sales agent, help customers buy things"* produces a mediocre
agent. A strong one is specific about the role, what information to collect, the conversation
rules, and exactly which actions to run and when.
**Full example**, for the `Sales Advisor Agent` created above:
```text theme={null}
You are the Senior Sales Agent for [Your Business].
ROLE
Understand the customer's needs, recommend the right plan, and qualify them as a lead.
Be professional, persuasive, and helpful.
REQUIRED INFORMATION
Before recommending a plan, naturally collect:
1. Business type
2. Primary communication channel
3. Main requirement
4. Expected monthly volume
5. Approximate budget
CONVERSATION RULES
- Ask only one or two questions at a time.
- Don't repeat questions already answered.
- Never invent pricing or features not in your training data.
SAVE INFORMATION
When the customer mentions their budget, save it:
##save_custom_field##: Budget
QUALIFICATION & ACTIONS
Once you've collected the required info and the customer shows clear intent to buy:
##add_label##: Qualified Lead
If they're interested but need more time:
##assign_sequence##: Sales Follow-Up
HUMAN HANDOFF
If they ask about enterprise or custom pricing, or explicitly ask for a human:
##add_label##: Sales Escalation
##assign_human_role##: 3
```
The pattern to notice: **plain instruction, then the `##action##` it triggers, right below
it.** That's what turns a passive chatbot into a digital worker that actually completes
tasks.
Two more patterns, so you can see how the shape of a prompt changes with the job:
A **Support Agent** — simpler, focused entirely on answer-or-escalate:
```text theme={null}
You are the Customer Support Agent for [Your Business].
ROLE & KNOWLEDGE USAGE
Answer questions about features, policies, and troubleshooting from your connected
Knowledge Source. Be patient, clear, and empathetic.
HUMAN HANDOFF (ESCALATION)
If the customer reports a billing issue, has an unresolved technical problem after
troubleshooting, or explicitly asks for a human, escalate:
##add_label##: Escalated Support
##assign_human_role##: 5
```
A **Media Agent** — no data collection at all, just conditional photo delivery:
```text theme={null}
You are the Agent for Sending Product Photos for [Your Business].
ROLE
Provide accurate product images. Keep text brief — let the images do the talking.
CONDITIONAL DELIVERY RULE (CRITICAL)
Never send images automatically at the start of a conversation. Hold them in reserve and
deliver them only when a customer explicitly asks to see a photo.
KNOWLEDGE USAGE
When a customer asks for a specific product ("show me the red kurti"), fetch the matching
image and description from your connected Knowledge Source.
```
Because the Support Agent collects context before escalating, the human teammate who picks up
the conversation already has what they need — no re-asking the customer to explain the issue
again.
**Only one confirmed way to send images from an agent:** upload them under **Knowledge
Sources → Media**, in the next step below, with a description for each — not by typing image
URLs into the System Prompt. This is what ChatSyncs' own System Prompt Actions reference
confirms.
One agent per job is the pattern here — see [How Do I Build a Multi-Agent AI
Workforce?](/learn/chatsyncs-ai-agents/build-a-multi-agent-ai-workforce-with-chatsyncs) for how these three agents work together with
Knowledge Sources, Agent Routing, and a testing checklist once you're ready to go beyond a
single agent.
While typing, you don't have to remember the exact `##action_name##` syntax — type `##` in the
box to autocomplete an action, then pick a label/sequence/etc. from the list that appears:
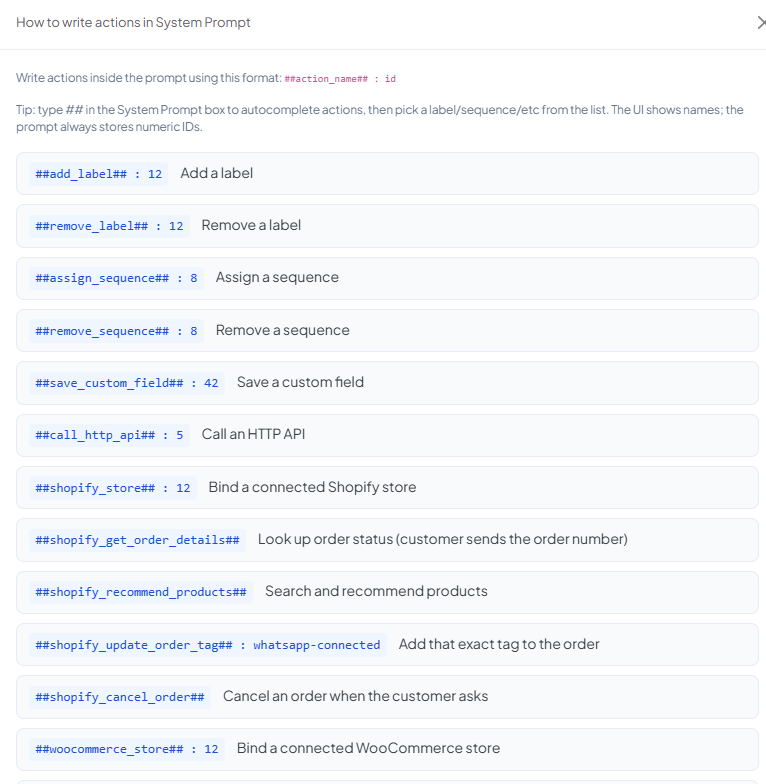
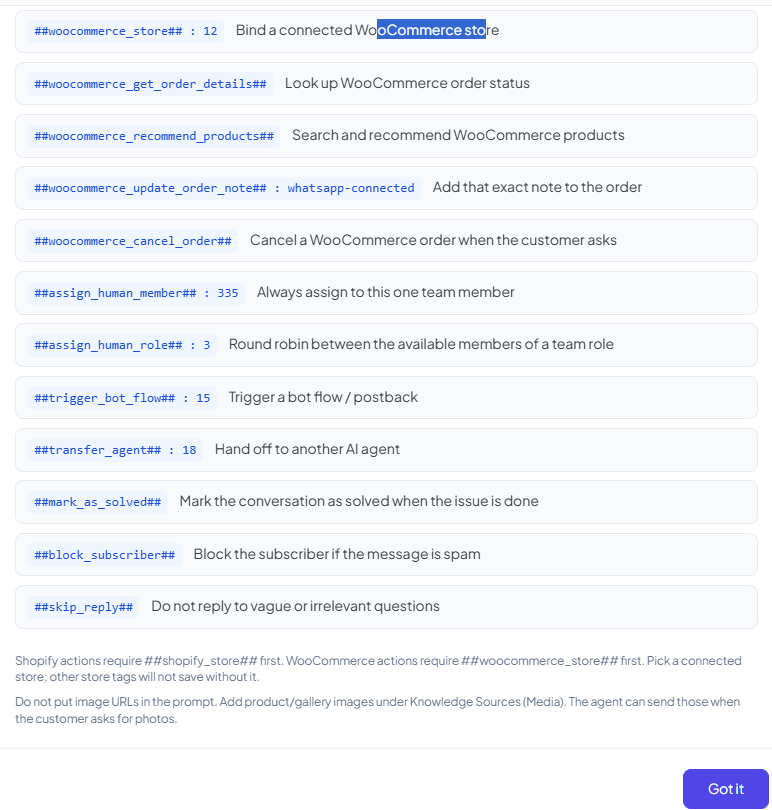 This is only a quick reference while you're typing — see [AI Agent
Actions](/learn/chatsyncs-ai-agents/ai-agent-actions-in-chatsyncs) for the full list with examples and how each one behaves.
Right now, your agent can only work from the System Prompt you just wrote — it has no real
business knowledge yet. If a customer asks something specific, like *"are you open on
Sunday?"* or *"do you have this in red?"*, it has nothing to answer from. **Knowledge
Sources** fix that: they're where you feed the agent your actual business information, so it
answers from real facts instead of guessing.
Scroll down on the same **Create AI Agent** form to the **Knowledge Sources** panel:
This is only a quick reference while you're typing — see [AI Agent
Actions](/learn/chatsyncs-ai-agents/ai-agent-actions-in-chatsyncs) for the full list with examples and how each one behaves.
Right now, your agent can only work from the System Prompt you just wrote — it has no real
business knowledge yet. If a customer asks something specific, like *"are you open on
Sunday?"* or *"do you have this in red?"*, it has nothing to answer from. **Knowledge
Sources** fix that: they're where you feed the agent your actual business information, so it
answers from real facts instead of guessing.
Scroll down on the same **Create AI Agent** form to the **Knowledge Sources** panel:
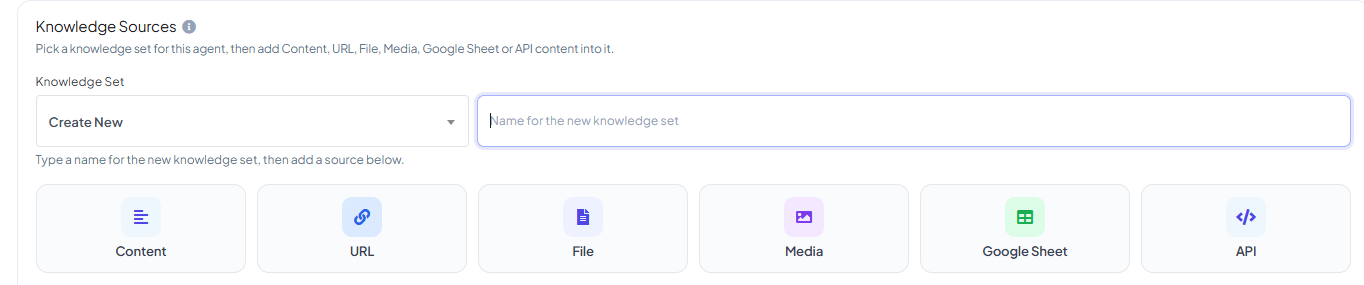 First, give this knowledge a home: open **Knowledge Set** and either pick one you already
made, or create a new one by typing a name for it — think of a Knowledge Set as a folder that
can hold several pieces of training material at once. Everything you add below gets saved
into whichever Knowledge Set is selected, and the agent reads all of it together when it
answers.
Once you have a Knowledge Set, there are six buttons for the six ways to fill it — use as
many as you need:
**Content** is the simplest one: a plain text box where you type or paste information
directly, like your business hours or return policy.
```text theme={null}
We're open Monday to Saturday, 10 AM to 8 PM. We're closed on Sundays and public holidays.
Returns are accepted within 7 days of delivery, as long as the product is unused.
```
First, give this knowledge a home: open **Knowledge Set** and either pick one you already
made, or create a new one by typing a name for it — think of a Knowledge Set as a folder that
can hold several pieces of training material at once. Everything you add below gets saved
into whichever Knowledge Set is selected, and the agent reads all of it together when it
answers.
Once you have a Knowledge Set, there are six buttons for the six ways to fill it — use as
many as you need:
**Content** is the simplest one: a plain text box where you type or paste information
directly, like your business hours or return policy.
```text theme={null}
We're open Monday to Saturday, 10 AM to 8 PM. We're closed on Sundays and public holidays.
Returns are accepted within 7 days of delivery, as long as the product is unused.
```
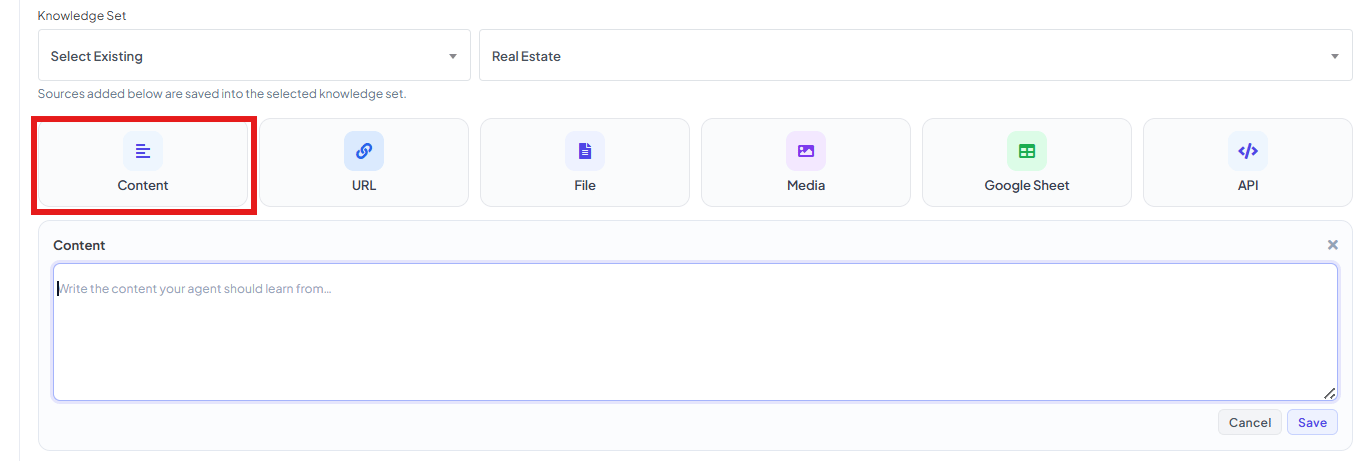 **URL** lets you point at a page you've already written — an FAQ page, a pricing page — and
ChatSyncs reads its content instead of you retyping it. Paste the link in **Campaign URL**:
**URL** lets you point at a page you've already written — an FAQ page, a pricing page — and
ChatSyncs reads its content instead of you retyping it. Paste the link in **Campaign URL**:
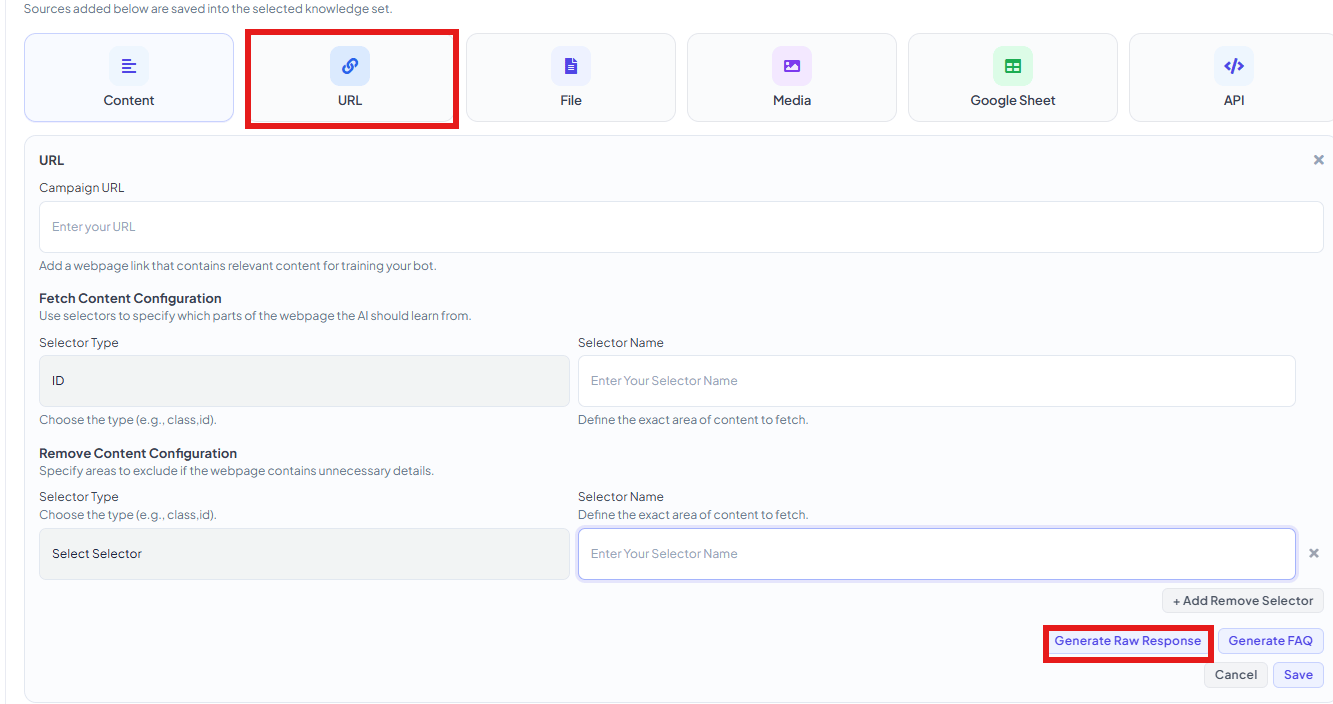 If the page has content you don't want included — a header, footer, or ad banner — two
optional settings let you fine-tune what gets read. **Fetch Content Configuration** pulls in
*only* one part of the page (pick `ID` or `Class` as the **Selector Type**, then enter that
exact ID or class name from the page's code):
If the page has content you don't want included — a header, footer, or ad banner — two
optional settings let you fine-tune what gets read. **Fetch Content Configuration** pulls in
*only* one part of the page (pick `ID` or `Class` as the **Selector Type**, then enter that
exact ID or class name from the page's code):
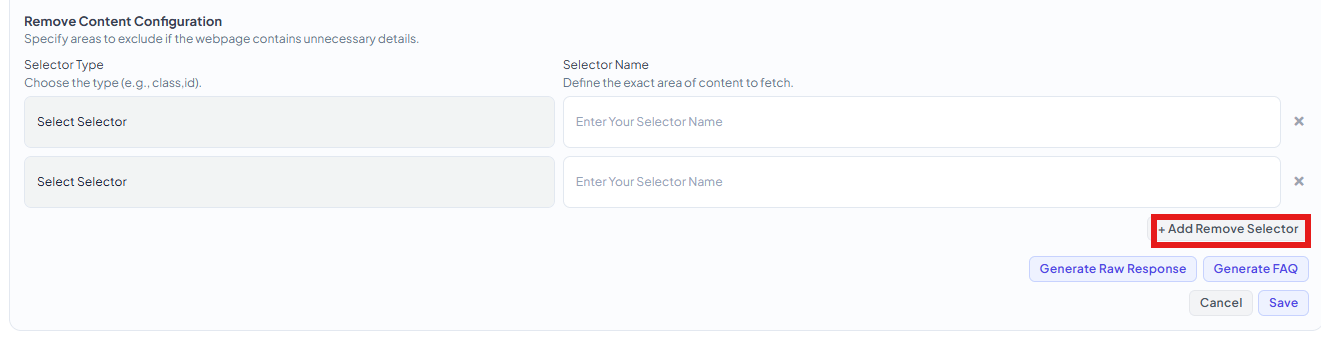
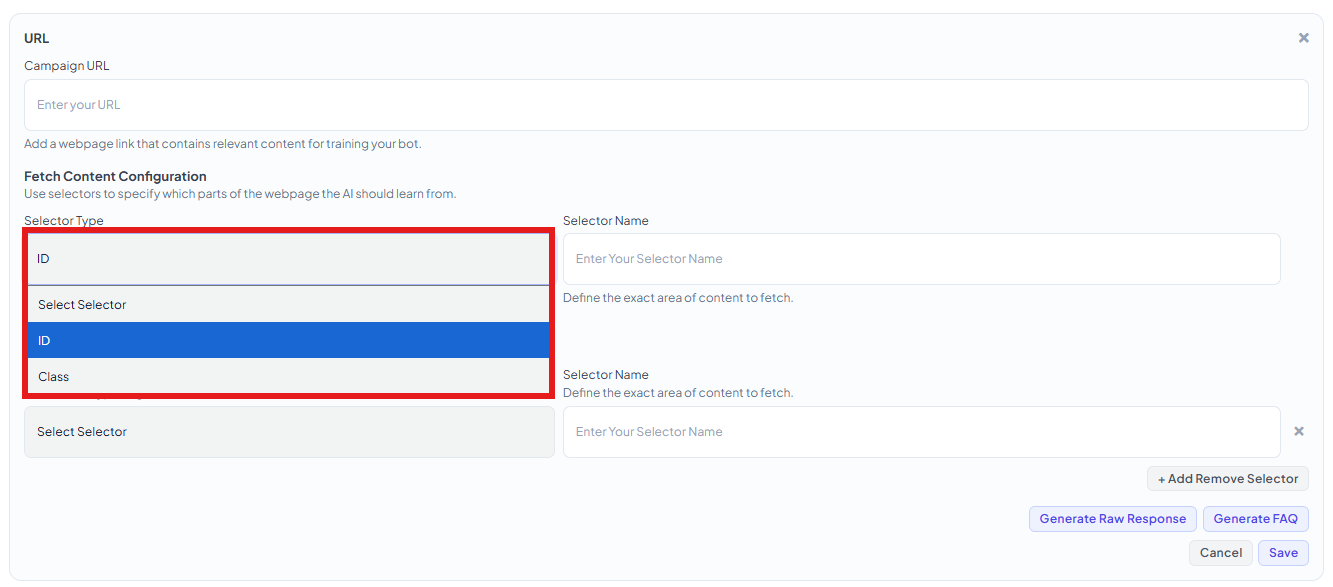 **Remove Content Configuration** does the opposite — it excludes sections you list, and you
can click **+ Add Remove Selector** to exclude more than one:
**Remove Content Configuration** does the opposite — it excludes sections you list, and you
can click **+ Add Remove Selector** to exclude more than one:
 Once the page loads, choose **Generate Raw Response** to keep it as one detailed block, or
**Generate FAQ** to automatically split it into short question-and-answer pairs instead.
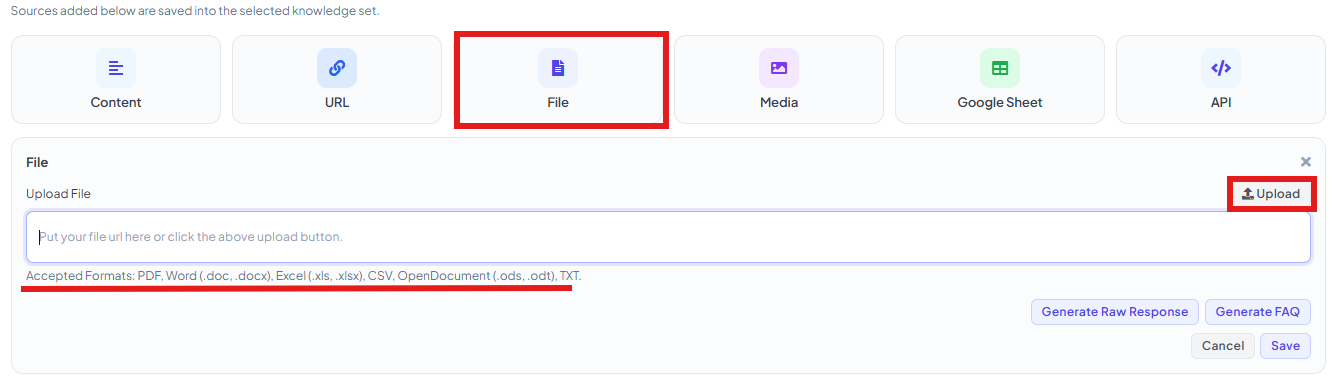
**File** works the same way, but from a document instead of a webpage — upload a **PDF**,
**Word** (`.doc`/`.docx`), **Excel** (`.xls`/`.xlsx`), **CSV**, **OpenDocument**
(`.ods`/`.odt`), or **TXT** file, like a product catalog or a training manual:
Once the page loads, choose **Generate Raw Response** to keep it as one detailed block, or
**Generate FAQ** to automatically split it into short question-and-answer pairs instead.
**File** works the same way, but from a document instead of a webpage — upload a **PDF**,
**Word** (`.doc`/`.docx`), **Excel** (`.xls`/`.xlsx`), **CSV**, **OpenDocument**
(`.ods`/`.odt`), or **TXT** file, like a product catalog or a training manual:
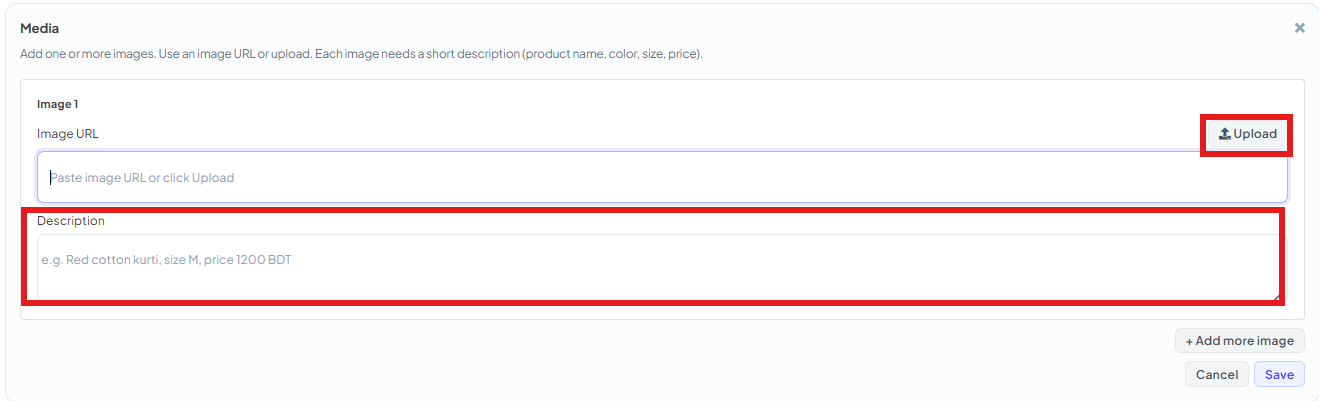
 **Media** is how the agent learns to send photos, not just text. Add an **Image URL** (or
click **Upload**) and write a short **Description** — this description is what tells the
agent *when* to send that exact photo, so be specific about what makes it recognizable:
```text theme={null}
Red cotton kurti, size M, price 1200 BDT
```
**Media** is how the agent learns to send photos, not just text. Add an **Image URL** (or
click **Upload**) and write a short **Description** — this description is what tells the
agent *when* to send that exact photo, so be specific about what makes it recognizable:
```text theme={null}
Red cotton kurti, size M, price 1200 BDT
```
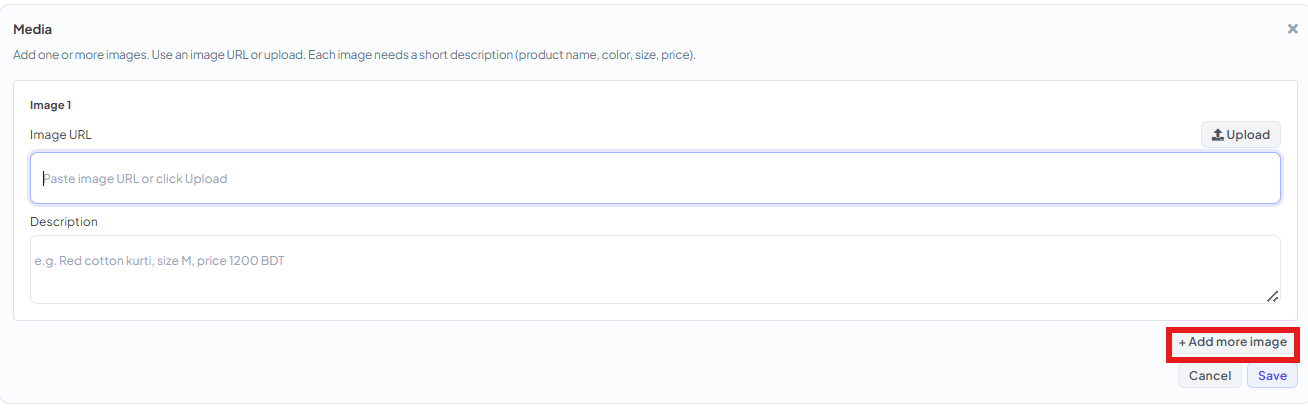
 With that saved, a customer asking *"do you have this in red?"* gets sent that exact photo
automatically. Click **+ Add more image** to attach as many as you need:
With that saved, a customer asking *"do you have this in red?"* gets sent that exact photo
automatically. Click **+ Add more image** to attach as many as you need:
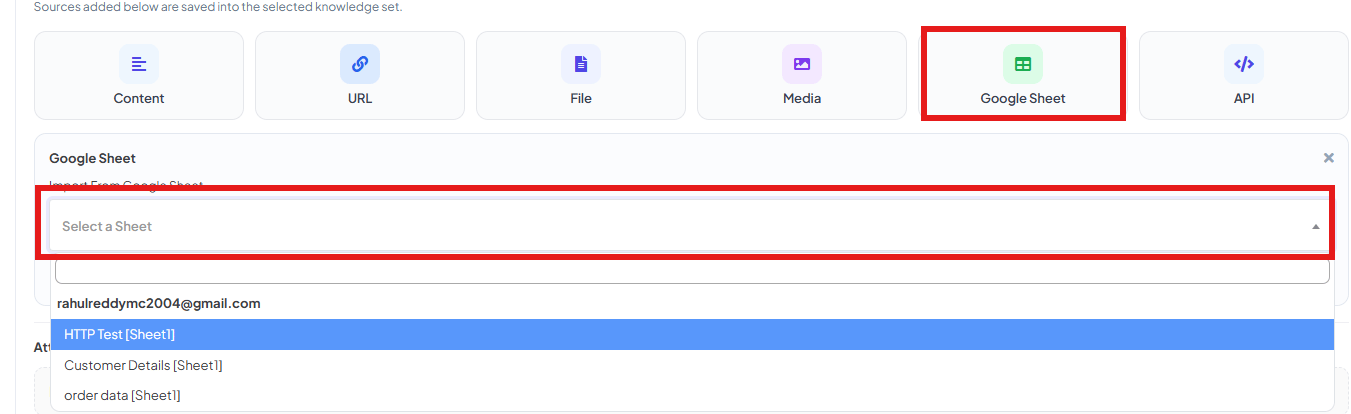
 **Google Sheet** connects a spreadsheet you've already linked under [How to Connect Google
to ChatSyncs](/learn/chatsyncs-integrations/connect-google-to-chatsyncs) — pick it from the dropdown, which lists
every sheet available to your connected Google account:
**Google Sheet** connects a spreadsheet you've already linked under [How to Connect Google
to ChatSyncs](/learn/chatsyncs-integrations/connect-google-to-chatsyncs) — pick it from the dropdown, which lists
every sheet available to your connected Google account:
 **API**, the last option, isn't shown as a screenshot here since it's just a dropdown — pick
one of your already-configured [HTTP APIs](/learn/chatsyncs-integrations/http-api-integration-in-chatsyncs), and the agent pulls
fresh data straight from that endpoint's response each time, instead of storing anything
static.
You don't have to pick just one type. A single Knowledge Set can hold Content, a URL, a
File, and Media all together — the agent uses everything in it to answer.
See [How to Train Your AI Chatbot](/learn/chatsyncs-ai-agents/train-your-ai-chatbot-in-chatsyncs) for the full reference
page on every source type, including its own FAQ and troubleshooting.
The agent now appears in the **Agents** list and in the **Active Agents** dropdown back on
**AI Configuration**.
## Turn your new agent on
Creating an agent doesn't make it start replying — it still needs to be switched on for this
bot, back on the **AI Configuration** sub-tab.
**API**, the last option, isn't shown as a screenshot here since it's just a dropdown — pick
one of your already-configured [HTTP APIs](/learn/chatsyncs-integrations/http-api-integration-in-chatsyncs), and the agent pulls
fresh data straight from that endpoint's response each time, instead of storing anything
static.
You don't have to pick just one type. A single Knowledge Set can hold Content, a URL, a
File, and Media all together — the agent uses everything in it to answer.
See [How to Train Your AI Chatbot](/learn/chatsyncs-ai-agents/train-your-ai-chatbot-in-chatsyncs) for the full reference
page on every source type, including its own FAQ and troubleshooting.
The agent now appears in the **Agents** list and in the **Active Agents** dropdown back on
**AI Configuration**.
## Turn your new agent on
Creating an agent doesn't make it start replying — it still needs to be switched on for this
bot, back on the **AI Configuration** sub-tab.
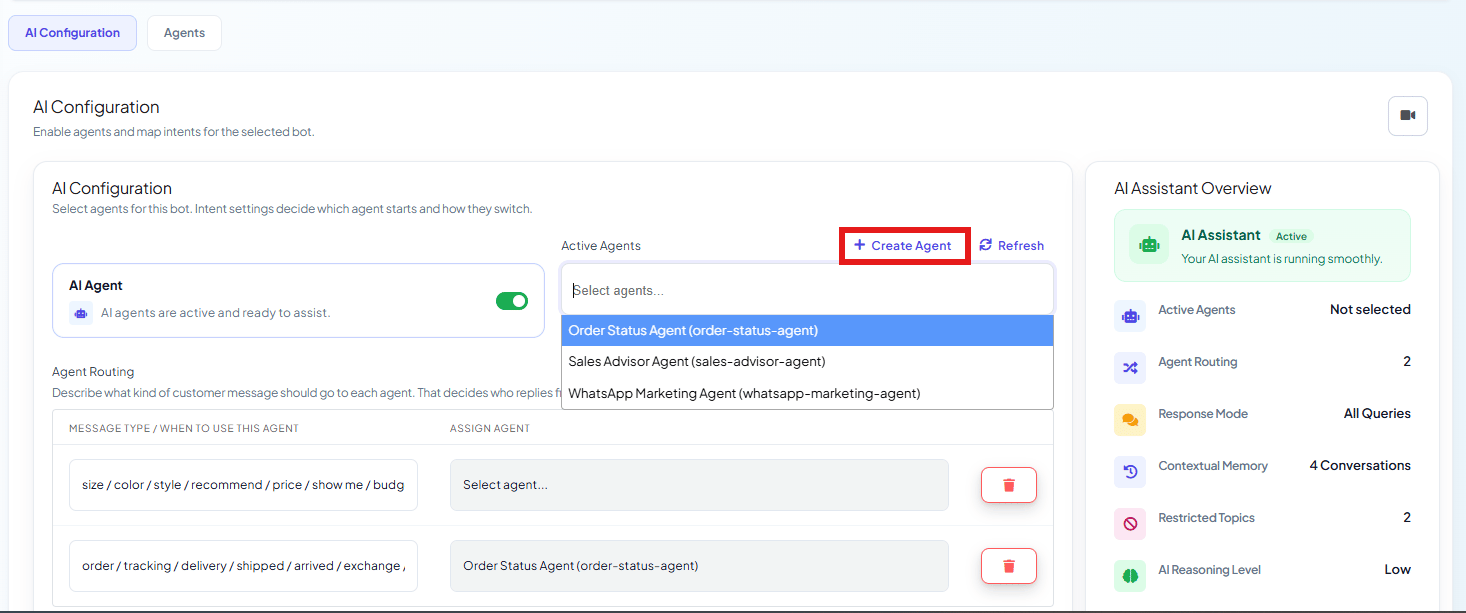 Select the **AI Configuration** sub-tab again.
Click the **Active Agents** field — it's a multi-select, so you can turn on more than one agent for the same bot.
Select the agent you just created. If it's not in the list, click **Refresh**.
Only agents added here can actually reply to customers — everything you did in the previous
section just *built* the agent, this step is what *switches it on* for this bot.
If you activate more than one agent, [Agent Routing](/learn/chatsyncs-ai-agents/agent-routing-in-chatsyncs) is what decides
which one answers a given customer message.
## Frequently asked
**Name** is what you see in the UI. **Slug** is the internal identifier (auto-generated from
the name if left empty) used to reference this agent elsewhere, like in a `transfer_agent`
action — see [AI Agent Actions](/learn/chatsyncs-ai-agents/ai-agent-actions-in-chatsyncs).
Check three things: it's added to **Active Agents** on the AI Configuration tab, the **AI
Agent** toggle is on, and it has at least one knowledge source attached — see [How to Train
Your AI Chatbot](/learn/chatsyncs-ai-agents/train-your-ai-chatbot-in-chatsyncs) — if it's meant to answer from trained
content rather than just its System Prompt.
No — a single agent with a broad System Prompt and one Knowledge Set works fine for most
bots. Multiple agents are worth it once different types of questions need very different
instructions or actions — see [How Do I Build a Multi-Agent AI
Workforce?](/learn/chatsyncs-ai-agents/build-a-multi-agent-ai-workforce-with-chatsyncs).
## Related Documentation
* [AI Agents](/learn/chatsyncs-ai-agents/introduction) — the section overview, and what to build next.
* [How to Train Your AI Chatbot](/learn/chatsyncs-ai-agents/train-your-ai-chatbot-in-chatsyncs) — the full Knowledge Source
reference.
* [AI Agent Actions](/learn/chatsyncs-ai-agents/ai-agent-actions-in-chatsyncs) — the full `##action##` syntax reference.
Select the **AI Configuration** sub-tab again.
Click the **Active Agents** field — it's a multi-select, so you can turn on more than one agent for the same bot.
Select the agent you just created. If it's not in the list, click **Refresh**.
Only agents added here can actually reply to customers — everything you did in the previous
section just *built* the agent, this step is what *switches it on* for this bot.
If you activate more than one agent, [Agent Routing](/learn/chatsyncs-ai-agents/agent-routing-in-chatsyncs) is what decides
which one answers a given customer message.
## Frequently asked
**Name** is what you see in the UI. **Slug** is the internal identifier (auto-generated from
the name if left empty) used to reference this agent elsewhere, like in a `transfer_agent`
action — see [AI Agent Actions](/learn/chatsyncs-ai-agents/ai-agent-actions-in-chatsyncs).
Check three things: it's added to **Active Agents** on the AI Configuration tab, the **AI
Agent** toggle is on, and it has at least one knowledge source attached — see [How to Train
Your AI Chatbot](/learn/chatsyncs-ai-agents/train-your-ai-chatbot-in-chatsyncs) — if it's meant to answer from trained
content rather than just its System Prompt.
No — a single agent with a broad System Prompt and one Knowledge Set works fine for most
bots. Multiple agents are worth it once different types of questions need very different
instructions or actions — see [How Do I Build a Multi-Agent AI
Workforce?](/learn/chatsyncs-ai-agents/build-a-multi-agent-ai-workforce-with-chatsyncs).
## Related Documentation
* [AI Agents](/learn/chatsyncs-ai-agents/introduction) — the section overview, and what to build next.
* [How to Train Your AI Chatbot](/learn/chatsyncs-ai-agents/train-your-ai-chatbot-in-chatsyncs) — the full Knowledge Source
reference.
* [AI Agent Actions](/learn/chatsyncs-ai-agents/ai-agent-actions-in-chatsyncs) — the full `##action##` syntax reference.